link to page 5 link to page 5 link to page 5 link to page 5 link to page 5 link to page 5 link to page 6 link to page 6 link to page 6 link to page 7 link to page 8 link to page 10 link to page 10 link to page 10 link to page 11 link to page 11 link to page 13 link to page 13 link to page 14 link to page 15
CHAPTER 28 – SPECIAL VOTES
CONTENTS
1
Overview of special votes ................................................................................................................ 1
1.1
Before you begin .....................................................................................................................1
1.2
Changes to Registrar of Electors .............................................................................................1
1.3
Purpose of special vote processing .........................................................................................1
1.4
What is a special vote? ............................................................................................................1
1.5
Principles for special vote processing .....................................................................................1
1.6
What special votes will my headquarters process? ................................................................2
1.7
Māori Electorate Managers .....................................................................................................2
1.8
Types of special vote declarations ..........................................................................................2
1.9
Witnessing declarations ..........................................................................................................3
1.10 Special vote packs ...................................................................................................................4
2
Special vote processing team .......................................................................................................... 6
2.1
Roles and responsibilities ........................................................................................................6
2.2
Training ....................................................................................................................................6
3
Checklist for special vote activities.................................................................................................. 7
under the Official Information Act 1982
3.1
Checklist ..................................................................................................................................7
4
Three stages of special vote processing .......................................................................................... 8
4.1
Special vote filing system ........................................................................................................8
4.2
Three stages of processing ......................................................................................................8
Released
5
Stage 1: Validation ........................................................................................................................... 9
5.1
Preparing for validation stage .................................................................................................9
5.2
Opening special vote envelopes ........................................................................................... 10
5.3
Validation check ................................................................................................................... 11
Chapter 28 – Special votes
link to page 18 link to page 18 link to page 18 link to page 19 link to page 19 link to page 20 link to page 22 link to page 23 link to page 26 link to page 26 link to page 26 link to page 26 link to page 27 link to page 30 link to page 31 link to page 32 link to page 33 link to page 34 link to page 34 link to page 35 link to page 37 link to page 38 link to page 40 link to page 40 link to page 41 link to page 42 link to page 44
6
Electorate Manager’s review of declarations ............................................................................... 14
6.1
Review and decide ................................................................................................................ 14
6.2
Dealing with late declarations .............................................................................................. 14
6.3
Declarations for a different electorate ................................................................................. 15
6.4
More than one declaration in the envelope ........................................................................ 15
6.5
No declaration or ballot paper found in the declaration side .............................................. 16
6.6
If you find a missing declaration........................................................................................... 18
6.7
Electorate Manager check of declaration validity ................................................................ 19
7
Stage 2: Qualification .................................................................................................................... 22
7.1
What is qualification? ........................................................................................................... 22
7.2
When can I start qualifying special votes? ........................................................................... 22
7.3
Preparing for the qualification stage .................................................................................... 22
7.4
Checking whether a voter is qualified .................................................................................. 23
7.5
Troubleshooting ................................................................................................................... 26
7.6
Batch headers ....................................................................................................................... 27
7.7
Checking a special vote batch .............................................................................................. 28
7.8
Scanning declarations ........................................................................................................... 29
8
Receiving qualification decisions ................................................................................................... 30
8.1
Qualification decisions ......................................................................................................... 30
8.2
Printing qualification stickers ............................................................................................... 31
under the Official Information Act 1982
8.3
Attaching qualification stickers to declarations ................................................................... 33
8.4
Sorting special votes based on qualification decisions ........................................................ 34
9
Stage 3: Preparing for the official count ....................................................................................... 36
Released
9.1
Separating for the official count – Boxes 8 and 9................................................................. 36
9.2
Moving envelopes into ballot boxes .................................................................................... 37
9.3
Checking that processing is complete .................................................................................. 38
10 Information for Special Vote Process Leaders .............................................................................. 40
Chapter 28 – Special votes
link to page 44 link to page 44 link to page 45 link to page 46 link to page 47 link to page 47 link to page 47 link to page 47 link to page 48 link to page 48
10.1 Checking that batches uploaded successfully ...................................................................... 40
10.2 Resolving a batch with a status of mismatch ....................................................................... 40
10.3 Editing special vote information: declaration number or invalidity reason......................... 41
10.4 Requests from the dual votes team ..................................................................................... 42
11 Monitoring progress ...................................................................................................................... 43
11.1 Batch management .............................................................................................................. 43
11.2 Reports in ERSA .................................................................................................................... 43
11.2.1 Special Votes Progress Report ........................................................................................... 43
11.2.2 Disallowed Votes Report ................................................................................................... 44
11.2.3 Special Vote Report ........................................................................................................... 44
under the Official Information Act 1982
Released
Chapter 28 – Special votes
under the Official Information Act 1982
Released
Chapter 28 – Special votes
1
OVERVIEW OF SPECIAL VOTES
1.1
BEFORE YOU BEGIN
Ensure you have received all necessary supplies for the special vote processing team. A full list of
required supplies can be found in Chapter 21 – Preparing for the post-election period.
1.2
CHANGES TO REGISTRAR OF ELECTORS
There has been a change since 2020 to the role of the Registrar of Electors. Under the new structure
of the Enrolment and Community Engagement group, the functions of the Registrar of Electors (RoE)
are now carried out by the team leader of the three regional Processing Teams. These teams are
based in Auckland, Wellington, and Christchurch. It should not be presumed that your electorate’s
special votes will be processed by the nearest regional team.
Because the Registrar of Electors holds responsibilities under legislation, you will still see the terms
Registrar of Electors, Registrar, or RoE used on some forms and in ERSA. In these instances, the Team
Leaders of the Regional Enrolment Processing Teams are fulfilling this role.
1.3
PURPOSE OF SPECIAL VOTE PROCESSING
The purpose of special vote processing is to determine whether each vote can be included in the
official count. Special votes are included in the official count if:
• the vote was received on time and the special vote declaration was filled in correctly; this
means the special vote declaration is
valid
• the voter is found on the electoral roll; this means the voter is
qualified.
1.4
WHAT IS A SPECIAL VOTE?
Any voter who cannot be marked off a voting place roll casts a special vote. This happens if the voter:
• is not enrolled by Writ Day, so their name is not on a printed roll at a voting place
under the Official Information Act 1982
• votes outside their electorate at a voting place not issuing ordinary votes for their electorate
• casts a takeaway vote because they are unable to visit a voting place
• uses the telephone dictation voting service because they are unable to vote independently
at a voting place
• votes from overseas
• is on the unpublished roll.
Released
1.5
PRINCIPLES FOR SPECIAL VOTE PROCESSING
When processing special votes, you need to ensure that:
• all special votes are included in the official count unless there is a legal reason to disallow
them
Chapter 28 – Special votes
1
• special votes are held in a secure area
• the secrecy of the vote is always maintained
• ballot papers are
not scanned or sent to the Team Leader of the Regional Enrolment
Processing Teams.
1.6
WHAT SPECIAL VOTES WILL MY HEADQUARTERS PROCESS?
You will process special votes cast for your electorate. You will send special votes cast in your voting
places for other electorates back to the relevant electorate for processing as part of the sort and
send process (see Chapter 24 – Sort and send).
You will not need to process overseas special votes, as this will be done at National Office. If you
receive any overseas votes, please contact the National Support Team
1.7
MĀORI ELECTORATE MANAGERS
Māori Electorate Managers need to process:
• all special votes cast for their Māori electorate
• all special votes cast for their home general electorate.
Māori and general electorate special votes must be processed separately. You need a separate
processing area and will appoint another Process Leader and Administrative Support staff to process
Māori electorate special votes.
You may only have a few Māori electorate special votes for processing on Tuesday E+3, so you may
not need all your processing staff until Wednesday E+4.
1.8
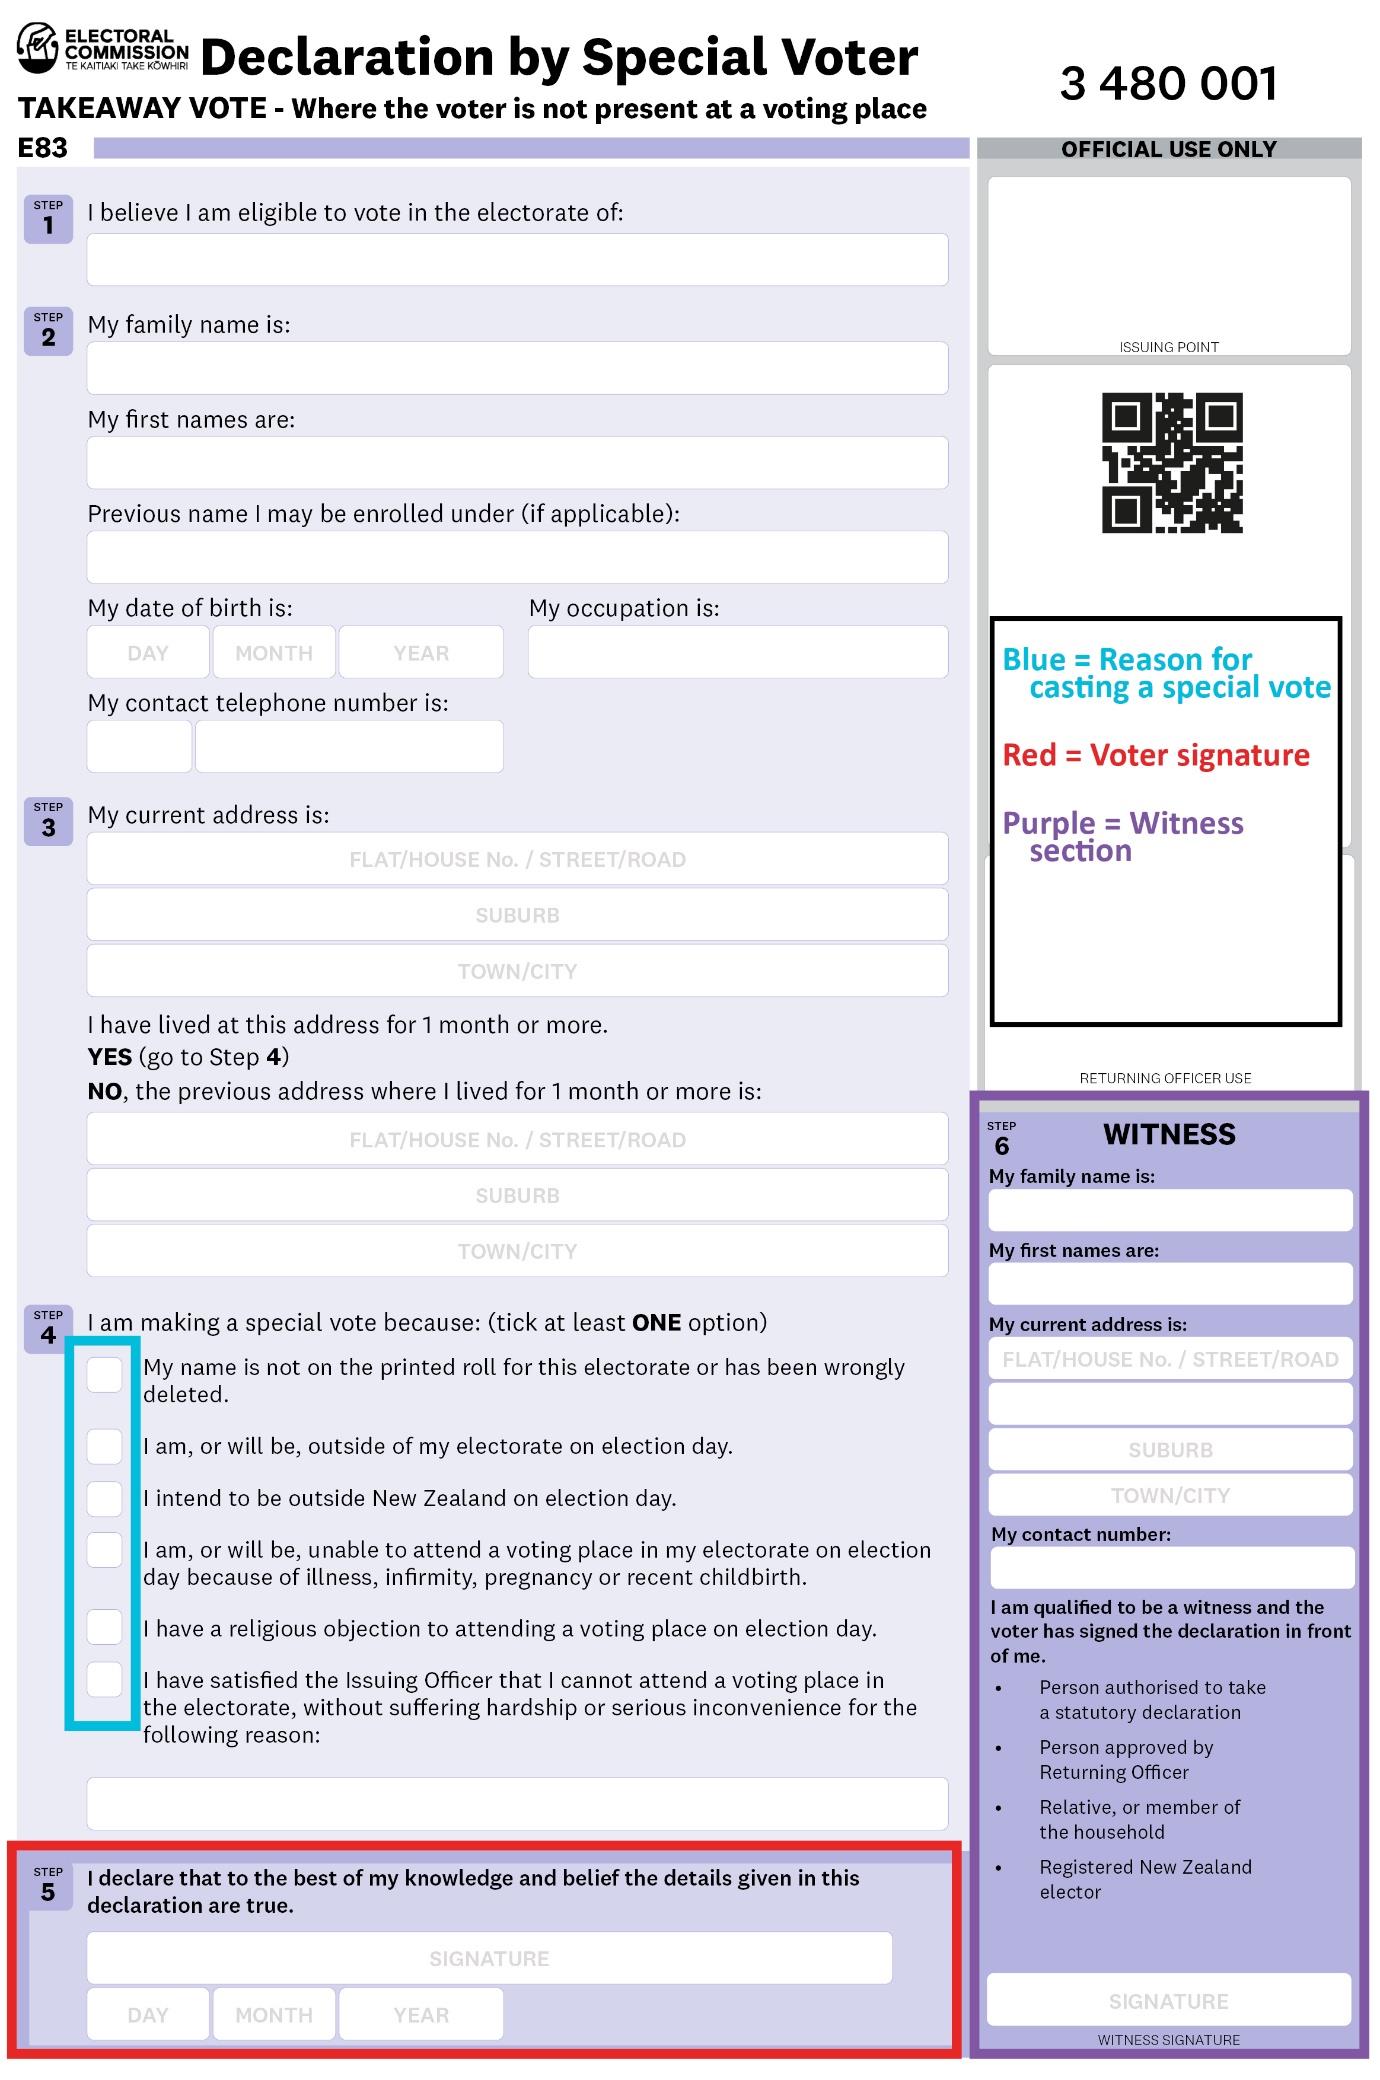
TYPES OF SPECIAL VOTE DECLARATIONS
Each special vote consists of a special vote declaration and the ballot paper. There are 2 types of
declarations. The type of declaration a voter requires depends on whether or not the voter attends a
voting place in person to vote, or whether they were not present at a voting place and were instead
issued with a takeaway vote.
under the Official Information Act 1982
The table on the following page contains the number identifying the declaration used in each case.
Released
2
Chapter 28 – Special votes

 Voter was not present
Voter was present
(Takeaway vote)
Voter was not present
Voter was present
(Takeaway vote)
E81 – In Person Declaration
E83 – Takeaway Declaration
*For more information on takeaway voting services refer to in Chapter 20 – Delivering voting
services.
1.9
WITNESSING DECLARATIONS
under the Official Information Act 1982
Normally all special vote declarations must be witnessed by a person other than the voter:
• the E81 declaration is completed by the voter in front of the Issuing Officer who will be the
witness
• the E83 declaration is completed away from the voting place, so a person other than the
voter is required to witness the declaration.
Released
Under some circumstances, some voters may be exempt from this requirement for this election.
Information on this is contained within Chapter 12 – Voting services preparations, section 4.9. If a
voter is exempt from having their vote witnessed, the witness section of their declaration will be
stamped “Witness not required”.
Chapter 28 – Special votes
3
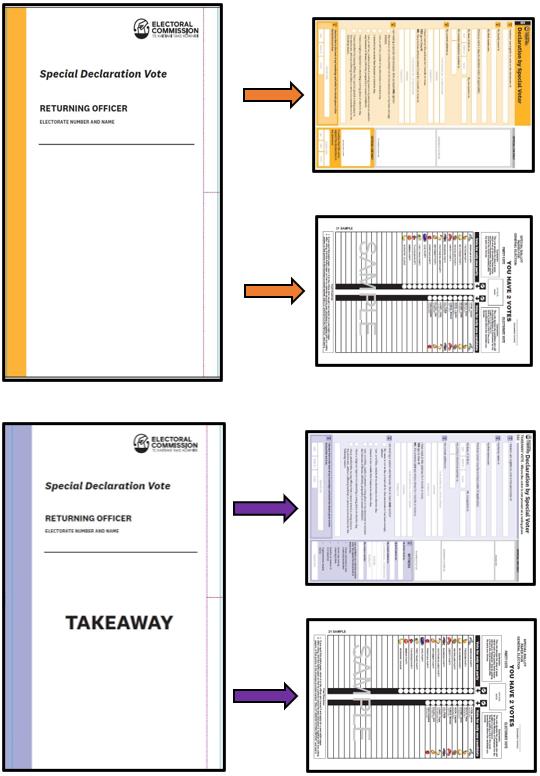
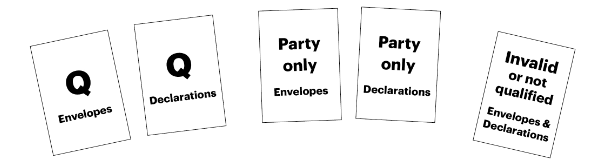
1.10 SPECIAL VOTE PACKS
Depending on the type of special vote and where it is issued, it may be returned to the headquarters
(HQ) in different ways and in different types of envelopes. Different special vote envelopes require
slightly different processing.
The following page provides images of the different special vote envelopes. It is recommended that
you photocopy this page and display it in the special vote processing area.
How the vote is
How the vote is issued
Declaration type
Consists of …
returned
At a voting place to a
Returned with voting
E81
voter present
place materials
Single envelope with two
compartments:
Issued at a voting place
• one for the
or HQ to a person who
E83
Can be returned:
declaration
delivers it the voter
• one for the voting
•
(takeaway vote).
With voting place
papers
materials.
Takeaway vote issued at
• By courier.
E83
the HQ
under the Official Information Act 1982
Released
4
Chapter 28 – Special votes
under the Official Information Act 1982
Released
Chapter 28 – Special votes
5
2
SPECIAL VOTE PROCESSING TEAM
2.1
ROLES AND RESPONSIBILITIES
Role
Responsible for
Electorate
• overall accountability
Manager (EM)
• final decisions on whether a special vote declaration is valid
overseeing the special vote processing and ensuring that:
• the Process Leader and staff are trained and follow the processes
• there is enough staff to complete the processing within the set timeframes
Post-election
• any issues are escalated to the Electorate Manager for decision
Manager
• the Electorate Manager makes the final decision on the
validity of
declarations
• the ballot boxes and count numbers provided to the official count team
are accurate
ensuring that:
• special votes are processed in accordance with the procedures outlined in
the Operations Manual (see Chapter 22 – Election Day and Night for
required tasks on Election Day.)
• the flow of special votes between the various stages is managed in a
coordinated manner to avoid bottlenecks
• votes are processed in the correct batch type (valid or invalid)
Special Votes
• declarations are scanned and ready for processing by the Team Leader of
Process Leader
the Regional Enrolment Processing Team
• the checking and marking of the electronic electoral roll and entry of “not
on roll” information is monitored in ERSA
• Registrar qualification decision stickers are applied correctly to
declarations
• envelopes are separated into the correct counts
• special vote declarations required by the dual votes team are provided in a
under the Official Information Act 1982
timely manner
• the Post-election Manager is informed about progress or any issues
HQ Support
• processing special votes in accordance with the instructions in the
Staff
Operations Manual
2.2
TRAINING
Released
Training for the Post-election Manager and Special Vote Process Leader will occur one week before
advance voting begins. Your Regional Manager (RM) or Regional Advisor (RA) will be in contact with
the Electorate Manager to advise on the date of your electorate’s session. Staff will be required to
read this chapter and complete some eLearning before attending training.
6
Chapter 28 – Special votes
3
CHECKLIST FOR SPECIAL VOTE ACTIVITIES
3.1
CHECKLIST
These tasks must be completed each day from Monday E+2 to Friday E+13.
Labour
Task
E+2 E+3 E+4 E+5 E+6
E+10 E+11 E+12 E+13
Day
Mon Tue Wed Thu
Fri
Mon
Tue
Wed
Thu
Fri
Monitoring progress against
❑ ❑ ❑ ❑
❑
❑
❑
❑
deadlines
Validation
Validate special vote
❑ ❑ ❑ ❑ ❑
❑
❑ ❑
❑
declarations
Electorate Manager (EM)
reviews potential ‘invalid’
❑ ❑ ❑ ❑ ❑
❑
❑
❑
❑
declarations (Box 1)
Confirm all special votes
❑
❑
❑
❑
received have been validated
Qualification
Qualify special votes in ERSA
❑ ❑
❑
❑
❑
❑
Scan and upload declarations
❑ ❑
❑
❑
❑
❑
not found in ERSA
Confirm that all votes received
❑
❑
❑
❑
have been looked for in ERSA
Process ROE qualification decisions
Enter ‘Not on Roll’ information
❑ ❑
❑
❑
❑
❑
in ERSA as required
Print and apply RoE
❑
❑
qualification decision stickers
❑
❑
❑
under the Official Information Act 1982
to declarations
Check in ERSA that all SV
❑
batches have been processed
❑
❑
❑
completely
Check that all disallowed votes
❑
have been processed and
❑
❑
❑
recorded correctly
Released
Preparing for the official count
Prepare special votes for the
❑
❑
official count
Support
Provide special votes to the
❑ ❑
❑
❑
❑
❑
dual votes team as required
Chapter 28 – Special votes
7
 4
THREE STAGES OF SPECIAL VOTE PROCESSING
4
THREE STAGES OF SPECIAL VOTE PROCESSING
4.1
SPECIAL VOTE FILING SYSTEM
You will use a vote filing system through the different stages of processing. The filing boxes should be
set up on a filing table in the processing area as explained in section 5.1.3 of Chapter 21 – Preparing
for the post-election.
4.2
THREE STAGES OF PROCESSING
Qualifying the declaration
Qualifying the voter
under the Official Information Act 1982
Released
Preparing the ballot papers
for the official count
8
Chapter 28 – Special votes
5
STAGE 1: VALIDATION
The first stage is to determine whether each special vote declaration has been received on time and
correctly filled in. This is crucial as whether a declaration is valid or invalid affects whether it is
included in the official count. Any special votes received after
7pm on E+13 (Friday 27 October) must
be disallowed under
Regulation 34 of the
Electoral Regulations 1996.
After E+10, any special vote declarations found which need to be repatriated to their home
electorate must be considered carefully. Can you rely on a courier to get that declaration to the
correct HQ before the cut-off date? Can you hand-deliver the special vote declaration in time? If you
are concerned that you will not be able to get a special vote declaration to its home electorate in
time, contact your regional team immediately.
Note that when receiving declarations at the electorate headquarters, HQ admin staff will identify
potentially late special votes and put these in filing Box 1 for the Electorate Manager to review. This
is covered in Chapter 24 – Sort and send.
As part of the special vote validation checks HQ Support staff determine whether a declaration
should be reviewed by the Electorate Manager.
The Electorate Manager
must review each declaration that may have been received late or fail an
initial validation check and make a final decision on whether it is valid or not. They then place the
declaration and envelope in the appropriate filing box for qualification stage.
The validation stage has two components:
• opening the envelope, this will depend on the type of special vote issued
• checking that the key fields have been filled in by the voter.
5.1
PREPARING FOR VALIDATION STAGE
The Process Leader needs:
• an E208 box with the sticker – Box 1 ‘EM to Review’
• a set of folders labelled as follows:
under the Official Information Act 1982
o
the declaration was received late
o
reason to be checked by Electorate Manager
o
the declaration failed validation
o
the declaration is for another electorate
o
there was something other than one declaration, eg. no declaration, more than one
declaration or contained the ballot paper.
Released
Note that special votes that are potentially late will be placed in the “declaration was received late”
folder as part of the “sort and send” process. The Electorate Manager will review these together with
other special votes that fail validation.
Chapter 28 – Special votes
9

5.2
OPENING SPECIAL VOTE ENVELOPES
These instructions are for all special votes, which are returned in envelopes with separate
compartments for the declaration and voting papers. From Monday E+2, HQ Support staff can
prepare declarations for their validity check.
Step Instructions
1
Place filing Box 1 – “EM to Review” in the middle of the processing table.
Get a special vote envelope.
Open the
declaration compartment of the special vote envelope and take out the
declaration.
2
Do not open the ballot compartment of the envelope!
Note: for most special votes, tear down the perforated strip in the middle of the envelope
and remove the declaration side’s strip.
If there is only one declaration in the envelope, go to
step 4.
If there is anything other than a
single declaration, eg. it is empty, has a ballot paper or has
3
more than one declaration:
• put every piece of paper back into the declaration side of the envelope
• place it in Box 1 on the table, for the Electorate Manager to review
• go back to
step 2.
Check that the declaration is made out for your electorate. If it is, go to
step 5.
If the declaration is
not for your electorate:
4
• put it back into the envelope
• place it in Box 1 for the Electorate Manager
to review
• go back to
step 2.
Check that the declaration number on the declaration matches the declaration number on
the envelope. If they match, go to
step 6.
5
If they don’t match, or there is no declaration number on the envelope, correct/write the
under the Official Information Act 1982
declaration number on the
envelope using a
red pen.
Staple the declaration to the envelope in the top left-hand corner. Staple
the declaration to the declaration pocket side of the envelope, not the
6
ballot paper side.
Important: Never staple the QR code or declaration number.
Released
Put the declaration and envelope in a pile on the table, face down, ready for a validation
7
check.
10
Chapter 28 – Special votes
link to page 18
5.3
VALIDATION CHECK
Each declaration must be checked to see if the three checkpoints have been completed correctly.
The checkpoints for the different types of declarations are shown on the following pages. The
checkpoints are:
• Reason for casting a special vote. This is circled in
Blue in the following examples
• Signed by voter. This is circled in
Red in the following examples
• Completed and signed by witness. This is circled in
Purple in the following examples.
Step Instructions
1
Place filing Box 1 – “EM to Review” in the middle of the processing table.
The Process Leader gets the declarations that were stapled to the envelopes and distributes
2
them face up and to the left of the person at the validation table.
Processing one declaration at a time, the HQ Support staff checks that
all three checkpoints
have been filled by the voter.
3
• reason for casting a special vote
• signature of the voter
• the witness section is filled out and signed.
If the declaration is type E83 and the voter ticked the final reason ‘I have satisfied the
Issuing Officer/Electorate Manager that…’ on the list:
4a
• place the declaration and envelope in Box 1 on the table
• go back to
step 3.
If one or more of the three checkpoints are not complete:
4b
• place the declaration and envelope in Box 1 on the table
• go back to
step 3.
If
all three checkpoints are complete, the declaration is valid. Place the declaration and
4c
envelope to your right, face down.
The Process Leader then collects the piles of
valid declarations from the table and puts
5
them in Box 5, ready for qualification on the
filing table.
under the Official Information Act 1982
The Process Leader takes the declarations with issues from Box 1 on the
processing table and sorts them into folders by issue:
• the declaration failed validation
• reason to be checked by Electorate Manager
6
• the declaration is for another electorate
• there was something other than one declaration, eg. no declaration, more than one
Released
declaration or contained the ballot paper.
When done, put the declarations in Box 1 on the
filing table for the Electorate Manager to
review (see section
6).
Chapter 28 – Special votes
11
under the Official Information Act 1982
Released
12
Chapter 28 – Special votes
under the Official Information Act 1982
Released
Chapter 28 – Special votes
13
 6
ELECTORATE MANAGER’S REVIEW OF DECLARATIONS
6
ELECTORATE MANAGER’S REVIEW OF DECLARATIONS
6.1
REVIEW AND DECIDE
The EM should review Box 1 twice a day between E+2 and E+13 to determine whether a declaration
is valid or not. Declarations will be sorted into groups depending on the type of issue, such as:
• the declaration was received late
• the declaration is for another electorate
• reason to be checked by Electorate Manager
• the declaration failed validation
• there is something other than one declaration, eg. no declaration, more than one
declaration or contains the ballot paper.
Do not open the ballot side of the envelope unless the following instructions tell you to.
Regulation 33 of the
Electoral Regulations 1996 allows the Electorate Manager or somebody with
your delegated authority to open the ballot side of the envelope if there is reason to believe it may
contain the declaration. If you need to open the ballot side of the envelope you must take all
possible care to preserve the secrecy of the voter’s ballot paper.
6.2
DEALING WITH LATE DECLARATIONS
Use these instructions to process declarations that arrive late.
Step
Instructions
• Open the declaration side of the envelope.
• Check that the declaration number matches the number on the envelope:
o if not, correct the
envelope using a
red pen.
1
• Check the declaration is for your electorate:
o if not, contact the National Support Team
• Staple the declaration to the envelope in the top left corner.
under the Official Information Act 1982
Check that the declaration was received within the timeframes shown below.
• If you think the declaration was received on time:
o put the declaration and envelope in Box 5.
2
• If you think the declaration was received late:
o write or stamp on the declaration “Disallowed – Received Late” and sign
Released the declaration.
o put the declaration and envelope in Box 2.
14
Chapter 28 – Special votes

Use this table to determine if the declaration was received on time.
Source
Definition of “received on time”
Returned from voting places /
• Assume it was returned on time by 7pm on Election Day,
teams in your electorate
unless stated otherwise on the envelope.
Advance voting (AV) and Election
Day (ED) special votes delivered
• Must be received by 7pm on Election Day.
by hand or courier to your HQ
• Assume it was returned on time by 7pm on Election Day
at the other electorate, unless stated otherwise on the
Returned from other electorates
envelope.
• Must be received at your headquarters by 7pm, Friday
E+13.
Must be:
AV and ED special votes returned
• postmarked or date-stamped on or before Friday E-1 and
by post to your HQ PO Box
• received by noon, Wednesday E+4.
If you receive any of these contact the National Support Team
Overseas votes
6.3
DECLARATIONS FOR A DIFFERENT ELECTORATE
Use these instructions if you find a declaration for a different electorate.
Step Instructions
If you find a declaration for another electorate:
1
• check that the number on the declaration matches the number on the envelope. If not,
correct the envelope using a
red pen
• write the electorate name and number on the envelope.
2
Seal the declaration inside the declaration side of the envelope.
under the Official Information Act 1982
3
Send the special vote to the electorate it is for (see Chapter 24 – Sort and send).
6.4
MORE THAN ONE DECLARATION IN THE ENVELOPE
If there is more than one declaration in the envelope,
do not open the ballot paper side of
the envelope until you reach step 3.
Released
Step Instructions
• Compare the declaration numbers on the declarations with the declaration number on
the envelope.
1
• Staple the matching declaration to the envelope in the top left corner.
Continued on next page
Chapter 28 – Special votes
15
link to page 19 link to page 15 link to page 19 link to page 15
Prepare a separate special vote envelope for each extra declaration.
• Take fresh envelopes from your headquarters supply. Don’t use leftover voting place
supplies.
• Use a red pen to cross out the declaration number on each special vote envelope and
2
write the number from the declaration.
• Write the electorate name from each declaration on the front of the corresponding
envelope.
• Stamp the new envelope with an issuing point stamp to show that the votes were
received on time.
3
Open the ballot side of the original envelope and remove the ballot paper(s).
Taking care to preserve the secrecy of the vote, compare the number under the black
sticker on each ballot paper and match it to the declaration with the same number.
4
You can shine a light through the paper, so you don’t need to remove the sticker. If you
remove the sticker, you must replace it.
5
Seal each ballot paper into the ballot paper side of the correct envelope.
6
Stamp each envelope with the “Opened pursuant to reg 33” stamp and sign the envelope.
• If the declaration is for
another electorate, follow the instructions in sectio
n 6.3. • If the declaration is for
your electorate:
o
7
staple the declaration to the front of the corresponding envelope
o do a validation check (see sectio
n 5.3) o put the declaration and envelope in either Box 5 (valid) or Box 2 (invalid)
for processing.
6.5
NO DECLARATION OR BALLOT PAPER FOUND IN THE DECLARATION SIDE
If the declaration side of the envelope has neither a declaration nor a ballot paper in it, then you may
open the
ballot paper side of the envelope.
Step Instructions
1
Open the
ballot paper side of the envelope.
under the Official Information Act 1982
2
Stamp the envelope with the “Opened pursuant to reg 33” stamp and sign the envelope.
If there is a declaration and a ballot paper in the ballot side:
3A
Seal the ballot paper back in the ballot side of the envelope.
• If the declaration is for
another electorate, follow the instructions in sectio
n 6.3. • If the declaration is for
your electorate:
o check that the number on the declaration matches the number on the
Released
3B
envelope. If not, correct the
envelope using a red pen
o staple the declaration to the front of the envelope in the top left corner
o complete a validation check (see sectio
n 5.3) o put the declaration and envelope in either Box 5 (valid) or Box 2 (invalid)
for processing.
If there is a declaration but no ballot paper in the ballot side:
16
Chapter 28 – Special votes
link to page 19 link to page 15 link to page 45 link to page 15 link to page 15
4A
Stamp or write “No ballot paper” on the declaration.
• If the declaration is for another electorate, follow the instructions in section
6.3.
• If the declaration is for your electorate:
o
check that the number on the declaration matches the number on the
4B
envelope. If not, correct the envelope using a red pen
o
staple the declaration to the front of the envelope in the top left corner
o
complete a validation check (see sectio
n 5.3)
o
put the declaration in Box 1 until E+13 in case you find the ballot paper.
On E+13, if no ballot paper has been found:
• validate and qualify the declaration as normal
• edit the special vote in ERSA (see section
10.3) and select “No ballot paper enclosed”
4C
from the Disallowed Status panel.
Note: You can’t select “No ballot paper enclosed” as a reason for invalidity when initially
entering the declaration, so if there is nothing else wrong with the declaration, it should be
entered as “Valid” and then edited as above.
5
If there is a ballot paper but no declaration in the ballot side of the envelope:
If the ballot paper is
Then…
for:
• seal the ballot paper into the ballot paper side of the
envelope
your electorate and
• stamp the envelope “No declaration” and put in Box 1, in
was issued in your
case the declaration is found
• have the electorate’s Logistics and Supplies Manager (LS
electorate (check the
Manager) organise staff to look for the declaration amongst
issuing stamp)
the voting place materials, eg. in a close of poll envelope,
loose in the supplies box or other ballot boxes.
If the declaration is found, follow the instructions in sectio
n 5.3
• seal the ballot paper back into the ballot paper side of the
envelope
• stamp the envelope “No declaration” and put in Box 1, in
under the Official Information Act 1982
case the declaration is found
• contact the Electorate Manager of the issuing electorate
• give them the declaration number and issuing point stamp
your electorate but was
number on the envelope
issued in a different
• ask them to look for the declaration amongst the voting
electorate
place materials, eg. in a close of poll envelope, loose in the
supplies box or other ballot boxes. If found, have them send
it to you by courier.
Released
• If the declaration is found, follow the instructions in section
5.3
Continued on next page
Chapter 28 – Special votes
17
link to page 15
• check and correct the electorate name on the envelope
using a
red pen if necessary
• seal the ballot paper back into the ballot paper side of the
another electorate
envelope
• stamp the envelope “No declaration”
• contact the National Support Team
for further
instructions.
If the declarations have not been found by Friday E+13, then:
• write “Disallowed – Declaration Missing” on each envelope and sign the envelope
• enter the vote in ERSA as an
invalid declaration using the number on the envelope
• record the reason the vote is invalid as “no declaration”
• enter the issuing point information from the envelope
• print the batch header, then check and place in Box 10.
6.6
IF YOU FIND A MISSING DECLARATION
Use these instructions if you find a missing declaration.
Step Instructions
1
Find the envelope that matches the declaration in Box 1.
If the declaration is for
your electorate:
• staple the declaration to the front of the envelope
2
• complete a validation check (sectio
n 5.3)
• put the declaration and envelope in either Box 5 (valid) or Box 2 (invalid) for
processing.
If the declaration is for
another electorate:
3
• check and if necessary, correct the electorate name on the envelope using a red pen
• seal the declaration inside the declaration side of the envelope
• send the special vote envelope to the other electorate. See Chapter 24 - Sort and send.
under the Official Information Act 1982
Released
18
Chapter 28 – Special votes
6.7
ELECTORATE MANAGER CHECK OF DECLARATION VALIDITY
The EM can accept a declaration that has not been correctly completed under certain circumstances. Use a hard copy of the electoral roll to complete this
process, as the data in ERSA will have changed since the roll was printed for Election Day. Use this table to determine whether a declaration is valid or
invalid.
Situation
Process
Put in box
Issued in error
If the voter
voted in voting place
where ordinary votes were issued for
Check whether the voting place indicated by the issuing point
your electorate
and the voter’s name is
on the hard copy certified roll for stamp issued ordinary votes for your electorate. If it did, check
your electorate, you can consider the declaration
valid, regardless of any
the certified roll for the voter.
fault in it.
5
In the “Electorate Manager use” space on the declaration, write
The voter was not required to complete a declaration and should have
“Allowed – voter is on a certified roll available where they
been issued an ordinary vote. The voter cannot be penalised for an
voted” and initial.
administrative error.
No reason stated
If the declaration is witnessed by an electoral official, eg. an issuing
officer you can consider the declaration
valid. The official was required to In the “Electorate Manager use” space on the declaration, write
5
check that the reason was ticked. The voter cannot be penalised for an
“Allowed – reason waived due to official error” and initial.
administrative error.
If the voter’s name does not appear on the hardcopy certified roll for
Use a red pen to tick the reason “My name is not on the printed
your electorate, you can consider the declaration
valid. The grounds for
5
roll” and initial the change.
under the Official Information Act 1982
casting a special vote can be inferred.
Released
Chapter 28 – Special votes
19
Situation
Process
Put in box
If the vote was cast in another electorate on Election Day, ie, it is an
Election Day vote with an issuing point stamp from another electorate,
Use a red pen to tick the reason “I am, or will be, outside my
5
you can consider the declaration
valid. The ground for casting a special
electorate on Election Day” and initial the change.
vote can be inferred.
In all other cases, you must consider the declaration
invalid and
disallow
In the “Electorate Manager use” space, write “Disallowed – no
2
the vote.
reason stated” and sign in full.
Voter ticked the final reason in the list: “I have satisfied the Issuing Officer/ Electorate Manager that…”
In the “Electorate Manager use” space write either of the
Chapter 12 – Delivering voting services goes through the valid reasons
following and sign in full:
5 (valid)
why you may be satisfied that a voter would have suffered hardship or
• “Allowed – I am satisfied the voter was unable to go to a
or
serious inconvenience if they had voted in person at a voting place.
voting place”
2 (invalid)
Disallow or
allow the vote according to that guidance.
• “Disallowed – I am not satisfied the voter was unable to go
to a voting place”
Not signed by the voter
You must consider the declaration
invalid and
disallow the vote.
Every declaration must be signed by the voter, or if the voter is unable to
sign, then by a person nominated by the voter to sign on their behalf and In the “Electorate Manager use” space, write “Disallowed – not
2
in their presence.
signed” and sign in full.
A declaration may still be valid if it is not dated. under the Official Information Act 1982
Released
20
Chapter 28 – Special votes
Situation
Process
Put in box
Not signed by a witness – takeaway votes only
The declaration can be considered
valid if:
• the witness section has been stamped “witness not required”
• the voter’s name is recorded on the M55-TAKEAWAY as being given
exemption from having their declaration witnessed (see section 5 of
Initial beside the “witness not required” stamp.
5
Chapter 20 – Delivering voting services). In these cases it is likely
“witness not required” will be written on the section in
handwriting.
In all other cases, you must consider the declaration
invalid and
disallow Write “Disallowed – improperly witnessed” in the “Electorate
2
the vote.
Manager use” space and sign in full.
Not signed by an authorised witness
Regulations require each declaration to be witnessed.
• If the witness has not signed the declaration, the Electorate Manager must try to determine whether the voter signed the declaration in the presence of an
authorised witness. An issuing point stamp or other official mark in the witness section of the declaration is enough to declare the declaration
valid.
• If an authorised witness did not sign a takeaway declaration (E83), but provided their details, try to contact the witness. If the witness confirms that they
witnessed the voter signing the declaration, you can consider it
valid.
If there is evidence that the voter signed the declaration in the presence
In the “Electorate Manager use” space on the declaration, write
5
of an authorised witness, you can consider the declaration
valid.
“Allowed – witness present but didn’t sign” and initial.
If the voter did not sign the declaration in the presence of an authorised
Write “Disallowed – improperly witnessed” in the “Electorate
witness, or you cannot determine whether they did, the declaration
2
under the Official Information Act 1982
Manager use” space and sign in full.
must be considered
invalid and the vote
disallowed.
Released
Chapter 28 – Special votes
21
7
STAGE 2: QUALIFICATION
7.1
WHAT IS QUALIFICATION?
Once you have determined whether a declaration is valid or invalid, it moves to the next stage of the
process – qualification. Qualification is about determining whether a voter is eligible to vote by
checking that they are on the roll.
Initial qualification is undertaken by electorate staff using the ERSA system. If the voter’s details –
name and address – match what is on ERSA, then the voter is “marked off” the electronic roll. If the
details do not match or the voter is not in ERSA, then they are marked as “not found” and will be
referred to the Regional Enrolment Processing Team Leader for a final qualification decision.
7.2
WHEN CAN I START QUALIFYING SPECIAL VOTES?
The Regional Enrolment Processing Team will need to finish entering all the enrolment forms
collected during advance voting and on Election Day. Having these all processed will reduce the
number of declarations that need to be scanned and sent to the Regional Processing Team Leader for
checking.
The roll must be closed before qualification begins. You will be able to qualify special votes
from
Thursday E+5.
7.3
PREPARING FOR THE QUALIFICATION STAGE
The processing team will need:
• trays for data entry operators to place qualified and not found declarations in
• stapler removers for removing staples for batches being scanned to the Regional Enrolment
Processing Team
• green and red highlighters for marking batch headers.
under the Official Information Act 1982
Released
22
Chapter 28 – Special votes


7.4
CHECKING WHETHER A VOTER IS QUALIFIED
Staff will check
the
valid declarations in Box 5
and the invalid declarations in Box 2 in ERSA to determine whether the voter is qualified to vote. They
must process valid declarations before invalid declarations, so they are ready for the official count.
You can only process one declaration type (valid or invalid) at a time. If you have been processing “Valid” declarations, you need to close any
open “Q” and “R” batches before using the “Change Mode” button to process “Invalid” declarations.
Step Instructions
Take the special vote declarations and envelopes from Box 5 (Valid) or Box 2 (Invalid). In ERSA
select “Special Votes” and then “Special Vote Entry”
1
from the menu.
Select the type of declarations you want to process – “Valid” or “Invalid”.
2
Note: If you have access to a Māori and a general electorate, you will need to process them
separately by selecting the appropriate electorate at this stage.
Process one declaration at a time.
For takeaway votes – E83:
• Using your handheld scanner, click into the “declaration QR code” and scan the QR code on
the special vote declaration. Once complete, go to step 6.
For all other special vote declarations:
3
• Enter the voter’s surname and forenames and click “Search”.
To use search you must enter at least one letter in the surname field. Searches match from the
under the Official Information Act 1982
beginning, eg. ‘Wrig’ will find ‘Wrigley’, ‘Wright’ and ‘Wright-Henare’ but not ‘Wainwright’ or
‘Henare-Wright’. The search terms you enter are determined by:
• how common the names are
• how clearly the names are written on the declaration.
Continued on next page
Released
Chapter 28 – Special votes
23


Your search results will be displayed.
If you get too many matches, enter more information if available.
4
If you get no matches, consider reducing the characters in a name search, especially if they are
unclear.
Check the voter’s name and address against the search results.
5
• If both the name and address match
, click
Mark Vote on the corresponding line
.
• If the name or address do not a match, click
Not Found.
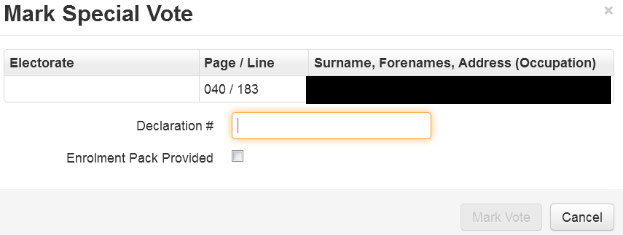
In the “Mark Special Vote” box.
• If the voter’s name and address are displayed, check that they are correct.
6
• Enter the 7-digit declaration number (top right on declaration). Make sure it is correct.
• If you are processing “Valid” declarations, click “Mark Vote”. Go to step 8.
• If you are processing “Invalid” declarations – go to step 7.
For
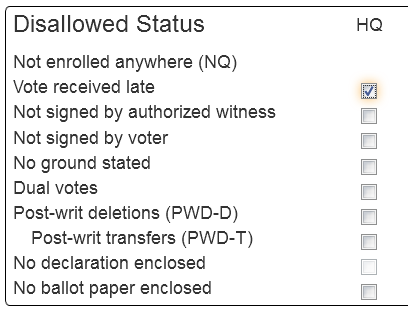
invalid declarations only, ERSA displays an “Invalid Declaration Reason” section.
• Tick all reason(s) for the declaration being invalid.
• Enter the electorate and issuing point where the special vote was cast (from the issuing point
7
stamp).
• Click “Mark Vote”. Go to step 8.
ERSA will display whether the declaration is qualified “Q”, or needs to be referred to the Registrar
“R”.
8
under the Official Information Act 1982
• Place the declaration in the appropriate tray on your desk.
• Click OK.
Continued on next page
Released
24
Chapter 28 – Special votes
link to page 32 link to page 32

Repeat steps 1-8
for each declaration.
As you process a declaration it will be added to either a “Q” or “R” batch. There is a different
9
batch header for each type of batch. The maximum number of declarations per batch is 48. The
batch will automatically close once it reaches the maximum and ask you to print the batch header.
Click
End Batch to close a batch at any time, including whenever you finish processing
declarations to move to another task, take a break or leave for the day. The batch header and a
print dialog box will display.
10
Make sure you print the batch header double-sided so you get a list of declaration numbers on
the reverse side.
Click OK to print the header.
Match the batch header to the declaration on top of the pile to make sure you have the correct
11
header. The top declaration should match either the first or last number listed on the back of the
batch header. Secure with a rubber band.
12
Go to the instructions in sectio
n 7.7. Checking a special vote batch.
under the Official Information Act 1982
Released
Chapter 28 – Special votes
25
7.5
TROUBLESHOOTING
Issue
Solution
Go to the ERSA “SV Batch Management” screen and select the batch number. The “SV Batch
Didn’t print the batch header when closing the batch.
Detail” screen will appear with the “Print batch header” button at the top right.
The system timed out while entering a batch.
Log back into ERSA. Go into the “Special Vote Entry” screen and continue processing the batch.
The voter already has a special vote declaration
Process the declaration as normal. This will be investigated by the dual votes team.
recorded by their name.
The batch header is not printing double-sided.
Check your printer instructions.
Check declaration numbers for both special votes have been entered correctly. If the number
Same declaration number appears twice in one batch.
has been correctly entered twice, contact NST.
under the Official Information Act 1982
Released
26
Chapter 28 – Special votes


7.6
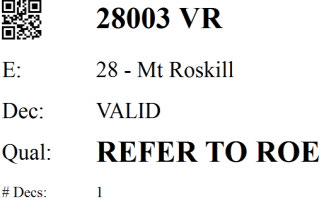
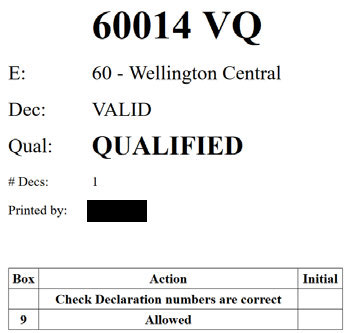
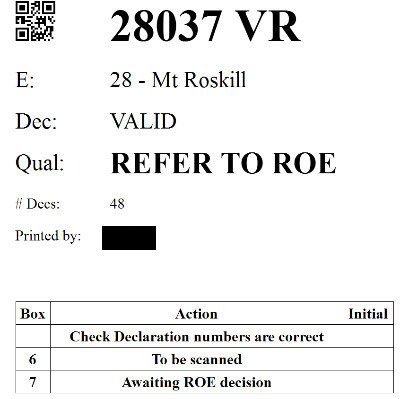
BATCH HEADERS
At the end of the qualification process each special vote declaration is placed into a batch and the
ERSA system creates a batch header. The batch header shows:
• the batch number and type (VQ, VR, IQ, IR)
• the electorate name and number
• whether the batch is valid or invalid
• the qualification decision – “qualified” or “Refer to ROE”
• the number of declarations in the batch
• who printed the batch header
• what are the next actions for the batch
• on the back of the batch header are the declaration numbers in the batch and for
“qualified” batches the names of the voters that have been marked off in ERSA.
The table below shows what the four types of batch headers will look like.
VQ
IQ
VR
IR
under the Official Information Act 1982
Released
Chapter 28 – Special votes
27
link to page 45
7.7
CHECKING A SPECIAL VOTE BATCH
Data entry staff need to check each batch after they have entered them into ERSA. It is important
that for each batch:
• they have correctly entered the declaration numbers into ERSA
• the number of declarations in the batch matches the number shown on the batch header.
Step Instructions
Check the declaration numbers against the numbers on the back of the batch header.
If the declaration numbers on the batch header are:
1
• correct, go to step 2
• incorrect, tell the special vote Process Leader. They can amend (see sectio
n 10.3) and
print a new batch header for checking.
When the declaration numbers are correct on the batch header, initial the “Check
2
declaration numbers are correct” box.
• For valid batches (VQ/VR) use a
green highlighter to highlight the batch number.
3
• For invalid batches (IQ/IR) use a
red highlighter to highlight the batch number.
For qualified (VQ or IQ) batches:
4A
• put a rubber band around each batch
• put in the box shown on the batch header – Box 9 (VQ - Valid) or Box 10 (IQ - Invalid).
For batches for the Regional Processing Team Leader (VR or IR):
• use a staple remover to separate the declarations from the envelopes
• place the declaration face down on one pile and the envelope, number side face down
4B
in a separate pile. Keep them in order
• continue until all declarations have been separated from the envelopes
• place the declarations on top of the envelopes, with the batch header on top
• place in the box indicated on the batch header – either Box 6 (VR - Valid) or Box 3 (IR -
Invalid).
under the Official Information Act 1982
Released
28
Chapter 28 – Special votes
7.8
SCANNING DECLARATIONS
You will probably scan and send around 35% of your special vote declarations to the Regional
Processing Team Leader for qualification.
Starting at noon on Thursday E+5, the scanning team needs to:
• prioritise the scanning of batches in Box 6 Valid – VR
• then the scanning of batches in Box 3 Invalid – IR
They need to meet the following timeframes.
% Special votes processed
Uploaded by:
10%
Thursday 5pm (E+5)
50%
Friday 5pm (E+6)
80%
Tuesday 5pm (E+10)
100%
Wednesday 5pm (E+11)
Stragglers
ASAP
See the instructions in Chapter 25 – Scanning for how to scan special vote declarations.
under the Official Information Act 1982
Released
Chapter 28 – Special votes
29
link to page 35
 8
RECEIVING QUALIFICATION DECISIONS
8
RECEIVING QUALIFICATION DECISIONS
8.1
QUALIFICATION DECISIONS
The Team Leader returns a qualification decision for each declaration as they are being processed.
Once
all decisions have been received for a batch, the batch status will change to “Print ROE
Stickers” and staff can then enter “not on roll” information (if required) and print the ROE decision
stickers.
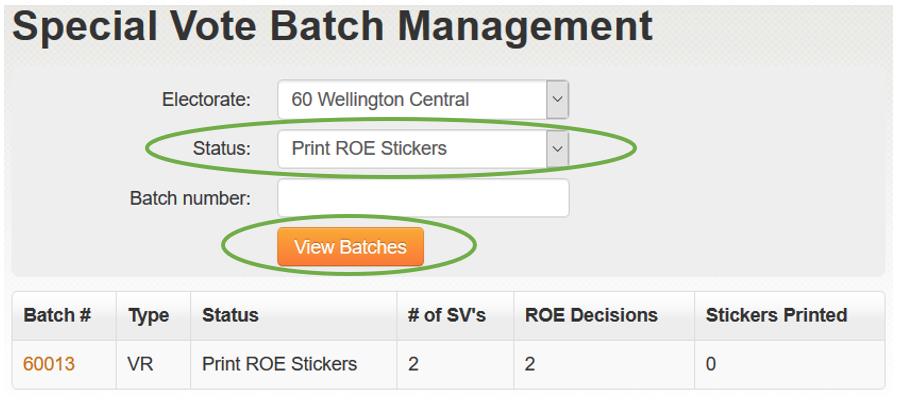
From Friday E+6, the special vote Process Leader must regularly check the progress of each batch in
the ERSA “Batch Management” screen.
Step Instructions
In ERSA:
• select
Special Votes from the top menu
• select
Batch Management from the dropdown menu
• select
Print ROE Stickers from the
Status dropdown menu
• click the
View Batches button.
Completed batches are listed.
1
Get these batches from Box 7 (Valid - VR) or Box 4 (Invalid - IR) and have HQ support staff
enter “not on roll” information and print RoE stickers (see section
8.2).
under the Official Information Act 1982
In ERSA
Special Vote Batch Management:
• select
Returned with Issues from the
Status dropdown menu
2
• click the
View Batches button.
If any batches appear here, it means that at least one declaration needs to be reprocessed.
Contact the National Support Team for instructions
Released
30
Chapter 28 – Special votes


In ERSA Special Vote Batch Management:
• select “
Batch with ROE for decision” from the “
Status” dropdown menu
• click the “
View Batches” button.
Keep track of these batches. Most batches will be processed in order. Occasionally a batch
3
may have most decisions returned but take longer for the last one or two. This happens
when the Regional Enrolment Processing Team needs to make enquiries to come to a
decision.
If any batches remain unfinished for an unusually long time, ask the EM to follow up with
the Regional Enrolment Processing Team.
8.2
PRINTING QUALIFICATION STICKERS
From Friday E+6, when qualification decisions for all of the declarations in a batch have been
returned, HQ Support staff will enter “not on roll” information as required and print the RoE decision
stickers.
Resources
Purpose
Avery L7162 labels
To show qualification decision
Step Instructions
1
Get a batch of declarations from either Box 7 (Valid - VR) or Box 4 (Invalid - IR).
In ERSA:
• select
Special Votes from the top menu
• select
Batch Management from the dropdown menu
2
• select
Print ROE Stickers from the
Status dropdown menu
• click the
View Batches button
• select the batch number.
The
Batch Detail screen will display.
If a declaration has an orange
List button next to it, you must enter “not on roll”
under the Official Information Act 1982
information before you print the sticker.
• Click the
List button.
• Enter the name and address information from the declaration. If the name or address
is missing from the declaration, record as ‘Not stated.’
• Click Save and Close.
3
The list button will turn green.
Released
This information is used to produce the “List of
Voters not on the Roll”, which becomes a public
record after the election.
Continued on next page
Chapter 28 – Special votes
31


When all “not on roll” information is entered for the
batch, select the stickers to be printed. Either:
• tick the “
Select All” box to select all stickers that
4
are ready to print
• or print individual stickers by ticking the
corresponding
“Print Sticker” boxes.
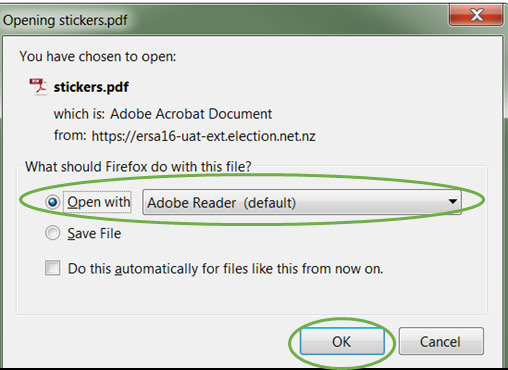
Click the “
Print Stickers” button at the top right of the screen.
5
This dialog box will appear. Select “
Open with Adobe Reader” and click “
OK”.
6
This will open the qualification labels in Adobe Reader.
under the Official Information Act 1982
• Load Avery 7162 labels into a print tray (the bypass tray is usually best) and ask other
staff not to print.
• Click the print icon.
7
• Change the paper type to “labels” in print settings.
• Select the tray where you have loaded the labels.
• Print the labels.
Released
Once a declaration qualification sticker is generated for printing, the “Batch Management”
screen will be updated to show the number of stickers printed for that batch.
When all stickers have been generated for a batch, the batch status changes to “Done”.
32
Chapter 28 – Special votes
link to page 38 link to page 38
8.3
ATTACHING QUALIFICATION STICKERS TO DECLARATIONS
Once stickers are printed, staff can start attaching them to special vote declarations. Process one
batch at a time and
do valid batches first.
You don’t need to separate declarations and envelopes for invalid batches. Put these batches
straight into Box 10.
Step
Instructions
1
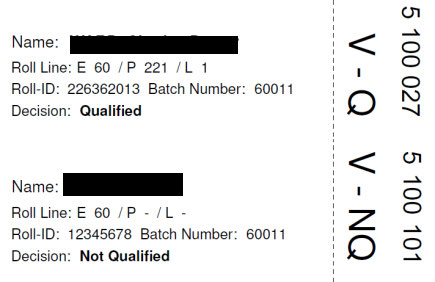
Get the qualification stickers that match the batch being processed.
Find the declaration that matches the sticker. Check that the:
• declaration and sticker numbers match
• the voter’s name matches.
2
Occasionally the name may be different, eg. due to marriage or other name changes. If
you are concerned that the sticker may not be for the right person, ask the Process Leader
to contact the Enrolment team.
Double check that the declaration number on the sticker matches the declaration.
Place the sticker vertically in the “Registrar of Electors use” section on the declaration.
3
Make sure that the number on the sticker is at the top.
The sticker can cover the QR code, as it is no longer needed.
When all the qualification stickers for the batch have been placed on the declarations:
• bundle the declarations and envelopes together
4
• put the batch header on top, then secure with a rubber band.
Put the batch to one side ready for sorting based on qualification decision (see section
8.4).
5
Repeat for the next batch.
If you’re not going to separate the declarations and envelopes straight away, put the
under the Official Information Act 1982
batches in an E206 box labelled “Qualification stickers attached”.
Released
Chapter 28 – Special votes
33
link to page 37 link to page 37
8.4
SORTING SPECIAL VOTES BASED ON QUALIFICATION DECISIONS
Following on from sectio
n 8.3, you have placed RoE decision stickers on VR batches, you now need
to sort these by qualification outcome.
Note: before starting check with the Dual Votes Process Leader that no more special vote
declarations are needed for investigations. Once they are separated, they are more difficult to find.
You need the following for this task:
• special vote processing sorting cards (M75-OUTCOME)
• E206 box - qualification stickers attached (if you did this in section
8.3) • rubber bands.
Step Instructions
1
Process one batch at a time.
2
Photocopy the batch header
twice, so you have three copies.
Place the special vote qualification sorting cards on a table as shown.
3
Count the number of declarations in the batch. Check it matches the number shown on the
4
batch header. If it doesn’t match, tell the Special Vote Process Leader.
For each declaration check that the declaration number and qualification sticker number
5
match and find the matching envelope by checking the numbers.
Put each envelope and declaration, with the number side up, on the appropriate
6
qualification sorting card.
under the Official Information Act 1982
The next steps must be completed by a different person
7
Check each declaration has been placed on the correct qualification sorting card.
For each pile of “Q”, “PV Only” and “NQ”:
• confirm the number of envelopes and declarations in each pile match
8
• put a batch header on top of the declaration pile
• in the top-right corner of the batch header, write the appropriate pile letter, ie, “Q”,
Released
“PV” or “NQ” and number of declarations in that pile
• secure with a rubber band.
Confirm that the combined number of declarations in each pile matches the original
9
number shown on the batch header.
10
Place the envelopes and declarations from the:
34
Chapter 28 – Special votes
• “PV Only” pile in filing Box 8
• “Q” pile in filing Box 9
• “NQ” pile in filing Box 10.
11
Repeat until all batches are finished.
under the Official Information Act 1982
Released
Chapter 28 – Special votes
35


 9
STAGE 3: PREPARING FOR THE OFFICIAL COUNT
9
STAGE 3: PREPARING FOR THE OFFICIAL COUNT
9.1
SEPARATING FOR THE OFFICIAL COUNT – BOXES 8 AND 9
From Thursday E+12 to Friday E+13, your staff will need to process boxes 8 and 9.
You will need:
• Special vote count cards (M75-SIGN)
• 3 x E208 boxes labelled – ‘Advance’, ‘Election Day’ and ‘Party Vote Only’
• 3 x E206 boxes labelled – ‘Advance’ , ‘Election Day’ and ‘Party Vote Only’
• 1 or more E206-CLERK box labelled – ‘Qualified/PV Only declarations’
• 3 x Ballot boxes labelled – ‘Advance’, ‘Election Day’ and ‘Party Vote Only’.
Step Instructions
Lay out the special vote count cards on a table as shown:
1
• Place the corresponding E208 box behind the count card on the table.
2
• Place the corresponding E206 box below the table.
• Put the E206-CLERK box on the table for declarations and batch headers.
• Take a batch from Box 9.
• Separate the batch header and declarations from the envelopes. You will need to
3
remove the staples from VQ batches.
• Put the batch header and declarations face-up in the ‘Qualified/PV Only declarations’
E206-CLERK box.
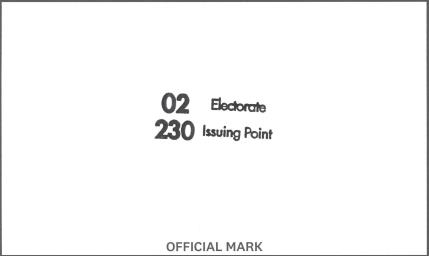
Place each envelope on the appropriate count card:
Count card
Stamp in ‘Official Mark’ box
Advance under the Official Information Act 1982
4
Released
Election Day
5
After each batch, place the envelopes in the corresponding E208 box.
36
Chapter 28 – Special votes
Repeat steps 2 to 5.
When the E208 boxes are getting full, finish the batch you are working on. Have a second
person check the count. Then:
6
• count the envelopes in the E208 box into piles of 50.
• secure each pile of 50 with a rubber band
• put the piles into the corresponding E206 box.
When Box 9 is complete – process Box 8
7
Put the PV Only count card and the E208 ‘PV Only’ box behind it on the table.
8
Take a batch from Box 8 and check all declarations have been marked PV Only.
Separate the declarations from the envelopes.
9
Put the batch header and declarations face-up in the ‘Qualified/PV Only declarations’ E206-
CLERK box.
Place the envelopes on the marker card. Repeat until all ‘PV Only’ batches have been
processed.
10
Count the number of envelopes and have a second person check the count.
• Count the envelopes in the E208 box into piles of 50.
• Secure each pile of 50 with a rubber band.
• Put the piles into the corresponding E206 box ‘PV Only’.
9.2
MOVING ENVELOPES INTO BALLOT BOXES
Depending on the number of special votes your electorate has, you may choose to do this gradually
so that the official count team can start the count, rather than providing all the special votes at once.
The count of special votes is due to start on Friday E+13.
Special votes are counted in separate counts for votes cast during advance voting, on Election Day,
and a “party vote only” count.
under the Official Information Act 1982
Prepare ballot boxes for each of the counts by labelling them as “Advance”, “Election Day”, and “PV
Only”.
Ideally, you’ll break each count into around 500 special votes by putting them in different ballot
boxes. This will make it easier for the official count team to complete the count. Ensure that the
number of votes in each ballot box you provide to the official count team is accurate, otherwise they
will need to conduct the count at least twice.
Released
Step Instruction
1
Process one count at a time.
Get the E206 box(s) for the count.
2
Continued on next page
Chapter 28 – Special votes
37
• Count the piles of 50 envelopes and place in the ballot box.
• Keep a running total of envelopes placed in the ballot box.
• When you reach approximately 500 votes (10 piles) or when all envelopes for that
3
count have been placed in the ballot box, clearly write the number on the top of the
ballot box.
If you use multiple ballot boxes for a count, record the number of ballot papers in each box
plus what ballot box number is – eg. Advance count, box 3, 513 votes.
4
Repeat for each count.
9.3
CHECKING THAT PROCESSING IS COMPLETE
The Special Vote Process Leader and Post-election Manager should check each filing box.
Step Instructions
1
Check that there are no declarations or envelopes in filing boxes 1 to 9.
From Box 10 process one batch at a time.
• Check that the declarations have either been:
o
stamped or marked “disallowed” and signed by the EM
2
o
or have an “NQ” qualification sticker.
• Count the number of envelopes in the batch and keep a running total.
• Put the envelopes and declarations in an E206-CLERK box labelled “Disallowed special
votes declarations and envelopes”.
In ERSA:
• select “Special Votes” from the top menu
• select “Disallowed Votes” from the dropdown menu
3
• open or print the csv report
• compare the total number of votes in Box 10 with the total on the report.
If the totals don’t match, contact the National Support Team.
under the Official Information Act 1982
Checking the count of special votes
Add up the numbers of special vote envelopes:
• in the advance count
4
• in the Election Day count
• in the PV only count (don’t include ordinary post-writ transfers)
• in the disallowed votes E206 box
Released
• retained by the dual votes team.
In the Election Management System (EMS) select Reports > SV Tracking > SV Received
Report.
5
Compare the total from step 4 with the total “SV Received”:
• If it doesn’t balance, go to step 6.
• If it balances, go to step 7.
38
Chapter 28 – Special votes
Check whether:
• all batches entered in ERSA have been processed (Status=Done)
• there are no envelopes or declarations in the special vote processing area (check all
6
boxes used during the process).
If the difference is 48 or a multiple of 48, this may mean a batch is missing.
Once you are sure there are no unprocessed declarations and envelopes, go to step 7.
7
Give the ballot boxes to the official count team.
1982
Act
Information
Official
the
under
Released
Chapter 28 – Special votes
39
link to page 35
 10 INFORMATION FOR SPECIAL VOTE PROCESS LEADERS
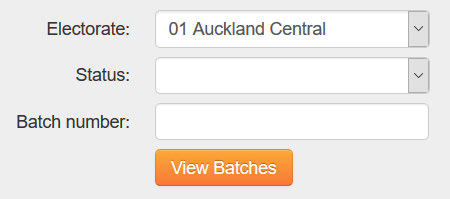
10.1 CHECKING THAT BATCHES UPLOADED SUCCESSFULLY
The Special Vote Process leader needs to check regularly in the ERSA Special Vote Batch
Management screen that batches have been uploaded successfully:
• Select
Special Votes from the top menu.
• Select
Batch Management from the dropdown
menu.
1982
• Filter the list of batches by selecting a status or
entering a batch number if you want to.
• Click View Batches.
Act
The batches for your (chosen) electorate will display.
Status
What it means
Mismatch
National Office will resolve this, you don’t need to do anything.
Batch with RoE for decision
Batch successfully uploaded.
Information
Scan an upload batch
Batch not uploaded, or upload failed.
Open
Batch still being entered.
Print RoE stickers
Batch returned from RoE, go to section
8.2.
Done
All stickers have been generated.
Official
Returned with Issues
There is an issue with one or more declarations.
the
10.2 RESOLVING A BATCH WITH A STATUS OF MISMATCH
A small number of declarations will not have a QR code, or the QR code can’t be read or was entered
under
incorrectly. National Office will resolve this issue, so if you see a batch with the status of “Mismatch”
you don’t need to do anything.
Released
40
Chapter 28 – Special votes
link to page 27


10.3 EDITING SPECIAL VOTE INFORMATION: DECLARATION NUMBER OR INVALIDITY REASON
The Special Vote Process Leader can edit a declaration if the wrong person has been marked off or
the wrong declaration number or validity reason has been entered.
Step Instructions
In ERSA, from the top menu select
Special Votes - Edit Special Votes.
1
1982
Search for the vote, by either:
• surname and forenames of the voter
2
• declaration number
Act
• batch number.
Click
Search.
Once you have found the vote you wish to edit, in the
Edit column click on the
3
declaration number.
This will open the
Edit special vote dialog box.
Information
If the wrong person was marked off:
4
• click on
Delete Vote to remove the vote
• process the declaration for the correct person. See sectio
n 7.4.
If the wrong declaration number was entered, correct the declaration
number then click
Update.
Official
5
the
If the wrong invalidity reason was entered, click on
the reason(s) you want to add or remove and then
click
Update. under
6
Released
Chapter 28 – Special votes
41
link to page 45 link to page 45
10.4 REQUESTS FROM THE DUAL VOTES TEAM
During special vote processing, the dual votes team may need a special vote for an investigation. If
this happens, they will give you a copy of the M71-INVEST dual vote investigation form. Use these
instructions to find a special vote for the dual votes team.
Step
Instruction
Take the M71-INVEST and use the batch and declaration numbers on the form to find the
special vote, then:
1
• put the M71-INVEST in its place in the batch
1982
• write that the vote has been given to the dual votes team next to the name and
declaration number on the back of the batch header
• initial and date the note on the batch header.
Act
2
Give the special vote declaration and envelope to the Dual Vote Process Leaders.
Some special votes will be returned to you.
If the vote is returned to you with no special instructions:
• return the vote to its original batch
• return the M71-INVEST form to the Dual Vote Process Leaders
• cross out the note on the batch header and write “Returned”
• initial and date the amended note.
Information
If you are informed that the wrong person has been marked off:
3
• find the original batch
• return the M71-INVEST form to the Dual Vote Process Leaders
• in ERSA:
Official
o delete the vote (see section
10.3) o re-enter the declaration in a new batch and process normally
• cross out the note on the original batch header and write “Re-entered in batch
the
#####”
• initial and date the amended note
• return the original batch to its place in the process.
under
Released
42
Chapter 28 – Special votes
link to page 31 link to page 31 link to page 44 link to page 44 link to page 31 link to page 31 link to page 34 link to page 34 link to page 31 link to page 34 link to page 34 link to page 45
11 MONITORING PROGRESS
11.1 BATCH MANAGEMENT
To monitor progress, select
Special Votes -
Batch Management. From here you can:
• check batch types (see section
7.6) and statuses (see section
10.1)
• for each batch, see how many:
• declarations have been entered (see section
7.6)
• decisions have been received (see section
8.1)
1982
• stickers have been generated (see section
8.1)
• enter the “Batch Detail” screen for a batch by selecting the batch number. From here you
Act
can:
• print replacement batch headers (see section
7.6)
• enter “not on roll” information (see section
8.1)
• print qualification stickers (see section
8.1)
• delete a declaration from a batch so that it can be re-entered correctly (see section
10.3 for
how to do this using ‘Edit Special Votes’)
• identify declaration records.
Information
You cannot delete a special vote that is currently “With ROE for Decision”.
You will have to reprint the batch header if you delete a declaration from a batch before it has been
scanned and uploaded. You do not need to reprint “R” batch headers that have already been
uploaded, or “Q” batch headers. Simply note any changes on the header.
Official
11.2 REPORTS IN ERSA
the
11.2.1 Special Votes Progress Report
This report shows you how many batches or declarations you have started processing and what
stage of the process they are at. The report is split into two sections – batches and declarations,
under
which are broken down by process stage and batch type.
The totals show the number of declarations that have been entered into ERSA, not the number of
declarations you still have to process. That number is recorded in EMS. You will need to manually
check EMS.
If any batches or declarations have the status of “error” or “failed”, contact National Office. Cases
Released
where the status is “mismatch” will be resolved by National Office, you don't need to do anything.
Chapter 28 – Special votes
43
11.2.2 Disallowed Votes Report
This report summarises and lists all the disallowed special votes for your electorate. It will be used to
populate your final official count certificate. It shows the number and reason declarations have been
disallowed.
A
Not enrolled
B
Vote received late
C
Not signed by authorised witness
1982
D
Not signed by voter
E
No ground stated
Act
F
Dual votes
G
Post-Writ deletion
H
No declaration enclosed
I
No ballot paper enclosed
Information
A declaration can only appear in one category. If a declaration is disallowed for multiple reasons, it is
placed in the first category for which it is disallowed.
The report also shows the electorate where the vote was issued, the issuing point, declaration
number, and the reason for it being disallowed for each disallowed vote.
Official
11.2.3 Special Vote Report
the
This report provides the following information for each declaration entered into ERSA:
• electorate number
• electorate name
•
under
batch number
• declaration number
• date and time entered
• voter surname and forename(s).
National Office will advise if you need to run this report.
Released
44
Chapter 28 – Special votes