

Victim Video Statements (VVS)
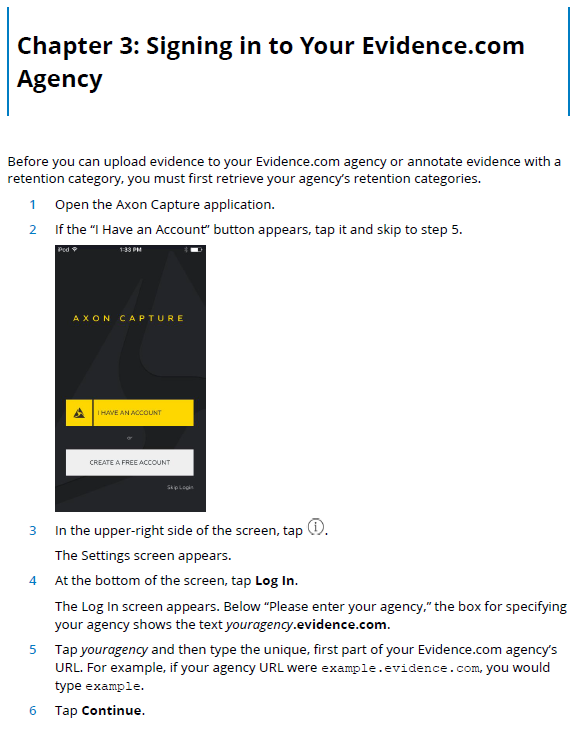
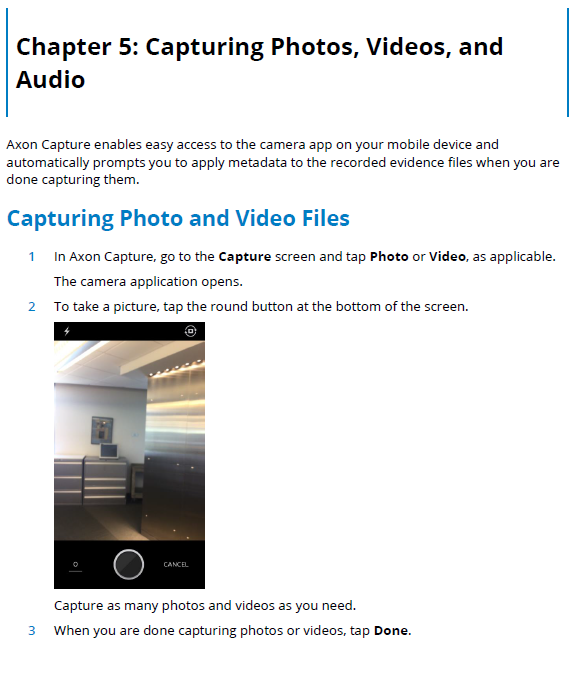
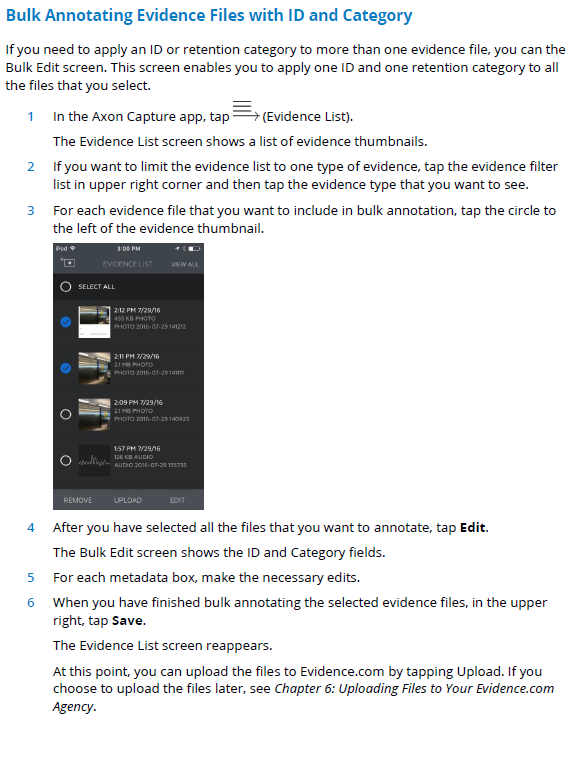
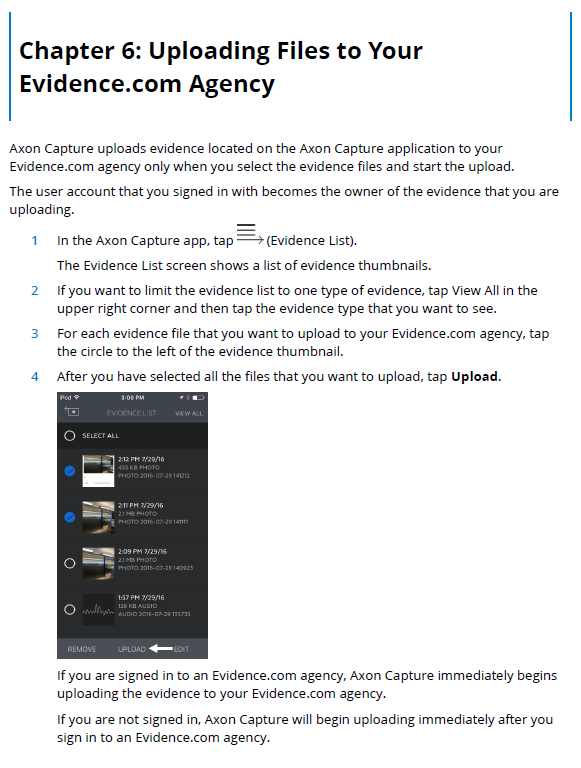
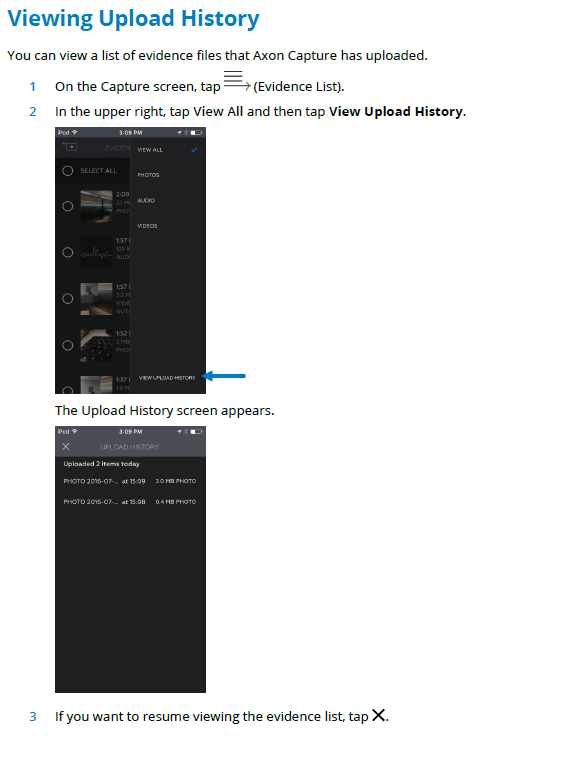
User Guide
Version 2.1 : March 2020
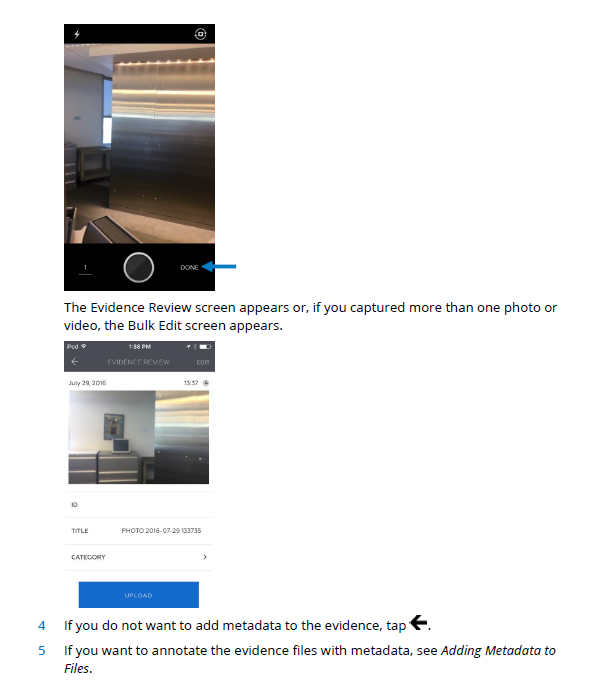
Document Owner: Bronwyn Marshal
Acting Superintendent
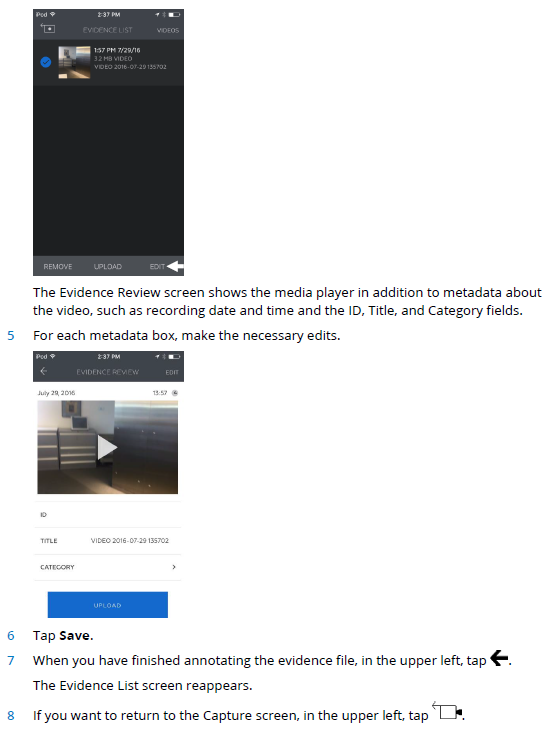
Business Owner: Safer Whanau
National Prevention Centre
Congratulations on completing your Victim Video Statement training. Please take
the opportunity to complete a family violence victim video statement wherever
you are able to. Overseas jurisdictions have shown that this statement-taking
method successfully supports prosecutions and makes things easier for victims to
tell us about what has happened. I hope you enjoy using the technology and
please give us feedback about how you are finding it.
Ma te wa
Acting Superintendent Bronwyn Marshall
Business Owner: Safer Whanau
© New Zealand Police
This document, or any portion of it, may not be reproduced or transmitted in any form or by any means, electronic or mechanical
(including photocopying, recording or by any information storage retrieval system), without the express written permission of the
New Zealand Police.
About this guide
Introduction
Welcome to the Victim Video Statement (VVS) User Guide. The purpose of
this guide is to complement the training you have received. It is designed to
better enable frontline officers responding to family violence episodes to be
able to legal y and appropriately record, upload and review interviews of
family violence victims using your iPhone and the AXON CAPTURE application.
Audience
This guide is intended for frontline users and their supervisors
Contact for
For further information about this guide or the training, please contact:
further
Acting Inspector Ross El wood, National VVS Lead
information
1 | P a g e V i c t i m V i d e o S t a t e m e n t U s e r G u i d e
Contents
In this guide
1. Section one: Getting started.
2. Section two: Legal Overview
o Section 106A
o Evidence Regulations
3. Section three: Business Rules
4. Section four: Resources
o Aide memoire
o Axon Capture
o Tripods
5. Section five: The Interview
o Pre-Interview
o The Interview
o Interview Closure
o A note on Investigative Interviewing
6. Section six: Post Interview Actions
o Photos
o Editing the metadata
o Upload
o Corroboration
o Determine whether to show the suspect the victim’s video
o Family Harm Policy and Procedure
7. Section seven: File and Data Management
o Provide defence lawyer access to the video
o Prepare video transcript for court
o Redact video for court
o Lodging evidence with the court
8. Section eight: Victim Management
o Victim Contacts
o Preparing your victim for court
o If the victim request review or deletion of video
o Inadmissible Statements
o Reluctant Victims
9. Section nine: Support
o Where to go for resources and assistance
Appendix 1: Key Evidence Regulations
Appendix 2: Axon Capture User Manual excerpts
Appendix 3: Preformatted Email to Defence Counsel
Appendix 4: Accessing Evidence in evidence.com
2 | P a g e V i c t i m V i d e o S t a t e m e n t U s e r G u i d e
Section one: Getting Started
Learning
The purpose of the VVS training package is to enable frontline officers
objectives
responding to family violence episodes to be able to legally and appropriately
record, upload and review interviews of family violence victims at the scene
using a police-issued iPhone and the evidence.com application.
At the end of the training constables will be able to:
• To carry out a victim centric video interview of the victim of a family
violence episode using the iPhone and the AXON CAPTURE application.
• To be able to upload the video onto evidence.com with the event number
referenced.
• To be able to access, view and share the video on evidence.com.
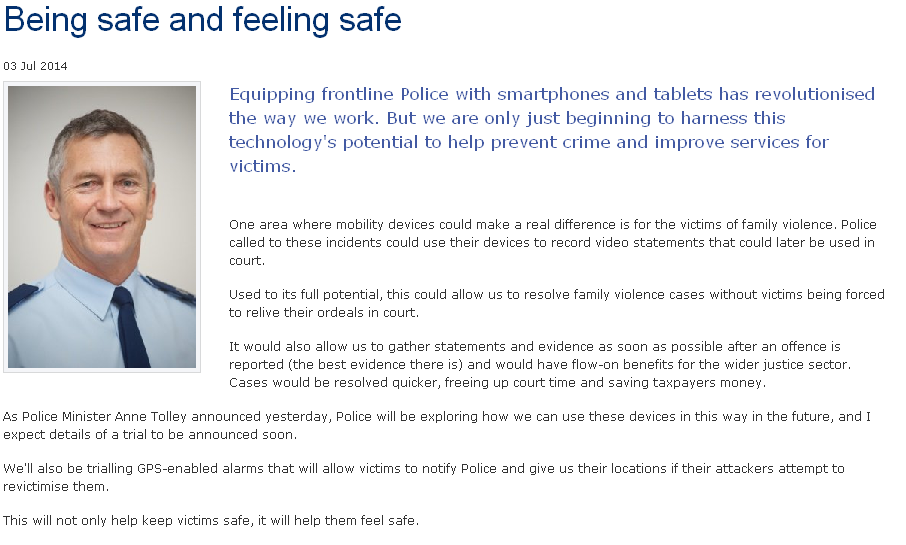
Why are we
Commissioner Bush – Bul etin Board 3 July 2014
doing this?
3 | P a g e V i c t i m V i d e o S t a t e m e n t U s e r G u i d e
Section two: Legal Overview
Introduction
For users to be able to conduct a robust Victim Video Statement, they must:
• Understand how legislation gives us the ability to apply to have videos
played in court.
• Understand the requirements of the Evidence Regulations and how they
relate to VVS interviews.
• Understand the challenges for Police Prosecutions Service.
• Understand how to be victim centred through the Police Prosecution
Process.
Victim Video Statements are an alternative way of giving evidence. This
means that victims may not have to give all of their evidence in court by giving
oral evidence (the normal way of giving evidence), but by having their Victim
Video Statement played as an alternative.
In this regard Victims Video Statements are similar Child Evidential Interviews,
and Level 3 interviews conducted with Adult sexual assault victims. These are
all “alternative ways” of giving evidence (as we seek to play an electronically
recorded interview in court instead of having the victim tell the whole story
again).
The key thing about alternative forms of giving evidence is that any interviews
have to be conducted in accordance with the Evidence Regulations 2007. The
following paragraphs discuss some key provisions in the Evidence Regulations.
Another point in relation to alternative ways of giving evidence is that Police
generally have to make an application to court to enable evidence to be given
in a different way. This is commonly known as a “Mode of Evidence”
application.
Victim Video Statements are different from other forms of alternative ways of
giving evidence. New law introduced in late 2018 means that Victims of
Family Harm offences are entitled to have any Victim Video Statement played
in court with Police having to make an application to have it played.
Section 106A
Section 106A of the Evidence Act 2006 came into law on 3 December 2018,
and provides an entitlement for the Victim to have a Victim Video Statement
made by them played in court as their evidence:
1) This section applies to a complainant who is not a child and
who is to give or is giving evidence in a family violence case.
2) A family violence complainant is entitled to give his or her
evidence in chief by a video record made before the hearing.
3) The video record must be one recorded—
(a) by a Police employee; and
(b) no later than 2 weeks after the incident in which it is
alleged a family violence offence occurred.
4 | P a g e V i c t i m V i d e o S t a t e m e n t U s e r G u i d e
link to page 9
Therefore, in order to be able to play a Victim Video Statement in court as the
Victim’s evidence:
1. The victim must be 18 years or over
2. The video statement must be recorded by a Police employee
3. The video statement must be recorded within 2 weeks of the offence.
Evidence
Victim Video Statements must be recorded and dealt with in compliance with
Regulations
the Evidence Regulations 2007
1. Non-compliance with the Regulations could
2007
mean that your Victim Video Statement will not be able to be played in court.
Your Victim will therefore not be afforded the protection and benefits of
having the video played.
If in doubt about whether or not your VVS can be played, please discuss with
your local VVS team or with your local PPS team for further advice.
Some key points to note in relation to the Evidence Regulations:
Part 1, Subpart 1 – Recording Video Evidence:
1. Only certain people can be present in the interview (Regulation 5)
a. The interviewer.
b. The Victim / witness.
c. Any person
needed to operate the recording equipment.
d. A support person.
e. An interpreter.
2. Support Persons must not take part in the interview (Regulation 6)
3. Certain things must be recorded (Regulation 8):
a. The interviewer stating the start date and time (8(a))
b. Each person identifying himself or herself (8(b))
c. The Victim making a promise to tell the truth (8(c))
d. The interviewer stating the time at which the interview finishes
(8(h)).
4. If using an interpreter, the interpreter must
promise to accurately and
completely translate the words of the witness (8(e)).
5. Support persons and interpreters must be clearly visible throughout the
video recording of the interview.
There are other Regulations dealing with what should take place in the event
of equipment failure or a break in the interview. A more comprehensive
summary of the Evidence Regulations is included at
Appendix 1.
1 Evidence Act 2006, section 106(2)
5 | P a g e V i c t i m V i d e o S t a t e m e n t U s e r G u i d e
Part 4 - Mobile Video Record Evidence
This part of the Regulations was enacted in January 2017, and provides us
with the legal foundation for recording Victim Video Statements. Key
Regulations to note from this part include:
1. Victim Video Statements are referred to as Mobile Video Records (MVR’s).
MVR’s must concern an allegation of domestic violence (Regulation 54).
2. Domestic Violence has the meaning given to it by section 3 of the
Domestic Violence Act, but
excludes sexual abuse (Regulation 53).
3. Every MVR must include statements from the Victim that:
a. They are aware that the MVR may be used as evidence in Court.
b. They agree to the use of the MVR for that purpose.
4. Police must,
as soon as practicable after the MVR is made, digital y
transfer the MVR directly to the cloud storage facility (Regulation 55). In
essence, we must upload to evidence.com as soon as practicable, ideally
no later than end of shift.
Aide Memoire
There are a lot of Regulations governing the recording and dealing with Victim
Video Statements. The Regulations outlined above are just a few of the key
ones impacting on Victim Video Statements.
An Aide Memoire has been developed to assist in taking Victim Video
Statements. This means that VVS users are not required to memorise al of
the Evidence Regulations.
Using and fol owing the Aide Memoire is your best way of ensuring
compliance with the Evidence Regulations, and ensuring that we can play the
statement in Court for the Victim.
6 | P a g e V i c t i m V i d e o S t a t e m e n t U s e r G u i d e
Section three: Business Rules
Determining
1. Consider whether the offence is suitable for a video interview. The
whether a video
offence must meet the fol owing criteria:
statement
a. It must relate to Family Harm offending (we must be able to
should be
establish a domestic relationship).
offered.
b. The offending cannot be sexual in nature (Victim Video
Statements can relate to physical and psychological abuse only).
c. It is a recent event that has taken place within the last two weeks
(refer section 106A of the Evidence Act 2006).
d. It should be a single event, not part of a multiple and/or historic
set of episodes. The intention is that videos will record single
events. Please use your discretion and common sense. For
example, if you have two distinct events within a last two week
period, it makes sense to record details of both events in a single
Victim Video Statement.
2. Consider whether the victim is in a fit state for an interview:
a. The victim should not have injuries requiring immediate medical
attention i.e. bleeding, internal damage. Consider fol owing up
with the Victim at hospital. It is acceptable and appropriate to
interview victims in hospital if circumstances dictate this.
b. The victim is not drunk or emotional y unfit. This is a matter of the
Victim being able to understand and give informed consent to
complete an interview. Again, common sense should be applied –
just because a victim has had a few drinks or is upset about what
has occurred does not mean that they cannot take part in an
interview.
3. Consider your own safety in taking a video interview.
4. Consider the interference from your radio on the video if you do not have
an earpiece and your phone won’t be receiving cal s for the duration of
the interview.
5. Check that English is the victim’s first language and if not discuss with
your supervisor if it is appropriate to continue.
6. Check that the victim is over 18.
7. Note that the suspect must be removed or absent from the scene prior to
video being taken.
8. If the conditions are not appropriate to conduct the video interview,
capture a written statement instead.
7 | P a g e V i c t i m V i d e o S t a t e m e n t U s e r G u i d e
Section four: Resources
Introduction
In order to complete a Victim Video Statement with a family harm victim, you
need three key things:
1. An Aide memoire
2. The Axon Capture application loaded to your Police-issued iPhone.
3. A tripod.
Aide Memoire
As outlined in the previous chapter, the Aide Memoire has been developed to
assist in taking Victim Video Statements. Following the Aide Memoire is the
best way of ensuring compliance with the Evidence Regulations, and ensuring
that we can play the statement in Court for the Victim.
The Aide Memoire has been structured to make it as logical and easy to fol ow
as possible. Anything printed in blue in the Aide Memoire has been scripted
for you in order to ensure compliance with the Evidence Regulations.
A more detailed discussion on the Aide Memoire and how to use it in an
interview is provided in the next chapter.
8 | P a g e V i c t i m V i d e o S t a t e m e n t U s e r G u i d e
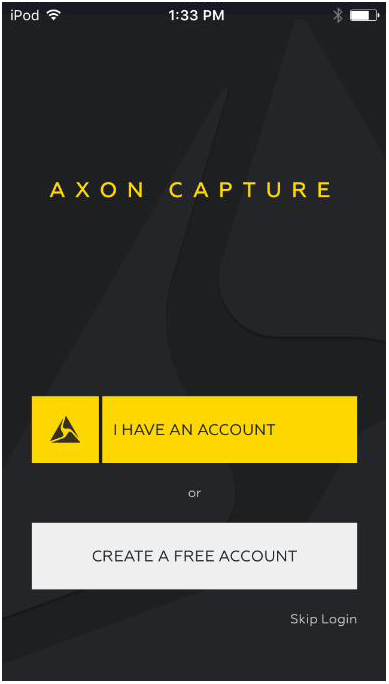
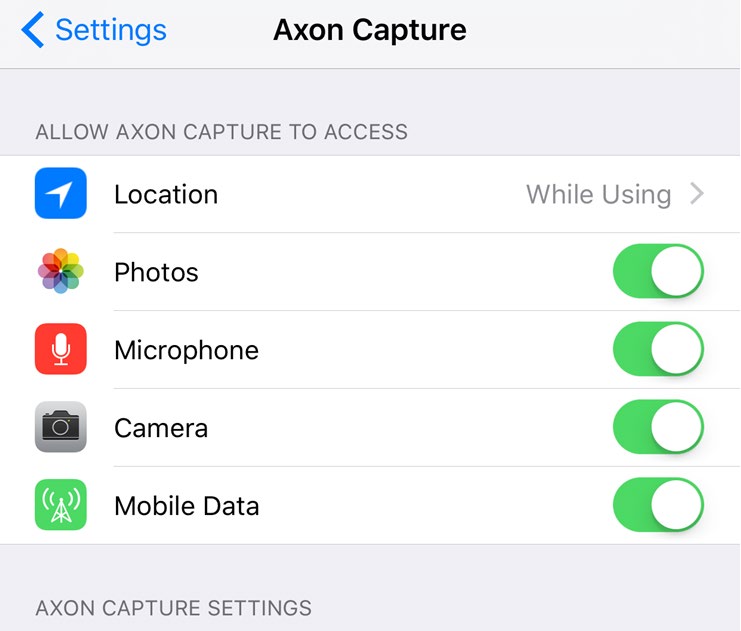
Axon Capture
• Axon Capture is the technical solution for
capture and storage of evidential
videos
and
photos
• This is the same company used by Police
for capture and storage of Taser video.
• With VVS, this will be via an Application on
your iPhone.
• Axon Capture is secure from capture to
upload, storage and retrieval.
• Role based access with managed expiry -
frontline, administration view all and
administration.
• An audit trail captures all actions.
Key Points:
1.
ID = Event Number. It is important to enter this correctly to enable
tracking and auditing of files.
2.
Category = Important to get this right as well. (eg. Uncategorised videos
and training videos are deleted after 90 days)
3.
Photos: Can be imported into Axon Capture from phone
4.
Video: Must be taken using Axon Capture.
Note:
You can bulk categorise and upload videos. This means that when you have
multiple items store in Axon Capture on your phone relating to the same
event (eg: a video interview and a series of photographs), you can enter the
event number for al items once, categorise all items at once, and upload all
items together.
Further information on logging on to Axon and use of the app can be found in
Appendix 2: Axon Capture User Manual Excerpts.
Tripods
Tripods are an important tool to use to conduct a professional looking
interview. Having a tripod means that you will be able to conduct an interview
without any “camera shake”, and you wil not need another Police member
present to hold your phone.
You should have received a tripod as part of your training. For replacements,
please contact your District VVS lead.
9 | P a g e V i c t i m V i d e o S t a t e m e n t U s e r G u i d e
Section five: The Interview
Introduction
Now that you have been introduced to the law and the resources available to
conduct an interview, it is time to look at how you will practically apply all of
this in an actual interview.
This section starts at the point you are at a Family Harm event. You have met
with the Victim, and the Victim has disclosed criminal offending in a Family
Harm context. You have received an overview from the Victim about what has
taken place, the Victim and has agreed to make a statement to you, and you
have determined that the VVS Business Rules are met.
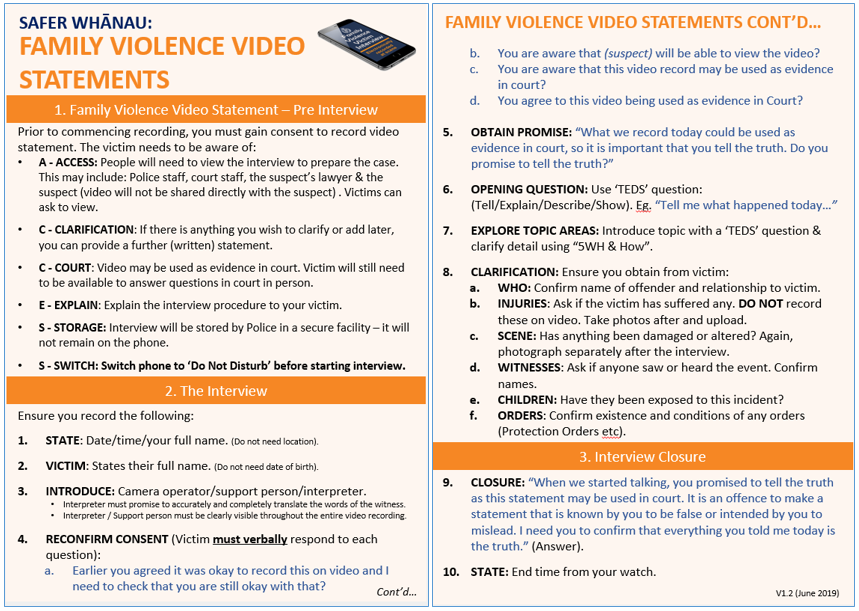
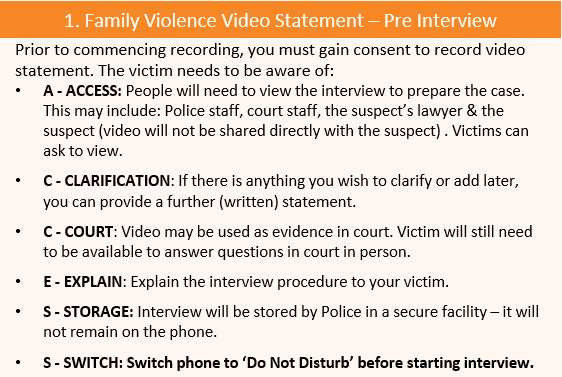
Pre-Interview:
1. Offer the option of a video interview to the victim. Explain to the victim
the reason for taking a video (a quicker and simpler way of recording the
Victim’s statement, and the fact that we may be able to use the VVS in
court as the victim’s evidence), how it may be used and who may view it
(follow the Aide Memoire):
• ACCESS
• CLARIFICATION
• COURT
2. Also explain that the interview will not remain on your iPhone. The
interview will be uploaded to a secure server or facility:
• STORAGE
3. If the Victim does not consent to completing a VVS, complete a written
statement and fol ow standard process. Please record in your Family
Harm report that a video statement was offered and declined, along with
the reason for declining if known.
This will be used for evaluation
purposes.
10 | P a g e V i c t i m V i d e o S t a t e m e n t U s e r G u i d e
4. If the Victim agrees to complete a Victim Video Statement, consider the
following matters when setting up your interview:
a)
Illumination: Consider lighting. Bright lights and windows in the
background can badly impact on video quality.
b)
Distance: Distance between the recording device and the victim
should be no more than 2 metres. The closer your phone is, the
better the sound quality.
c)
Distractions: Minimise noise distractions and consider
background noise/outside noise e.g. turn off household
appliances, if children to play quietly in another room if
appropriate.
d)
Introduce: Al parties must be introduced and remain on camera
for entire interview. Exception is camera operator, who can be
introduced by interviewer
e)
Orientation: The phone must be ‘landscape’, with home-button
to the right, and volume buttons facing down
f)
Tripod: There must be a suitable place to set up the phone. The
phone must be stable and ideal y not hand-held
Mnemonic = “IDDIOT”
5.
EXPLAIN the process to your Victim:
a)
Process: Explain the process that you wil fol ow and the structure
of your interview. Refer to the Aide Memoire.
b)
Require Verbal Responses: Explain that you require verbal
responses (ie. “yes”) to each of the initial questions you ask.
c)
Open-ended question: Explain that you will ask an open-ended
question like, “Tell what happened”, and that this is their prompt
to tel their story from the start in their own words.
d)
Questions: Explain that once they have given their initial account,
you wil focus on some parts of the account, and ask a few
questions to obtain a bit more detail.
e)
Further points to consider:
• If you intend taking notes (recommended), explain that you
will do so, but will be listening to what they are saying
• Explain that at the end of the interview you will confirm with
them that everything they have said is the truth.
Mnemonic = “IDDIOT PROQF”
6.
SWITCH the phone to
Do Not Disturb so that you won’t be interrupted by
incoming cal s during the interview:
a) You will need to ensure the settings for “Do Not Disturb” are
correctly configured so that you do not actual y receive any calls
during the interview.
11 | P a g e V i c t i m V i d e o S t a t e m e n t U s e r G u i d e

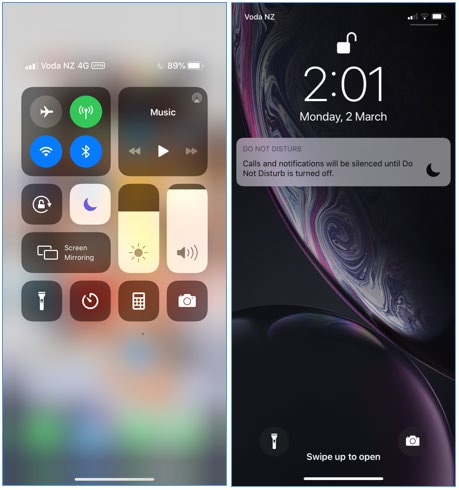
b) Go to Settings
c) Select “Do Not Disturb”, and ensure your settigns are the same as
shown below.
d) Select “Do Not Disturb” from the shortcut screen:
12 | P a g e V i c t i m V i d e o S t a t e m e n t U s e r G u i d e

7. It is also recommended that you check that the phone is ready to record:
a.
Voice settings. Check that the phone microphone isn’t on mute:
b. Check that the
battery life of the phone is more than 50% and
that you have the backup battery pack with you.
c. Check the
storage capacity on the phone (it is not recommended
that you have more than two interviews of 5-10 mins in length on
a phone at once).
The Interview:
13 | P a g e V i c t i m V i d e o S t a t e m e n t U s e r G u i d e
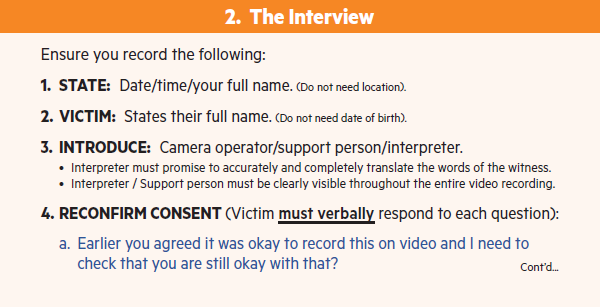
Record the victim’s statement on video (refer Aide Memoire):
1. State the date and time, and introduce yourself by ful name. You do not
need to state the location of the interview, and it is recommended that
you do not. Location information is often personal or sensitive, does not
add any valuable information, is not legally required for the interview, and
will generally need to be redacted out.
2. Ask the victim to state their ful name.
3. If you have a “camera operator”, remember to introduce them. Ask
anyone else present for the interview to introduce themselves.
Remember:
a) If you have an interpreter, they must promise to accurately and
completely translate the words of the victim (Regulation 8(e)).
b) Interpreters and Support Persons must be clearly visible
throughout the entire video recording (Regulations 11 & 12)
c) Your support person is there as support only. They cannot answer
questions on behalf of the Victim. The support person should be
briefed on this point ahead of the interview.
4. Reconfirm consent. Ask the Victim each of the four consent questions
listed in the Aide memoire. Pause between each question and ensure you
get a positive verbal response to each question.
5. Obtain a promise to tell the truth from the victim by reading the scripted
question from the Aide memoire. This also requires a verbal response.
6. Ask your victim a simple open-ended question to start them on their free
recall. It is recommended that you take brief notes in your notebook as
you go. These notes serve to prompt you to identify topic areas.
7. Once the Victim has completed their initial free recall, explore identified
topic areas. Start each topic area with another open-ended question, and
clarify using “5WH and How” questions.
Remember to explore any other “investigatively important” topics:
a) Matters raised by the victim before the interview, but not covered
during the interview,
b) Any other matters known to you as the interviewer, but not raised by
the Victim.
8. After you have asked questions about your identified topic areas, move to
the Clarification section of your Aide Memoire. You are strongly advised
to ask questions on all of the points listed in this section. You wil ensure a
thorough interview and consideration of key area of evidence. You may
also be surprised at the answers you wil get:
a)
WHO: It is vital from an evidential perspective that we confirm
the identity of the offender. Identity is the first element we must
prove for any criminal charge. We must also establish the
relationship between the Victim and Offender, as there must be a
domestic relationship (Regulation 53)
14 | P a g e V i c t i m V i d e o S t a t e m e n t U s e r G u i d e
b)
INJURIES: Ask about any injuries the Victim has suffered as a
result of the offending.
c)
SCENE: As about any changes or damage to the scene.
d)
WITNESSES: Ask whether anyone else was present. Could anyone
have seen or heard what went on?
e)
CHILDREN: Ask about children. How many children do they have?
What are their ages? Where were they when the offending took
place? These questions are around exposure of children to family
harm.
f)
ORDERS: Ask about any orders that are in existence, particularly
in Breach of Protection Order matters. Confirmation of the order
provides good context to the interview.
At this point you should have covered all of the key parts of the interview
and be ready to close. Before closing the interview, it is good practice to
check with the Victim about how the offending made them feel. The
responses to these questions often provide important information around
the impact of the offending, which will assist with the Victim Impact
Statement. They can also make the video powerful in an emotional
context, lending credibility to the Victim statement, and hopeful y
showing the offender (when he or she gets the opportunity to view) the
full impact of his actions.
Interview
Closure
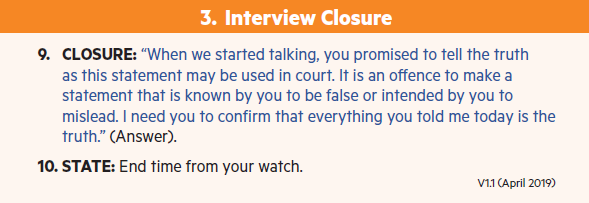
1. Close your interview by reading the closing statement at the end of the
aide memoire. It is not a legal requirement to read this, but it will make
your interview much more robust in the event of any later legal
arguments (such as a hostile witness application). It is always much
stronger when the Victim has made a promise to tell the truth at the start
of the interview, and then confirms at the end that everything they have
said is the truth. It makes it very difficult for a victim to later recant.
2. State the end time from your watch.
15 | P a g e V i c t i m V i d e o S t a t e m e n t U s e r G u i d e
Note:
If you forget to read the closing statement, you can do one of two things:
1. If only a short time has elapsed, start a fresh video and pick up from
where you left off. Explain that you have commenced another recording
as you forgot to cover off the closing statement. Then run through the
closure statement. DO NOT repeat the full interview.
2. Write out the closure statement in your notebook and have your Victim
sign it. Consider how long it has been since you finished the interview,
and whether you need to play back the interview to the Victim to refresh
their memory. If you do play the interview back, record the fact of this in
your notebook as well.
Further tips and advice:
1. You may have occasion during your interview to take a break. This could
be to take some advice, or it could be at the request of your victim.
Regulation 9 provides that you can decide to take a break. If you do, you
must state the fol owing things:
a. The fact a break is being taken,
b. The estimated duration of the break,
c. The reason for taking it.
If your break is a short one, start a fresh video, and recommence your
video approximately at the point you took the break. There is no need to
cover off the consent questions again, although best practice would be to
remind the victim of their earlier promise to tell the truth.
If the break is for anything longer than ten minutes, re-confirm consent
(ask if they agree to continue to carry on with the interview), and obtain
another promise to tell the truth.
A note on
You will recall from previous training that Investigative Interviewing provides
Investigative
a process for us all to conduct complete and robust interviews for all victims,
Interviewing
witnesses and suspects.
P E A C E
INTERVIEW
Preparation
Engage
Account
and
and
Clarification and
Closure
Evaluation
Planning
Explain
Chal enge
16 | P a g e V i c t i m V i d e o S t a t e m e n t U s e r G u i d e
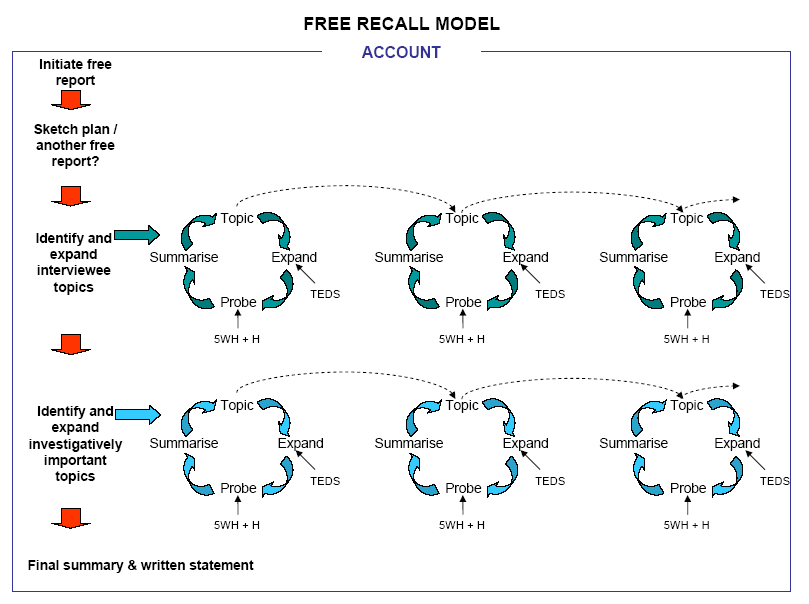
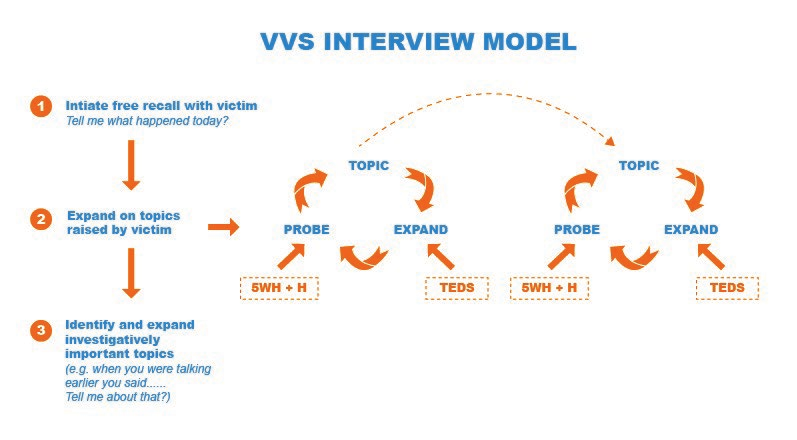
The original “Free Recall Model” (shown above), is the one we have been
trained to use when interviewing cooperative victims and witnesses. It is
modelled on the assumption that you will first interview your victim or
witness in order to gather complete and accurate information and ensure
understanding, before committing that interview to a written statement on
behalf of the witness.
In the Victim Video Statement process, this process is modified slightly, as
there is no requirement to complete the final written statement:
Obtaining an account from your Victim (ie. getting the body of your interview)
is essentially a three-step process:
1. Initiating a free recall with your Victim
2. Expanding on topic areas raised by the Victim
3. Identifying and expanding on Investigatively Important Topic Areas
17 | P a g e V i c t i m V i d e o S t a t e m e n t U s e r G u i d e
Initiating a free recall:
This is when you ask the open-ended question at Point 6 of the Aide Memoire.
The important part here is to give the Victim the opportunity to give an
uninterrupted account of what has taken place.
It is recommended that you take brief notes, simply to identify topic areas for
later questioning and clarification.
Expanding on topic areas
Topic areas will typically include matters like:
1. Physical actions of the offender
2. Weapons
3. Injuries
4. Damage to property
5. Witnesses
6. Children, etc etc
These should be explored by asking an open-ended questions to introduce the
topic area, and then probing for detail using “5WH and How” questions. For
example,
“You mentioned that he punched you in the head. Tell me about that”:
•
How many times did he punch you?
•
What level of force did he use? (Scale of 1-10)
•
Where exactly did the punches land?
•
What injuries did you get as a result?
Investigatively Important Topic Areas:
Identifying and expanding investigatively important topics will generally fall
into one of two areas:
1. Matters raised by the victim during the pre-interview, but not mentioned
again during the video interview. These topic areas can be introduced by
simply asking, “
Earlier you mentioned [XYZ]…. Tell me about that”
2. Matters not mentioned at all by the Victim, but are of relevance to the
investigation. An example of this could be a witness you have spoken to,
who raises something not mentioned by the Victim. Another example
could be damage to the scene not mentioned by the witness. These topic
areas can be introduced by simply asking questions like:
“
We have spoken with a witness, who mentioned…. Tell me what you
know about that”
“My partner has observed that there is damage to…. Tell me what you
know about that”
18 | P a g e V i c t i m V i d e o S t a t e m e n t U s e r G u i d e
Summarising:
The requirement to summarise has been removed from the original
Investigative Interviewing process. This is because the statement is being
electronically recorded, and it is the words of the witness that are evidential
when the interview is played in Court.
However, summarising may be appropriate in some cases, particularly when
you have an unclear narrative from your Victim. If you are struggling to
understand clearly what has taken case, summarising wil give the victim a
chance to clarify and confirm understand.
19 | P a g e V i c t i m V i d e o S t a t e m e n t U s e r G u i d e
Section six: Post-Interview Actions
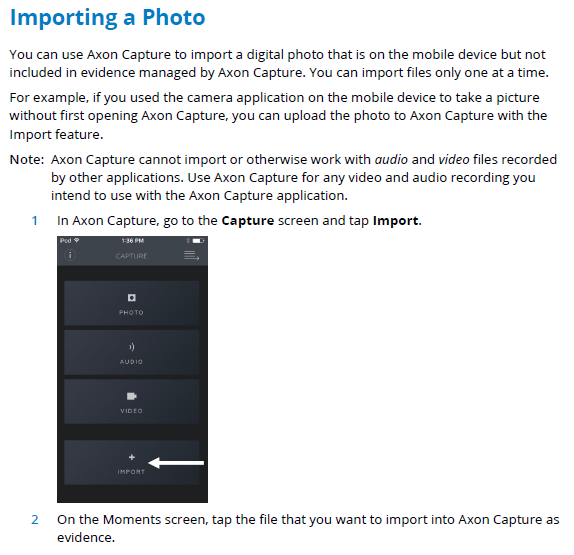
Photos
Photos are a powerful way to corroborate a Victim Video Statement.
Photos can be taken directly in Axon Capture and uploaded to evidence.com.
The limitation in this approach is that the photos are then automatically
deleted from your phone and printing copies for your prosecution file can be
difficult.
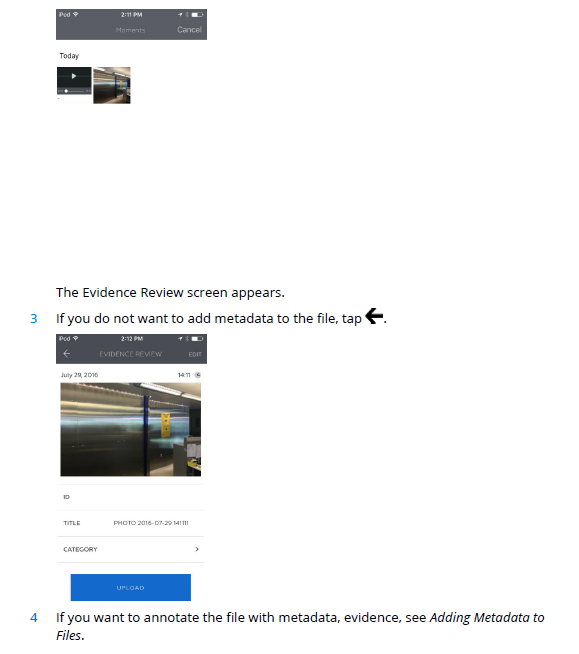
Photos can be imported into Axon Capture using the “IMPORT” function in the
application.
Recommendation:
It is recommended that you take photos using the standard camera function
on your phone. Import into Axon a few key photos that best corroborate the
Victim’s account. Photographs of injuries, weapons and damage to a scene
are ideal.
These few photos can be uploaded to evidence.com to support the video.
All photos stored on your iPhone can then be dealt with as per standard
practice in your District.
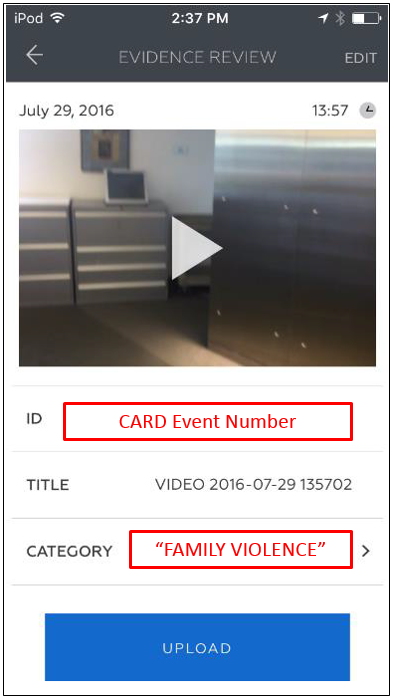
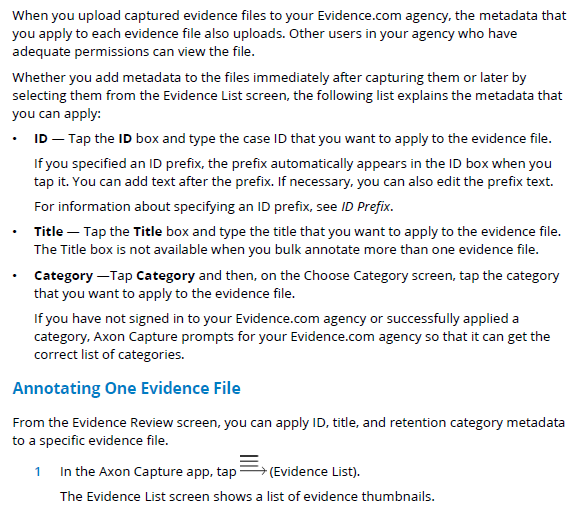
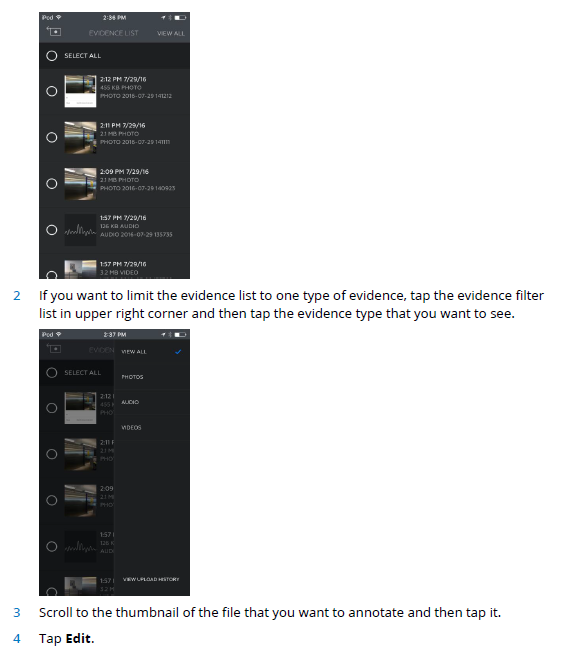
Editing the
1. Once you have completed your interview it is important to edit the
Metadata
metadata attached to the video and any associated photos in Axon
Capture:
a. Enter the
CARD event
number into the ID field. It
is important that this is
accurate, as locating the
evidence in evidence.com is
normal y done by a search
of the event number.
b. Categorise your video as
“
FAMILY VIOLENCE”. This is
also important, as this wil
change the retention period
for the video. (Recall:
uncategorised videos are
deleted after 90 days)
c.
Do not alter or edit the
video title. This is
essentially a unique number
created by AXON and
assigned to the video
20 | P a g e V i c t i m V i d e o S t a t e m e n t U s e r G u i d e
Note:
Further instruction on how to edit the metadata, including the bulk editing of
multiple pieces of evidence (eg when you have video and photos) is contained
in
Appendix 2: Axon Capture User Manual Excerpts.
Upload
Upload of your Victim Video Statement must be completed by end of shift.
The Evidence Regulations require us to upload videos as soon as practicable.
Upload can be done in one of two ways:
1. Using your iPhone’s 3G/4g connection. This will use some of your
al ocated data, but advice from our ICT team is that it should have no
significant impact on your total data al owance.
2. Return to the muster room as soon as possible to upload the video via a
wifi connection (if available).
Note:
1. Videos
must be uploaded before the end of your shift.
2. Part-recorded videos
must also be saved and uploaded to evidence.com.
Once captured the video must be retained and stored.
3. It is
strongly recommended that you upload your video / photos to
evidence.com prior to leaving the scene. This is the best way to ensure
compliance with the Evidence Regulations.
Corroboration
Note that you stil need to col ect al evidence as you would normal y do.
Corroborating evidence is still essential – remember the “Best Evidence” rule.
Matters to consider should include:
1. Document your own observations in a formal written statement. This
should include noting:
a. Any observations of the scene.
b. Any observations of the victim and / or suspect, including
spontaneous comments, demeanour and apparent injuries.
c. Descriptions of any photographs you have taken, including what you
have observed (often injuries are not immediately apparent in
photos taken using iPhones, particularly at night or in low-light
situations).
2. Photographs at the time of injuries, scene and weapons.
3. Referral to photography section for fol ow-up photos with the Victim.
Remember, bruising wil evolve over time, and photography section will
take better quality photographs for you.
4. Witness statements.
5. Obtain copies of any 111 calls made to Police.
6. Complete an Area Canvass.
21 | P a g e V i c t i m V i d e o S t a t e m e n t U s e r G u i d e
7. Obtain medical evidence.
8. Consider obtaining Telco data.
The above list is not exhaustive, and there may be other avenues of enquiry
relevant to individual Family Harm episodes.
Determine
1. Showing parts of the video to the suspect should only be considered in
whether to show
exceptional circumstances. This should be done only when you believe it
suspect the
is essential to obtaining a guilty plea, and when the victim is not in danger
victim’s video
of retaliation. Carefully consider the consequences of showing parts or all
of the video to the suspect. The victim’s safety must be paramount.
2. If you wish to show all or part of the video to the suspect,
seek your
supervisor’s approval.
3. If your supervisor approves, show the suspect the parts of the video you
need to. Scene photos can be shown to the suspect, per current standard
practice.
4. If the video is shown to the suspect by Police,
advise the victim. Make
sure they have support in place. The victim will be aware from the outset
that the suspect will have the right to view the video and review any
transcript via their defence lawyer, but will not be provided with access to
the video statement directly by Police.
Family Harm
It is worth noting the fol owing excerpt from the Family Harm Policy and
Policy and
Procedures Chapter in Police Instructions:
Procedures
Deciding whether to arrest
Arrest if sufficient evidence of offending
As with all other offending, determine whether:
•
there is sufficient evidence of an offence to arrest, and
•
the tests for prosecution in th
e Solicitor-General's Prosecution Guidelines
would be met (See
Prosecution in the ‘Prosecution or case disposition’
section of this chapter for more information).
If there is sufficient evidence of an offence, suspects responsible for family
violence related offences or breaches of protection orders should,
except in
exceptional circumstances, be arrested. Protection orders continue to be
effective until discharged by a court. Where there has been an historical breach,
action should stil be taken.
Where offending is disclosed and actions other than arrest are contemplated,
you
must consult your supervisor before proceeding. It is advisable to also consult
with the Family Violence Coordinator/Family Harm Specialist who may have
relevant information known through multi-agency tables.
22 | P a g e V i c t i m V i d e o S t a t e m e n t U s e r G u i d e
link to page 27 link to page 27
Section seven: File and Data Management
Provide defence Disclosure of Victim Video Statements
must be managed via evidence.com.
lawyer access
Under no circumstances should interviews be downloaded and burned to disc
to video
for disclosure, unless directed to do so by the Court.
The process to share Victim Video Statements with Defence Counsel will vary
from District to District, depending on local practice and team structures. The
ability to share with external parties is restricted to Administrative users of
evidence.com, and frontline staff are therefore not able to share directly with
Defence Counsel.
If unsure of your local practice, please contact your local VVS team for
guidance.
The workgroup responsible for managing access for Defence Counsel should
take the following steps when sharing with Defence:
1. Receive disclosure request from defence lawyer.
2. Confirm correct email address for the defence lawyer (see note below re
generic email addresses).
3. Check that the video has been assessed for pre-disclosure redactions, and
that any required redactions have been completed.
4. If the video has been assessed and had any necessary redactions
completed, create
view-only access for the lawyer. The default period for
access is 90 days. This can be edited as required
2.
5. Once you have shared the interview with Defence Counsel, evidence.com
will send an automated email to the lawyer to advise them of this. You
should send a fol ow-up email to the lawyer, confirming that the interview
has been shared, and providing instructions on how to create an account
in my.au.evidence.com. (Use the email template provided in
Appendix 3).
Note:
1. Videos
must not be shared with evidence.com accounts linked to generic
email accounts (ie. Email accounts shared and accessed by multiple
users). Examples of such accounts include:
a.
[email address]
b.
[email address]
2. Police should not share with generic accounts, as we will then not be able
to meet the reporting requirements under the Evidence Regulations, and
ensure that the privacy considerations for the Victim are met. This was
confirmed in the District Court in
Police v Nielson3.
2 For further on the technical aspects of completing redactions, please refer to the Axon Capture User Guide
3 NZP v Richard John Nielsen, [2019] NZDC 7173
23 | P a g e V i c t i m V i d e o S t a t e m e n t U s e r G u i d e
link to page 28
3. If you suspect that a lawyer is asking you to share to a generic email
address, please confirm that the account to which you are sharing the
video is accessed exclusively by that lawyer.
4. For a more comprehensive overview on Disclosure, please refer to the
VVS Disclosure Guide.
Prepare video
Transcripts are required to be completed as soon as practicable after the
transcript for
Defendant has pleaded not-guilty
4. The fol owing process should be fol owed:
court
1. Defendant enters not-guilty plea.
2. Transcript request generated and approved.
3. Transcript Request emailed to typing service.
4. VVS record checked in NIA to ensure that any required pre-disclosure
redactions have been completed.
5. Share the VVS with typing service.
NOTE: if redactions have been
completed, the redacted version must be the one shared.
6. On receipt of the transcript;
a. Transcript to be checked for accuracy.
b. Disclose as appropriate to Defence Counsel
c. Attach a copy in NIA at Case Level. This will ensure that the
prosecutor has access to the transcript if required for any court
hearings.
Redact video for 1. Once redactions have been agreed with Defence, mark up a copy of the
court
transcript with the intended redactions.
2. Scan and email a copy of the marked-up transcript to your local forensic
imaging office, and request that the redaction are completed.
3. Once redactions have been completed, you wil receive advice of this from
your forensic imaging office.
4. Arrange to share the redacted copy with Defence Counsel.
5. Make redactions as required.
Lodging
All videos are played in Court by sharing a link to the Court. This wil be
evidence with
accessed by the Court Registrar and played as evidence-in-chief. The following
the court
process should be fol owed:
1. Identify that a Victim Video Statement is required to be played in Court as
part of a hearing (Bail Hearing, Pre-trial, Trial, JAT).
2. Check that the video has been “tagged” with the Defendant’s name and
PRN (eg,
John Smith PRN 12345678).
4 Evidence Regulations 2007, Regulation 28.
24 | P a g e V i c t i m V i d e o S t a t e m e n t U s e r G u i d e
3. Confirm with Court the registrar who wil be sitting in Court.
4. Share the video with the Registrar. It is recommended that access is
provided for a limited time only. This will ensure that only limited videos
appear on screen for a Registrar at any given time, meaning that
navigation of evidence and identification of correct evidence is simpler.
Note:
Training has been provided to Court Registrars on how to set up their own
accounts in my.au.evidence.com. A one page guide has been prepared to
assist Registrars to log-on and locate evidence. A copy of this is included in
this guide at
Appendix 4: Accessing Evdience in evidence.com.
25 | P a g e V i c t i m V i d e o S t a t e m e n t U s e r G u i d e
Section eight: Victim Management
Victim Contacts Victim contact is a vital part of managing your file through the prosecution
process and achieving a good outcome. You are encouraged to stay in contact
with your victim throughout and update them on any significant
developments.
One of the biggest issues faced by officer’s in charge of Family harm
prosecutions are reluctant victims, unwil ing to attend court. This problem can
be compounded when the victim’s anxiety levels are elevated due to not
knowing what is happening with the case.
Please stay in touch with your victim, and record al contacts in NIA.
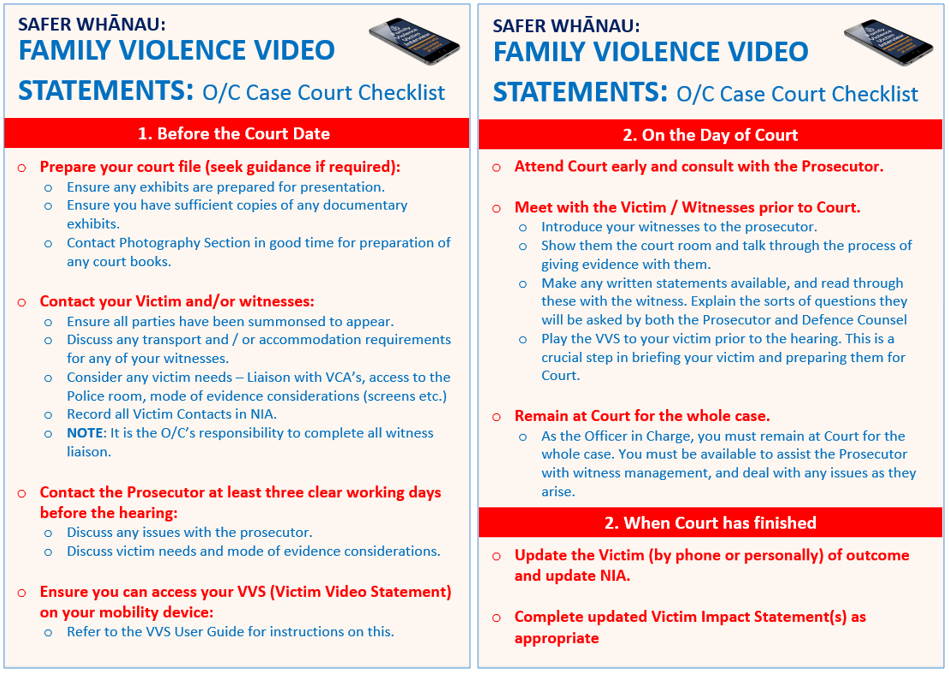
Preparing your
Victim for Court
The checklist above has been prepared to help officers in charge of
prosecution matters manage their obligations when preparing and attending
court.
In preparing and briefing your Victim on the morning of court, an essential
part of the process is to show the Victim their Victim Video Statement. This is
most easily done using your Police-issue iPhone by taking the fol owing steps:
1. Ensure you have access to the interview in evidence.com. If you were not
the interviewer, you will need the interviewer to share the interview with
you. Alternatively, contact your local VVS team, and they can organise
access for you.
2. Open Safari on your Police iPhone.
3. In the search / address bar at the top of the screen, enter
26 | P a g e V i c t i m V i d e o S t a t e m e n t U s e r G u i d e

4. Once the evidence.com home screen is open, you wil be able to log in
using your normal log-in. You may be prompted for multi-factor
authentication. You will need to retrieve and enter the six digit code that
will be emailed to you.
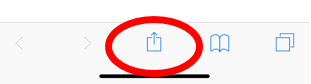
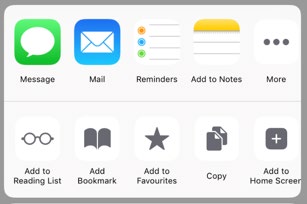
5. For future ease of access, you can add a shortcut to evidence.com to the
home screen on your phone. Tap on the share icon at the bottom of the
screen:
6. Tap the “Add to Home Screen” icon, and then tap “Add”:
You should now have a shortcut on your home screen that wil take you
directly to evidence.com for future ease of access.
If victim
• If the victim wishes to review the video at any point they can contact
requests review
Police and come to the station to view it.
or deletion of
• If the victim wishes to withdraw the video statement after it is taken, a
video
decision as to whether the video statement will be used will be made by
Police Prosecutions.
• Videos must
never be deleted by an officer.
27 | P a g e V i c t i m V i d e o S t a t e m e n t U s e r G u i d e
Inadmissible
If it is decided that your statement is not admissible or cannot be played in
Statements
court, the case can progress as it has always traditional y done – summons the
witness to attend court to give oral evidence.
If this is the case, a transcript should be requested, and the transcript used by
the Prosecutor to lead the Victim’s evidence in Court.
Please Note:
1.
Do not take a written statement from the Victim to replace the Video
Statement. You wil simply be putting the Victim through a further
unnecessary process. You will also potentially open up areas of conflict
between the two statements, which could open up the Victim to further
cross-examination in court.
2.
Do not have the transcript signed by the Victim. There is no legal need to
do this, and again it is putting the Victim through a further unnecessary
process. The original VVS is still the original statement, and is available to
be referred to. Even if it is not able to be played as evidence-in-chief, it is
still available to be played if a hostile witness application is made.
You should only be asked to take an additional statement from the Victim in
the fol owing circumstances:
1. If moderation of the interview indicates that the interview has not
covered off al of the ingredients to meet what has been charged. In these
circumstances, take a statement only to cover off the required
information. Do not conduct another ful interview. Consider taking an
additional VVS if you are still within the two week window since the
offence date.
2. New information or evidence comes to light, which requires a response
from the victim.
Reluctant
An issue commonly encountered in family harm prosecutions is a change of
Victims
heart from the Victim about seeing a prosecution through. Many victims wil
seek to withdraw charges, or seek to recant their original statement. The
reasons for victims wanting to take this course of action can be many and
varied.
It is important that victims are not judged on an expressed wish to have the
prosecution withdrawn. Police should instead seek clarification about why the
victim no longer wishes to go through with the prosecution.
Recanting vs Withdrawing:
When a Victim states they no longer wish to proceed with a prosecution, it is
important to find out why this is the case. Victim’s wil general y adopt one of
two positions:
28 | P a g e V i c t i m V i d e o S t a t e m e n t U s e r G u i d e
1. The original statement made by the Victim is not correct. The Victim wil
often seek to offer a different version of events, which will no longer
sustain the prosecution.
2. The Victim does not seek to change their original statement. They simply
no longer wish for the prosecution to go ahead.
In either of these circumstances, it is important to speak with the Victim and
record what they say. In speaking to the Victim, cover the fol owing points:
1. Confirm with the Victim their position in relation to the original
statement. ie: is the original statement true, but the Victim no longer
wishes to proceed with the prosecution; Or does the victim now wish to
offer a different version of events.
2. If the Victim confirms that the original statement is true:
a. Ask why they no longer support the prosecution. Some reasons to
consider:
i. Has the victim reconciled with the offender?
ii. Has the victim being receiving any pressure to withdraw
charges?
iii. Does the Victim have any concerns about the Court process?
(Seeing the offender in court, who else will be in court etc)
iv. Are there other factors making the Victim anxious about the
court process? (transport to court, childcare issues, taking time
off work etc)
b. Consider what measures you can put in place to support the Victim
(contact the Victim Court Advisors, Victim Support referral, offer to
arrange transport). Sometimes doing things like simply explaining
the Court process and advising that you wil be Court with the victim
will be enough to reduce anxiety.
c. Consider any follow-up enquiries that may be needed. For example,
if the Victim is being contacted by the offender and having pressure
placed to withdraw charges, telco or prison enquiries could be
appropriate.
3. If the Victim states that they wish to offer an alternative version of events:
a. Confirm with the Victim what the alternative version of events is.
b. Focus on the differences with the original version of events.
c. Consider the new version offered by the Victim in light of the
evidence gathered during the original investigation.
d. Chal enge the Victim around any inconsistencies and seek an
explanation. For example:
•
You told us in your original statement that he punched you three
times in the head. You now state that he only pushed you. We
have photographs taken on the night showing fresh bruising and
swelling to your face. Explain how you got those injuries.
29 | P a g e V i c t i m V i d e o S t a t e m e n t U s e r G u i d e
e. Consider if there are any follow-up enquiries needed as a
consequence of the fresh version offered by the Victim.
How to record:
Once you have spoken with your victim, record your conversation in an
Officers Formal Written Statement.
The general position is that you
SHOULD NOT take a further statement from
the Victim:
1. If the Victim is simply wanting to withdraw the prosecution, but confirms
that their original statement is correct, then the information is likely to be
non-evidential. It is information that should be relayed to the prosecutor
and the court, and this can be done via and Officer’s FWS.
Consider whether the Victim has offered information related to further
offending. For example, if the offender has put pressure on the Victim to
withdraw charges, this is evidence of Attempting to Pervert the Course of
Justice. In this circumstance, a fresh statement dealing with the fresh
offending should be taken.
2. If the Victim seeks to change or recant their original statement, the
position created is that one of the versions of events proffered by the
Victim is a false version. This opens up the Victim to being prosecuted for
making a False Allegation or Report to Police (Summary Offences Act,
section 24). If a new statement were to be taken from the Victim, the
Victim should be cautioned and advised of their rights. This is
problematic, particularly when you have evidence to support the original
statement and prosecution. It is recommended in this circumstance that
you record the fresh information / change in account via an Officers FWS.
If in doubt about how to record information received from a Victim after
charges have been laid, please consult your local Family Harm team, VVS
team, or Prosecution office for advice.
30 | P a g e V i c t i m V i d e o S t a t e m e n t U s e r G u i d e

Section nine: Resources
Where to go Victim Video Statements has a home page on the Police Intranet.
for
resources
and
assistance
http://nzpintranet/projects/PolicingExcel encetheFuture/SaferWhanau/Pages/Victimvideointerviewing.aspx
On this page you will find links to:
• Printable resources, such as the Aide Memoire and User,
• How to videos showing users how to perform a variety of tasks
• Caselaw relating to Victim Video Statements
• A comprehensive list of FAQ’s
For VVS and Axon Capture Support, in the first instance contact your local VVS team:
• Northland:
• Waitemata:
[email address]
• Auckland:
[email address]
• Counties-Manukau:
[email address]
• Waikato:
• Bay of Plenty:
• Eastern:
• Central:
• Wellington:
• Tasman:
• Canterbury:
• Southern:
For
urgent access to Victim Video Statements (particularly out of office hours):
• Call the Service desk on ext.
or DDI
0
. Alternatively email
@police.govt.nz ).
For password re-sets:
• Users can reset their own password by clicking on “Forgot your username or
password” at the evidence.com login screen. Enter your email address using
the format:
.
31 | P a g e V i c t i m V i d e o S t a t e m e n t U s e r G u i d e
APPENDIX 1: Key Evidence Regulations
Reg
Requirement
Comment
5
Only certain persons to be present during interview
Witness, interviewer and support person
The only persons who may be present at the video recording of the
(if there is one) will be in the room.5
interview are:
a) The person facilitating the interview (the interviewer)
Should not interview while children or
other people are present.
b) The witness
c) Any person needed to operate the recording equipment
d) If regulation 6 applies, the witness’s support person
e) If regulation 7 applies, an interpreter
Support person
Where support person is going to be
A support person must not take part in the interview
present, interviewer will tell them they
(1) A person may be present at an interview to support a witness if the
must not take part in the interview before
interviewer considers that—
the interview commences.
(a) it is in the interests of the witness; and
Ensure that guidance is complied with
(b) the person is an appropriate person to support the witness.
during the interview.
(2) A person present at an interview under subclause (1) must not take part
in the interview.
Additional requirement if person present to support witness (Reg 11)
A person present at an interview to support a witness must be clearly
visible throughout the video recording of the interview
7
Interpreter may be present
Interviews involving interpreters are
An interpreter may be present at an interview if—
difficult. You must comply with these
(a) the witness does not have sufficient proficiency in the English language
regulations.
to understand the interview if conducted in English; or
If using another Police officer to act as an
(b) the witness has a communication disability
interpreter, they must act only as an
interpreter for the purpose of the
Additional requirement if interpreter present (Reg 12)
interview.
An interpreter present at an interview must be clearly visible throughout
Interviews conducted in languages other
the video recording of the interview.
than Te Reo, English or sign will not be
admissible in court (ie, you must use an
Note also Regulation 8(e), which provides that interpreter must promised
interpreter for other languages).
to accurately and completely translate the words of the witness
Be very cautious about using a family
member as an interpreter:
o They should not be a witness to the
event as well.
o Ensure they understand their
obligations under the Regulations.
5
R v S [2011] NZCA 128 [28(a)] – strict compliance requires there only to be one interviewer present.
32 | P a g e V i c t i m V i d e o S t a t e m e n t U s e r G u i d e
Reg
Requirement
Comment
8
What must be on video record
all matters in this list must be
shown on
The video record of an interview must show the following:
the video record (not just heard)
(a) the interviewer stating the date and time at which the interview
starts
the Interviewer should be in view for the
entire interview
(b) each person present identifying himself or herself
(c) the witness making a promise to tell the truth (in any form, provided
the overall effect is a promise to tell the truth)
(d) [N/A – only applies to witness under 12 and child witnesses are
excluded under definition of MVR]
(e) Any interpreter present promising to accurately and completely
translate the words of the witness
(f) The entire interview
(g) An accurate means for measuring and recording time in hours,
minutes and seconds
(h) The interviewer stating the time at which the interview finishes
9
Additional requirement if break taken
Note:
If a break is taken, the video record must also show the interviewer stating:
Cannot pause interviews.
(a) The fact that a break is being taken; and
(b) The estimated duration of the break; and
If a break has to be taken for some
unexpected reason, interviewer will need
(c) The reason for taking it.
to commence a second interview, and
cover off matters in Reg 9.
Need to be linked when uploaded (by
ensuring they have the same Event
number)
10
Additional requirement if premature conclusion
If the interviewer decides to conclude the
If the interviewer decided to conclude the interview without asking all the
interview without asking all intended
intended questions, the video record must also show the interviewer
questions, they will need to state that the
interview is concluding prematurely and why.
stating the following matters:
a) The fact that the video record is concluding prematurely; and
b) The reasons for that.
New section in Regulations:
53
Interpretation
Mobile device not defined
Mobile video record means a video record‐
Will only record adult complainants (18=
(a) That a Police employee has made on a mobile device with the
intention that it be offered later as evidence in criminal proceedings;
and
(b) That records the evidence of a complainant who is not a child;
(c) That concerns allegations of domestic violence
53
Domestic violence has the meaning given to it by section 3 of the Domestic
Will only record complaints of domestic
Violence Act but excludes sexual abuse.
violence but not sexual abuse
DV Act, section 3:
Meaning of domestic violence
(1) In this Act,
domestic violence, in relation to any person, means
violence against that person by any other person with whom that
person is, or has been, in a domestic relationship.
(2) In this section,
violence means—
(a) physical abuse:
(b) sexual abuse:
(c) psychological abuse, including, but not limited to,—
(i) intimidation:
(ii) harassment:
(iii) damage to property:
33 | P a g e V i c t i m V i d e o S t a t e m e n t U s e r G u i d e
Reg
Requirement
Comment
(iv) threats of physical abuse, sexual abuse, or psychological abuse:
(iva) financial or economic abuse
54(2)
Every MVR must include statements made by the complainant that indicate
Covered in Aide Memoire by including
that the complainant:
questions to confirm this.
(a) Is aware that the MVR may be used as evidence in a court; and
(b) Agrees to the use of the MVR for that purpose
55(1)
Storage of MVR
Requires transfer before shift ends.
Police must (as soon as practicable after MVR made) digitally transfer the
Commissioner has approved the evidence.com
MVR directly to a storage system or facility approved by Commissioner
cloud based storage facility.
55(2)
Once the MVR is transferred, the record must be deleted from the device
Video record automatically deleted from
that made it
phone once uploaded – IT solution
55(3)
Police must ensure that information about how to access the MVR is stored
Staff need to be conscious of security
in a manner than it cannot be accessed or used by an unauthorised person
requirements – training
55(4)
If the MVR is edited, the new version must be clearly marked as an edited
If editing required, a child version is created.
version and dealt with in accordance with the regs. The original has to be
The parent remains unchanged.
retained.
56 &
20 –Limited purposes for which Police may show working copy
Staff who can access need to be aware of
20
limited purposes to ensure don’t breach regs
56 &
28 – Prosecution to give transcript to defence following not guilty plea
Typed transcript to be given to defendant or
28
their lawyer as soon as practicable following
not guilty plea – process between PPS and
CJSU
57
Access to mobile video records
Default position is that lawyers get to view the
If Police have to give a copy to a defence lawyer (under s106(4) or (4b) or a
MVR by Police granting access.
Crown Lawyer (under s 106(9):
‐
Unless Judge directs otherwise, Police to provide access to view the
NB – Judge may order otherwise
MVR in the storage system
‐
Regulations 31‐34 apply (custody of lawyers copy; use of lawyers copy
by defendant’s lawyer, prohibition of copying lawyer’s copy, use of
lawyer’s copy by Crown lawyer) with adjustments as necessary for
MVR (e.g. providing a “copy” is to be treated as providing access to
MVR in the storage facility; or if the MVR is given on a portable data
storage device, that device etc)
58
Privacy in respect of MVR
Guidance/policy to be developed on
Have to keep MVR. Copy or transcript in a way that preserves the privacy of
disclosure.
the person recorded on it
62
Police to be kept of dealings with MVR
Police have to keep records of:
Should all be in metadata and available in a
‐
transfer from phone to storage including name of person transferring
report
and date occurred
‐
any transfer of MVR from storage system to portable data storage
device including name of person doing and date
‐
each instance of access to MVR in the storage system
34 | P a g e V i c t i m V i d e o S t a t e m e n t U s e r G u i d e
 APPENDIX 2: Axon Capture User Manual Excerpts
35 | P a g e V i c t i m V i d e o S t a t e m e n t U s e r G u i d e

36 | P a g e V i c t i m V i d e o S t a t e m e n t U s e r G u i d e
Enter the fol owing data:
a.
37 | P a g e V i c t i m V i d e o S t a t e m e n t U s e r G u i d e
Remember:
a) Check volume is set to maximum.
b) Check that there is enough space on the phone to take video.
c) Place iPhone in “airplane” mode to avoid emails/phone calls from interfering with the video
capture/recording.
d) Place iPhone in Gorilla tripod in horizontal position (landscape) and place tripod on table or
clamp over chair (whatever is appropriate).
38 | P a g e V i c t i m V i d e o S t a t e m e n t U s e r G u i d e
 39 |
39 | P a g e V i c t i m V i d e o S t a t e m e n t U s e r G u i d e

 40 |
40 | P a g e V i c t i m V i d e o S t a t e m e n t U s e r G u i d e
 41 |
41 | P a g e V i c t i m V i d e o S t a t e m e n t U s e r G u i d e
42 | P a g e V i c t i m V i d e o S t a t e m e n t U s e r G u i d e
43 | P a g e V i c t i m V i d e o S t a t e m e n t U s e r G u i d e

44 | P a g e V i c t i m V i d e o S t a t e m e n t U s e r G u i d e
 45 |
45 | P a g e V i c t i m V i d e o S t a t e m e n t U s e r G u i d e
46 | P a g e V i c t i m V i d e o S t a t e m e n t U s e r G u i d e
47 | P a g e V i c t i m V i d e o S t a t e m e n t U s e r G u i d e
 48 |
48 | P a g e V i c t i m V i d e o S t a t e m e n t U s e r G u i d e
49 | P a g e V i c t i m V i d e o S t a t e m e n t U s e r G u i d e
APPENDIX 3: Pre-formatted email to Defence Counsel
Dear Sir / Madam
Police completed a Mobile Video Record with the complainant in this file in accordance with the
Evidence Regulations 2007. You can view the secure video record online at your convenience through
the Police storage provider
evidence.com. A transcript wil be prepared if a not guilty plea is entered.
Very shortly you will receive a separate email which will provide you with a link to the Mobile Video
Record in the
evidence.com website. You will need to have an account registered in
evidence.com and
linked to your email address in order to view the Mobile Video Record. Once you have an account and
are logged into
evidence.com, you wil be able to view this record and any other video records which
you may be granted access to in future cases. There is no cost to register an account.
Should you need to register an account, please follow the following five easy steps:
1. Go
to my.au.evidence.com and go to the “Register” Tab.
2. Fill out the fields in the form and submit.
3. Send the verification code via SMS to your cell phone
4. Enter the verification code into the form and submit
5. View the Evidence that has been shared with you
Video records of this nature contain sensitive personal information. We draw your attention to the
security requirements for video records in the Evidence Regulations 2007, in particular the provisions of
Regulations 32, 33 and 57. By logging on to
evidence.com to view this video record you agree that you
will keep your
evidence.com access details secure.
Please let us know if you experience any difficulties creating your
evidence.com account or viewing the
video record.
Regards
50 | P a g e V i c t i m V i d e o S t a t e m e n t U s e r G u i d e
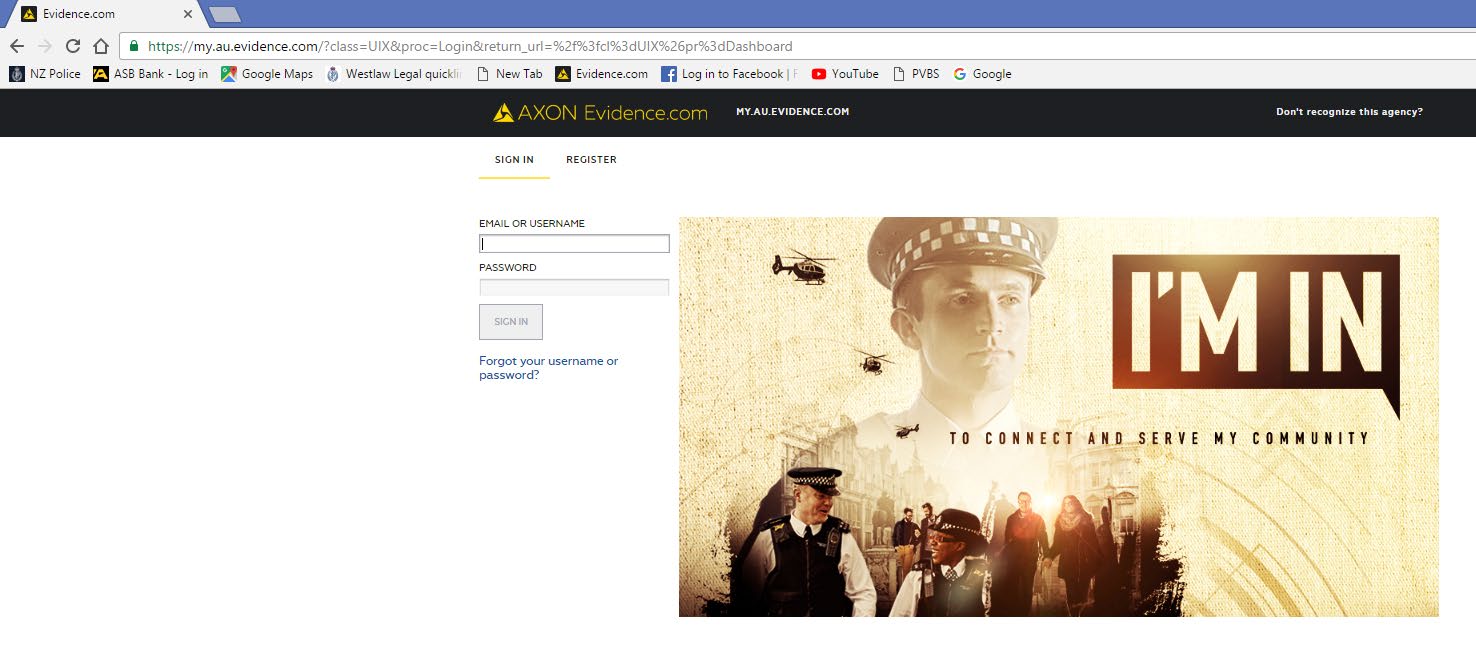
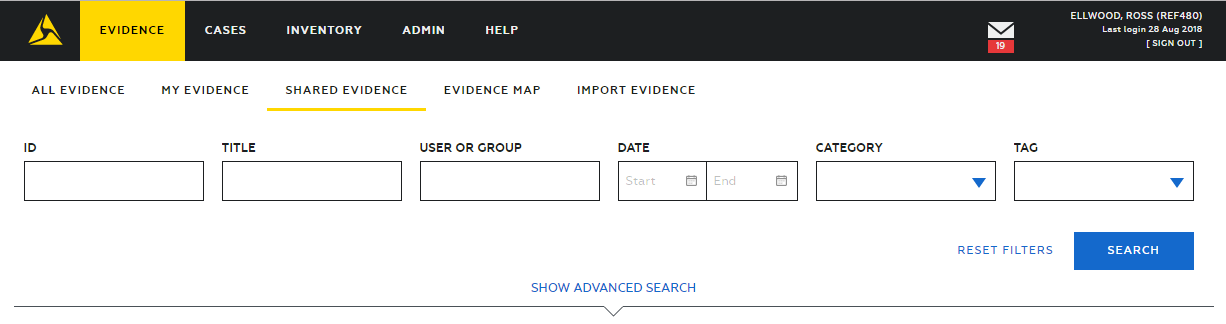

 APPENDIX 4: Accessing Evidence in evidence.com
Accessing evidence in evidence.com
APPENDIX 4: Accessing Evidence in evidence.com
Accessing evidence in evidence.com
1. In your internet browser go to
my.au.evidence.com, and log in using your log-
in details. (Tip: Save
my.au.evidence.com in your “Favourites” for future
access)
1
2. Go to the
EVIDENCE screen (select EVIDENCE in the black ribbon bar).
3. Select
SHARED EVIDENCE. 4. Enter the surname of the Defendant in the
TAG search field, and then hit
SEARCH.
4
2
3
5. Click on the video to open the play screen.
5
6. If you need to rotate the video, click on the settings button and click the rotate
icon.
7. Select the full screen button to expand the video to full screen.
6
7
If you get stuck, please contact the Police team at
[email address]
51 | P a g e V i c t i m V i d e o S t a t e m e n t U s e r G u i d e
Document Outline