
 Emailing from Eos using a Template –
System Steps
Contents
Emailing from Eos using a Template – System Steps .................................... .. ...................................... 1
Email a Single Document from Eos using a Template – System Steps .. .. . ........................................... 3
Email Multiple Documents from Eos using a Template – System Steps ................................................... 4
Emailing from an Eos Purchase Order – System Steps ...... ....... ............................................................ 4
Emailing from Eos using a Template – System Steps
Emailing from Eos using a Template – System Steps
he Official Information Act 1982
1
From the
ACC45 Claim, select the
Email button:
under
2
Select option
Email from Template
3
Select
Recipient from the
Available Recipients section, then select the
To button.
IMPORTANT
• You can only send emails to
verified email addresses.
TIP For Purchase Order related emails:
Released
• If requesting clinical notes, use the
Admin/Med Note Request email address
• If approving Non-
1
 Emailing from Eos using a Template – System Steps
4
1.
Emailing from Eos using a Template – System Steps
4
1. Scroll down and select the
Documents Type Folder Tab
2. Under the
Templates folder, select the
NGCM Administration Email Templates sub-folder
3. Scroll down and select the appropriate Template from the
Document Types section.
NOTE: Options available to choose from are:
−
Accredited Employer Email
−
Cancelling Service Email
−
Forward Email
−
Medical Notes Request (Purchase Order) Email
−
Medical Notes Request Email
−
Non-Acute Rehabilitation Email
−
Purchase Order Approved Email - PO
−
Request and Referrals Email
−
Send Letter on Behalf Email
4. Select
OK
NOTE:
Alternatively, if you know the name of the template you wish to use (see above), search for the
template:
1. Select the
Search Tab
(Instead of the Documents Type Folder Tab) 2. Enter the name of the Template in the
Document Type field
3. Select
Search 4. Select
OK
5
Outlook wil open with the email template you requested
1. Check the
recipient is correct
2. Edit the email
NOTES:
•
Don’t remove the filing away email address in the Bcc field or the subject
• The email
Subject line auto-populates with the client’s name, the ACC45 claim number and the
client ACCID number If the email is related to a specific Eos Task Type, include the name of the
support or referra in the
Subject line.
• The
Bcc address should read [email address]
If you need to ema l from …
under the Official Information Act 1982
An INDIVIDUAL Mailbox 1. When the email is ready to be sent, select the
Send button
NOTE: The outbound email wil be automatically filed away as a contact on the
ACC45 claim
A GROUP / SHARED Mailbox
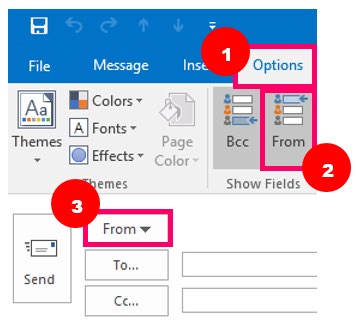
1. Select the
Group / Shared email address in the
From dropdown
NOTE: If you don't see the
From field:
Released
− Select
Options (1)
− Select
From (2)
− This wil allow you to see the
From field (3)
2
 Emailing from Eos using a Template – System Steps
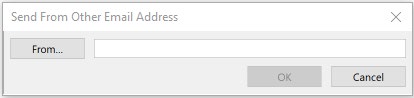
NOTE: If you can’t see your team’s
Group / Shared mailbox as an option:
− Select the
Other Email Address… option
− Select the
From… in the window that opens to search for the email address:
2. When the email is ready to be sent, select the
Send button
NOTE: The outbound email wil be automatically filed away as a contact on the
ACC45 claim
Email a Single Document from Eos using a Template – System Steps
Email a Single Document from Eos using a Template – System Steps
1
Navigate to the
Documents Tab on the relevant
ACC45 claim.
2
1. Select the
Email button
2. Select the document you want to email and click
AddTo Email
NOTE: Check the document you wish to email is visible in the
Documents to Email section and
there are
no other documents that shouldn t be emailed present.
3. Change the
Type of Email selection to
Email from Template then select the
Email button:
4. Go t
o Emailing from Eos Using a Template – System Steps and follow
Steps 3 to 5.
under the Official Information Act 1982
Released
3

 Email Multiple Documents from Eos using a Template – System Steps
1
Email Multiple Documents from Eos using a Template – System Steps
Email Multiple Documents from Eos using a Template – System Steps
1
Navigate to the
Documents Tab on the relevant
ACC45 claim.
2
1. Select
Document Group with the documents you want to email
The first document in this Document Group is automatically selected by default
2. Select the
Email button
3
In the next
Select Documents to Attach to Email screen:
1982
1. From the
General section, select the documents you want to email
TIP: You can select
al the documents at the same time by selecting the field indicated below:
Act
2. Select the
AddTo Email button
3. Check the documents you wish to email are visible in the
Documents to Email section and remove
documents that shouldn’t be present.
4. Change the
Type of Email selection to
Email from Template then select the
Email button:
Information
5. Go t
o Emailing from Eos Using a Template – System Steps and follow
Steps 3 to 5.
Official
the
Emailing from an Eos Purchase Order – System Steps
IMPORTANT:
The fol owing extra fields and functionality is only available when the
Purchase Order Email button is used:
under
•
Select Documents To Attach To Email Screen:
− Auto-population of Purchase Order documents into the
Documents to Email section
−
Attachable Documents section
> Document Groups column
•
Choose Recipient and Document Type For Email Screen:
−
Filter by Purchase Order Vendor and Provider tick-box field
This means you can’t access this extra functionality using
Email buttons available elsewhere in Eos
e.g., the
ACC45 Documents Tab, ACC45 Claim Email shortcut
Released
4


 Emailing from an Eos Purchase Order – System Steps
1
1.
Emailing from an Eos Purchase Order – System Steps
1
1. From the Eos
Purchase Order Details screen
Purchase Order Documents section select
Email:
NOTE: The
Email button is only enabled after the Purchase Order is
Authorised The ‘Select Documents to Attach to Email’ screen is displayed
2
SELECT DOCUMENTS TO ATTACH TO EMAIL SCREEN When this screen is accessed from the
Email button on a Purchase Order, the Purchase Order
documents are automatical y prepopulated into the
Documents to Email section at the bottom of the
screen.
1. Check all the documents you wish to email are visible in the
Documents to Email section and
remove documents that shouldn’t be present.
2. Ensure the
Type of Email field is showing
Email from Template then select the
Email button:
The ‘Choose Recipient and Document Type for Email’ screen is displayed
3
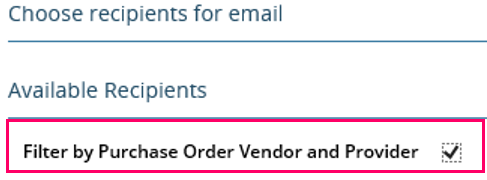
CHOOSE RECIPIENT AND DOCUMENT TYPE FOR EMAIL SCREEN
When this
screen is initially loaded, a
Filter by Purchase Order Vendor and Provider tick-box wil be
displayed:
under the Official Information Act 1982
IMPORTANT:
If the Vendor and/or Provider used in the Purchase Order
are not linked as a Participant on the claim,
they won t be able to be filtered or displayed as an
Available Recipient.
NOTES:
• The
Available Recipients wil be automatical y filtered to
only show the Vendor and/or Provider
associated with the Purchase Order.
• Unticking the
Filter by Purchase Order tick-box and selecting the
Refresh Available Recipients
Released
button wil enable all Available Recipients linked to the claim to be displayed. You can reapply the filter
ticking the
Filter by Purchase Order tick-box and selecting the
Refresh Available Recipients button
1. Go t
o Emailing from Eos Using a Template – System Steps and follow
Steps 3 to 5.
5