
Approved tactical equipment and carriage for constables and Authorised Officers
(non specialist)
Table of Contents
Table of Contents
2
Policy statement and principles
5
What
5
Why
5
How
5
Who does this chapter apply to?
5
Approved equipment and carriage
6
Where to carry approved equipment
7
Allocation and replacement
8
Auditing tactical equipment
9
Definitions
9
Data administration
9
Audit requirements
9
How aud ts w be managed
10
Aud t procedure
10
Issues or repairs required
10
Loss or theft of tactical equipment
10
BAS (Body Armour System)
11
BAS Carrier
11
Body armour ‐ Stab Resistant Body Armour (SRBA)
12
Stab Resistant Body Armour
12
BAS Hard Armour Plates (BAS HAP)
13
SRBA Hard Armour Plates (SRBA HAP)
14
TOTE brand Hard Armour Plate
14
BAS Duty Belt and BAS issued pouches
15
SRBA Duty belt
16
Safariland Model 4302 duty belt
16
Handcuffs and plastic ties/cuffs
17
Handcuffs and plastic ties/cuffs
17
Oleoresin Capsicum (OC) spray
19
Batons
20
ASP baton
20
Personal Protection Kit
21
Personal Protection Kit
21
Officer Safety Alarm
23
Smartrak Officer Safety Alarm
23
Handheld/Portable Radio
24
Handheld/Portable Radio
24
TASER
25
TASER X2 with TASERCam
25
Firearms
26
Bushmaster M4 rifle
26
Glock 17 pistol
26
Torches
27
Streamlight MultiOps torch and LedLenser Micro TT with traffic wand
27
Ammunition
28
Movement of firearms, TASER and ammunition
29
Procedures for receipt and dispatch of tactical equipment
29
Movement requirements
29
How movements w be managed
29
Personal delivery of firearms is preferred
29
Preventing complete firearms or TASERs from being lost or stolen
29
The approved courier system
30
Guide to packaging
31
Secur ty sea s
32
R f es
32
P sto s and ASERs
33
Labe s requ red for Ammun t on ASERs and ASERs w th batter es ( aser cam) and ASER ca tr dges a one
33
Ammun on
33
TAS R c/w camera ba ery)
34
TAS R car r dge
34
Some examp es o cases w h s ckers on
35
Approved tactical equipment and carriage for constables and Authorised Officers (non specialist)
Part of the 'Use of Force' chapter
4/36
Approved tactical equipment and carriage for constables and Authorised Officers (non specialist)
Policy statement and principles
What
olice provides a range of equipment to constables and Authorised Officers to enable them to perform response duties as effectively
and safely as possible. This equipment includes mandatory equipment that
must be carried, and optional equipment that may be
carried.
Only the approved equipment in this chapter can be carried or used, non‐approved variations of this equipment
must not be carried or
used, modifications to approved equipment is prohibited.
Why
The purpose of this policy is to clearly identify approved equipment that can be carried and used by constables and Authorised Officers
(non‐specialist).
Auditing and tracking movement of tactical equipment ensures that equipment is in working order, and that we know where it is, and
is properly allocated.
How
‑ All equipment must be approved by the Director: Capability.
‑ The individual’s responder level will determine what equipment must be carried, and what equipment is optional.
‑ The Tactical Equipment Record of Movement (TERM) system will be the only platform used to track movements of all critical
responder equipment.
‑ The audit and movement processes will be overseen and monitored by the Frontline Capability National Database
administrator.
‑ There will be one centralised data record of all Police approved tactical equipment.
‑ Allocation and replacement of approved tactical equipment will be managed by the Director: Capability.
Who does this chapter apply to?
This part of the ‘Use of Force’ chapter:
‑ outlines approved tactical equipment, and its carriage, for constables and Authorised Officers, and in some circumstances,
Police employees without constabulary powers
‑ applies to all:
‑ constables
‑ Authorised Officers authorised to carry and use approved equipment according to their role and function under section 24
Policing Act 2008
‑ Police employees and contractors engaged in training roles that require the carriage and use of approved equipment for
training purposes only, and
‑ any other Police employees who from time to time may be issued with, or required to carry and use, approved equipment,
for example, wearing BAS/SRBA for occupational health and safety reasons (see 'Body Armour System (BAS) policy' and
'Stab Resistant Body Armour (SRBA) policy'.
‑ does
not include approved equipment worn by specialist groups (e.g. Armed Offenders Squad), or by Police Support Units (e.g.,
Dog Section). This equipment is managed by Tactical Co‐ordinators within each specialist group.
5/36
Approved tactical equipment and carriage for constables and Authorised Officers (non specialist)
Approved equipment and carriage
he table below lists mandatory and optional approved equipment that constables and Authorised Officers
must or may carry and use
when deployed depending on whether they are working in a Level 1: Primary Responder; Secondary Responder; or a Level 2
esponder role. Constables and Authorised Officers carrying and using equipment in these responder roles must be currently certified
for their responder level.
LEVEL 1 trained
LEVEL 1 trained
LEVEL 2 trained
Approved equipment
Primary Responder
Secondary Responder
Responder
Body Armour System (BAS)
✔
✔
✔
Stab Resistant Body Armour (SRBA)
BAS HAP ‐ Hard Armour Plates
✔
✔*
X
SRBA HAP (Hard Armour Plates)
BAS Duty Belt
✔
✔
✔
Duty belt
BAS Handcuff Pouch
✔
✔
✔
Handcuffs with standard leather pouch
O C spray
✔
✔
✔
ASP baton
✔
✔
✔
Personal protection kit (PPK)
✔
✔
✔
Officer safety alarm (OSA)
✔*
O
O
Radio (Portable) or other communication device
✔
✔
✔
TASER holster/attachment plate
✔
O
X
TASER
✔
O
X
Bushmaster M4 rifle
✔
O
X
Glock holster/attachment plate with cover
✔
O
X
Glock magazine pouch
✔
O
X
Glock 17 pistol
✔
O
X
Plastic ties/plasti‐cuffs
O
O
O
Torch
O
O
O
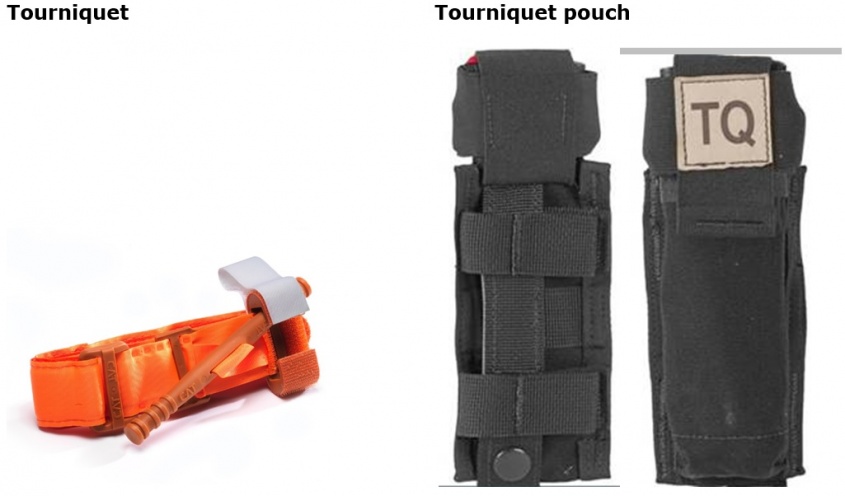
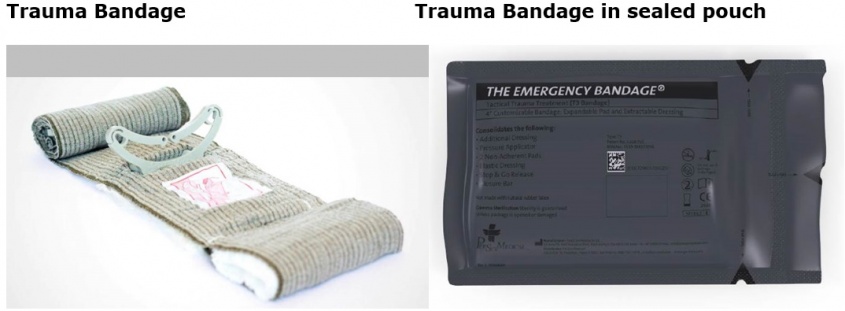
Tourniquet
✔
✔
O
Trauma Bandage
✔
✔
O
✔ mandatory (
must be carried when deployed)
✔* mandatory in certain circumstances (when attending an event involving firearms)
O optional (may be carried or worn)
X
must not be carried or worn
For information on approved equipment that is not carried on the duty belt or person (e.g. spitting hoods), see the ‘Mechanical
estraints’ part of the ‘Use of Force’ chapter.
6/36
Approved tactical equipment and carriage for constables and Authorised Officers (non specialist)
or information on approved equipment in Police vehicles, see the ‘Equipment in Police vehicles’ section of the ‘Police vehicle
management’ chapter of the Police Manual.
Where to carry approved equipment
For reasons including staff safety, the following equipment is worn, as follows:
Master side
Non‐master side
Glock holster/attachment plate
✔ Mandatory
X
Taser holster/attachment plate
X
✔ Mandatory
O C spray
X Not recommended
✔ Recommended
ASP baton
✔ Recommended
X Not recommended
Glock magazine pouch
X Not recommended
✔ Recommended
7/36
Approved tactical equipment and carriage for constables and Authorised Officers (non specialist)
Allocation and replacement
he Director: Capability is the business owner of all Police tactical equipment. Firearms and TASER will be assigned to districts and
other groups to manage their operational deployment requirements. Firearms and TASER will be assigned to the RNZPC to manage
their recruit initial training and PITT training requirements.
e‐allocation of tactical equipment:
‑
within a district or national group is the responsibility of the District Commander, Director or unit commander
‑
outside of the district or national group must be done in consultation with the Director: Capability.
The annual management, purchase and budget allocation for firearms and TASER replacement is the responsibility of the Director:
Capability.
8/36
Approved tactical equipment and carriage for constables and Authorised Officers (non specialist)
Auditing tactical equipment
Definitions
his table provides key definitions used in this part.
Employee
For this chapter means a constable or appropriately warranted Authorised Officer or warranted enforcement officer
or non‐constabulary member.
Frontline
Frontline Capability Group are responsible for the administration and maintenance of the national data records for
Capability
all Police tactical equipment and supporting all audit and movement tasks and requirements on behalf of Police.
Group
Tactical
All Police owned operational firearms, training firearms, drill weapons, simulator or FX ammunition weapons,
equipment
Tasers, BAS/SRBA hard armour plates (HAP) or other equipment as identified from time to time by the Director:
Capability.
Tactical
TERM has an Operational Asset Management section that provides facilities for Police tactical equipment movement
Equipment
requirements. TERM is the only platform to be used for of tactical equipment.
Record of
Movement
(TERM)
Audit levels
There are three audit levels:
‑ A
level one audit is a 100% audit of all tactical equipment at each station.
‑ A
level two audit is a 10% audit of all tactical equipment independent of the level one audit.
‑ A
level three audit is a 100% audit of all tactical equipment conducted by an employee independent of the
district or group where the audit is taking place.
Station
For the purposes of this chapter, a station usually means any Police station. It also includes each Armed Offenders
Squad, Special Tactics Group, Protection Services, the Royal New Zealand Police College, the Police Armoury and any
other location owned, controlled or used by Police that has or may have Police tactical equipment assigned or
housed.
Data administration
Frontline Capability Group:
‑ maintains a national database for all Police tactical equipment which allows for the monitoring and tracking of all equipment
types, serial number(s) and locations
‑ updates all movement information each business day.
Audit requirements
Level
Requirement
By Whom
Frequency
Level one 100% audit of all tactical equipment
An employee from that station.
Monthly between February
audit
assigned to each station.
and December.
Level two 10% audit of all tactical equipment
An employee different to the employee that
Monthly between February
audit
assigned to each station.
conducted the level one audit.
and December.
Level three 100% audit of all tactical equipment
An employee that is independent of the district or Once annually.
audit
assigned to each station.
group being audited.
9/36
Approved tactical equipment and carriage for constables and Authorised Officers (non specialist)
How audits will be managed
All tactical equipment audits will be managed by Districts.
District Operations Managers and Group Commanders oversee the completion of all audit tasks for their district or group by the due
date.
Level one and two audits will commence on the first Monday of the month and be completed by the third Monday of the same month.
Level three audits will be conducted on an annual basis, usually by employees from the Police Armoury.
Audit procedure
Step Asset type
Action
1
Tactical equipment Check:
‑ serial number(s) against national data base
‑ day to day access procedures are being followed
‑ functionality and cleanliness for deployment or training needs.
2
Ammunition
Check there is correct and sufficient type and quantify of serviceable ammunition per weapon.
Issues or repairs required
If any fault with weapons is discovered during this audit process, forward the firearm to the Police Armoury immediately, following the
instructions for transporting/relocating firearms.
Loss or theft of tactical equipment
The loss or theft of tactical Police equipment is a serious issue and must be reported to your supervisor. Consideration should be given
to the creation of an enquiry file dependent upon the circumstances of the incident.
Any loss of equipment must also be recorded in the Security and Privacy Incident Register (SPIR). Any identifiable details such as serial
numbers must also be entered into NIA. Any loss or theft of particularly important equipment must be reported as soon as possible to
the Director: Capability. That equipment includes:
‑ Firearms
‑ TASERs
‑ OC Spray
‑ BAS
‑ BAS HAP
‑ SRBA
‑ SRBA HAP
‑ Portable radios
‑ Batons
‑ FX weapons
‑ Drills weapons.
10/36
Approved tactical equipment and carriage for constables and Authorised Officers (non specialist)
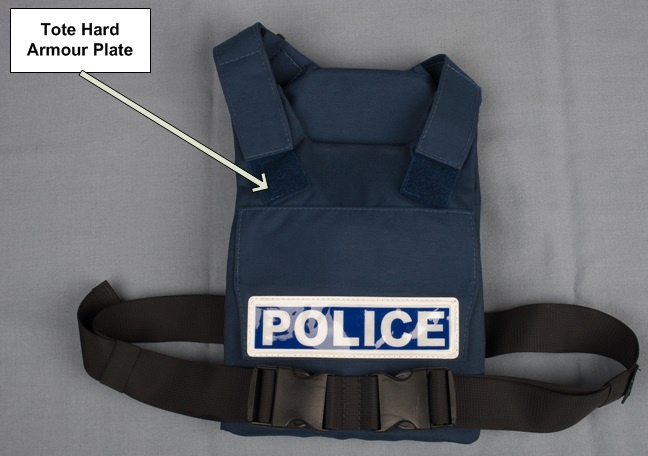
BAS (Body Armour System)
he new approved Body Armour System for wear by employees is replacing the original armour through a planned national roll‐out
process. BAS and the integrated components are individually issued and fitted. The individually issued BAS and components cannot be
shared with another staff member. BAS uses Cooneen Protection’s soft armour panels and hard armour plates for wear by constables
and Authorised Officers. All services, e.g. technical, replacement and information, are available through Tactical Solutions ‐
www.bas.tactical.co.nz.
BAS Carrier
11/36
Approved tactical equipment and carriage for constables and Authorised Officers (non specialist)
Body armour ‐ Stab Resistant Body Armour (SRBA)
The approved Stab Resistant Body Armour (Aegis SRBA) for wear by employees is the Aegis brand armour.
Stab Resistant Body Armour
12/36
Approved tactical equipment and carriage for constables and Authorised Officers (non specialist)
BAS Hard Armour Plates (BAS HAP)
he new approved Ballistic Body Armour, Cooneen Protection Hard Armour Plates are individually issued as part of BAS and
componentry. The BAS hard armour plates (HAP) are part of a personally fitted system and cannot be shared with another staff
member. The BAS HAP is a component of an in‐conjunction system and
must always be fitted inside the pockets of the BAS to provide
optimum ballistic protection. For further information see BAS Policy.
13/36
Approved tactical equipment and carriage for constables and Authorised Officers (non specialist)
SRBA Hard Armour Plates (SRBA HAP)
he approved Ballistic Body Armour (BBA) for wear by constables is the TOTE brand Hard Armour Plate (HAP) contained within a blue
bib carrier. HAP
must be worn over the top of SRBA to provide optimum ballistic protection.
For further information on HAP see the SRBA/HAP Policy.
TOTE brand Hard Armour Plate
14/36
Approved tactical equipment and carriage for constables and Authorised Officers (non specialist)
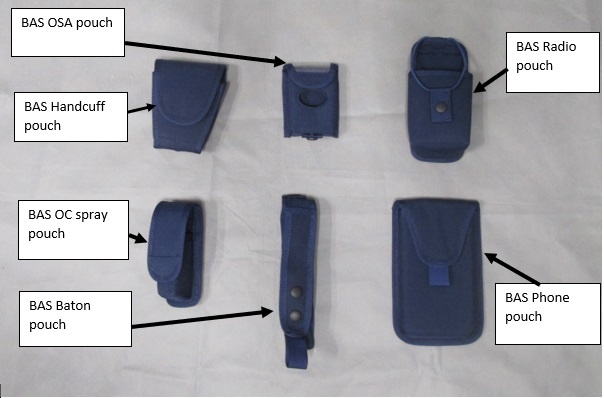
BAS Duty Belt and BAS issued pouches
he Cooneen Protection supplied duty belt is worn attached to the BAS carrier and is issued as part of the componentry for use by
constables and Authorised Officers. The pouches may be attached to either the carrier or the duty belt. For further information see the
BAS Policy.
15/36
Approved tactical equipment and carriage for constables and Authorised Officers (non specialist)
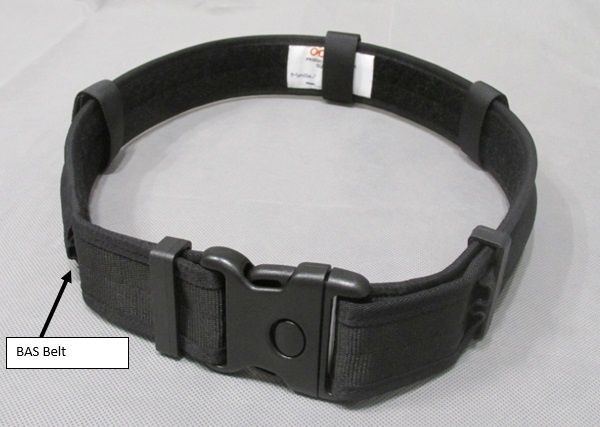
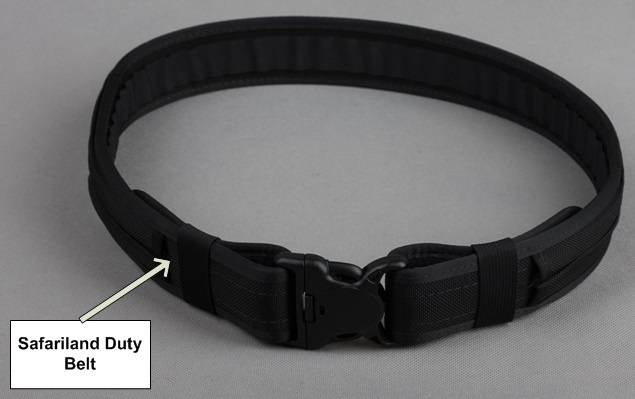
SRBA Duty belt
he approved duty belt for use by constables and Authorised Officers is the Safariland Model 4302 belt.
or further information on duty belts see SRBA/HAP Policy.
Safariland Model 4302 duty belt
16/36
Approved tactical equipment and carriage for constables and Authorised Officers (non specialist)
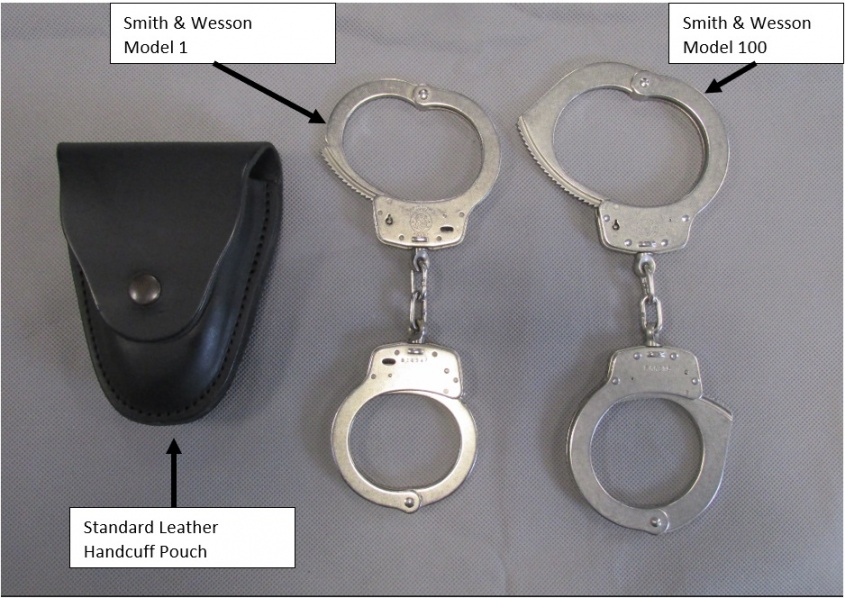
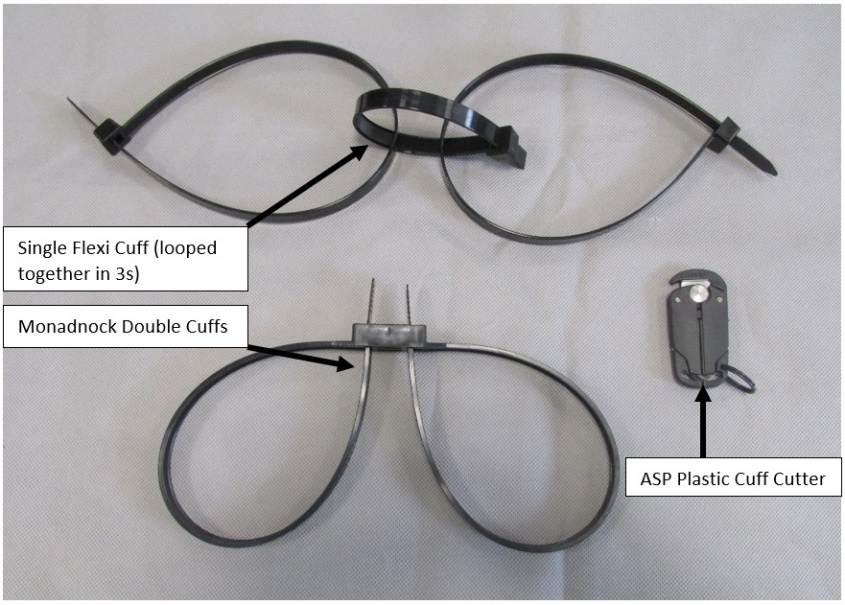
Handcuffs and plastic ties/cuffs
he approved handcuffs for use by constables and Authorised Officers are the Smith and Wesson Model 1 handcuff, the Smith and
Wesson Model 100 nickel chain link metal handcuff, the single plastic tie/cuff (used in threes), and the Monadnock double cuff. The ASP
Scarab Cutter is used to safely remove the single flexi and monadnock double cuffs.
he carriage of additional disposable plastic ties/cuffs is recommended for use when metal handcuffs do not fit on a person’s wrist.
he metal Smith and Wesson handcuffs have two types of pouch for their carriage:
‑ standard leather pouch, and
‑ BAS issued blue handcuff pouch that can be worn on the MOLLE.
For further information on handcuffs see the ‘Mechanical restraints’ part of the ‘Use of Force’ chapter.
Handcuffs and plastic ties/cuffs
17/36
Approved tactical equipment and carriage for constables and Authorised Officers (non specialist)
18/36

Approved tactical equipment and carriage for constables and Authorised Officers (non specialist)
Oleoresin Capsicum (OC) spray
he two approved OC spray products for use by constables and Authorised Officers are the Sabre Red Crossfire Stream, and the Sabre
ed Crossfire Gel, with their associated pouch. Those issued with BAS will have an OC Spray pouch that must be worn on the MOLLE.
or further information on O C Spray see the Oleoresin Capsicum (O C) Spray part of the ‘Use of Force’ chapter.
19/36
Approved tactical equipment and carriage for constables and Authorised Officers (non specialist)
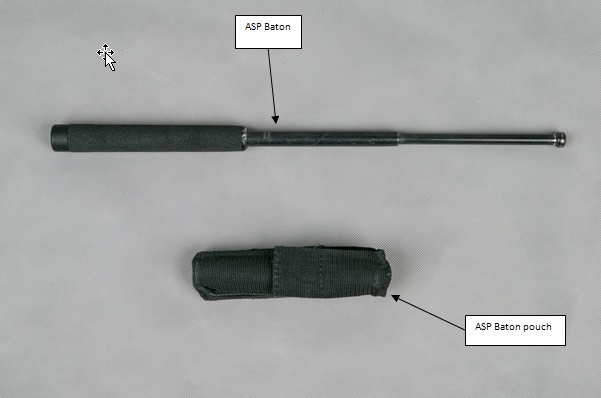
Batons
he approved baton for use by constables and Authorised Officers is the extendable ASP baton. Those issued with BAS will have a blue
baton pouch that must be worn on the MOLLE.
or further information on batons, including the side‐handle baton and straight baton, see the ‘Batons’ part of the ‘Use of Force’
chapter.
ASP baton
20/36
Approved tactical equipment and carriage for constables and Authorised Officers (non specialist)
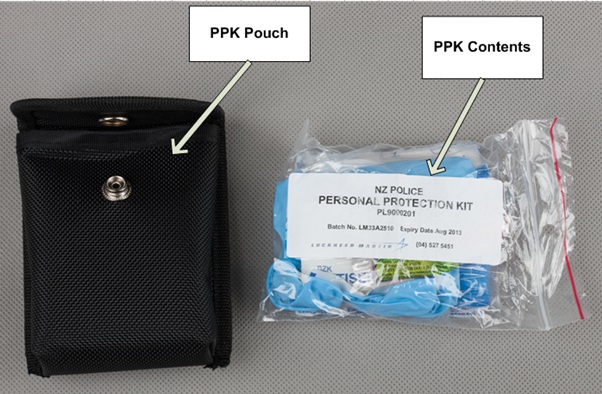
Personal Protection Kit
he approved Personal Protection Kit (PPK) for use by constables and Authorised officers contains disposable gloves, a face shield,
band aids, antiseptic wipes, antiseptic cream, and disposable soft ear plugs.
Also part of PPE is the Police issued Tourniquet and Trauma bandage.
hose issued with BAS will have a blue handcuff pouch that will also store PPK and can be worn on the MOLLE. The Tourniquet is
supplied with a pouch that can also be worn on either the belt or the MOLLE.
PE kit, Tourniquet and Trauma bandage must be carried by all L1 staff when deployed.
or information on Police first aid kits see the ‘Police‐specific first aid kits’ section of the ‘First Aid Training and Equipment Kits’
chapter of the Police Manual.
Replacement items for the PPE kit, Tourniquet or Trauma bandage must not be taken from police first aid kits and districts are to
maintain stocks for the purpose of replacement on use.
Personal Protection Kit
21/36
Approved tactical equipment and carriage for constables and Authorised Officers (non specialist)
22/36
Approved tactical equipment and carriage for constables and Authorised Officers (non specialist)
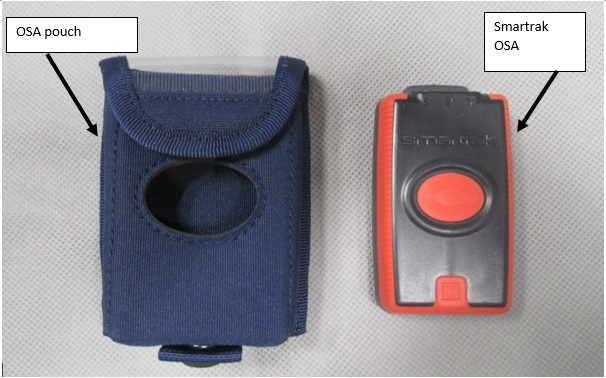
Officer Safety Alarm
he approved Officer Safety Alarm (OSA) for use by constables and Authorised Officers is the Smartrak OSA, and associated pouch.
hose issued with BAS will have a blue OSA pouch that can be worn on the MOLLE.
or requirements of carriage and further information on OSAs see the ‘Officer Safety Alarms’ chapter of the Police Manual.
Smartrak Officer Safety Alarm
23/36
Approved tactical equipment and carriage for constables and Authorised Officers (non specialist)
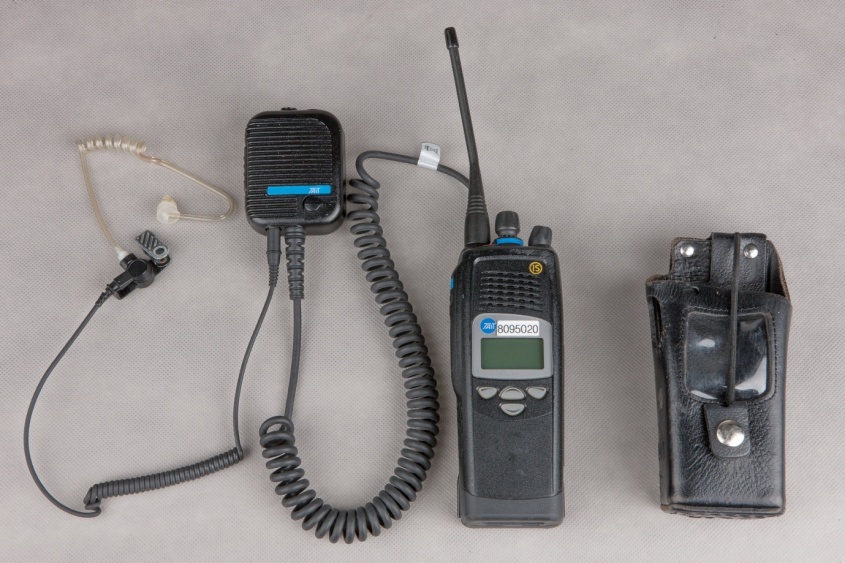
Handheld/Portable Radio
he approved portable radios for general (non‐specialist) use is the Tait Models TP9155, 9400 and 9600. These radios are used in either
digital or analogue configurations.
To be deployable, staff in all levels of Responder roles, must carry a portable radio or other communication device (cellphone). Those
issued with BAS will have a blue radio and blue cell phone pouch that can be worn on the MOLLE.
For further information on the use of radio see the ‘Radio and Communications Centre Protocols’ chapter of the Police Manual.
Handheld/Portable Radio
24/36
Approved tactical equipment and carriage for constables and Authorised Officers (non specialist)
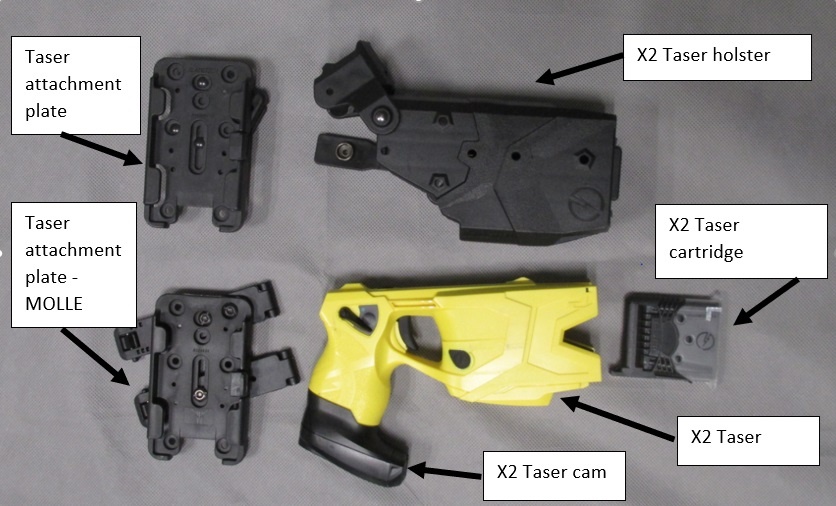
TASER
he approved TASER, and associated equipment, for use by constables is the X2 with TASERCam.
or further information on TASER see the 'TASER (Conducted Electrical Weapons)' part of the ‘Use of Force’ chapter of the Police
Manual.
TASER X2 with TASERCam
25/36
Approved tactical equipment and carriage for constables and Authorised Officers (non specialist)
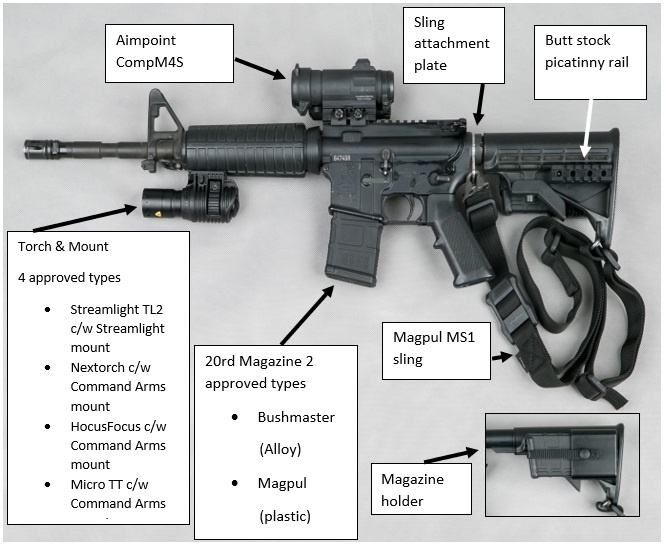
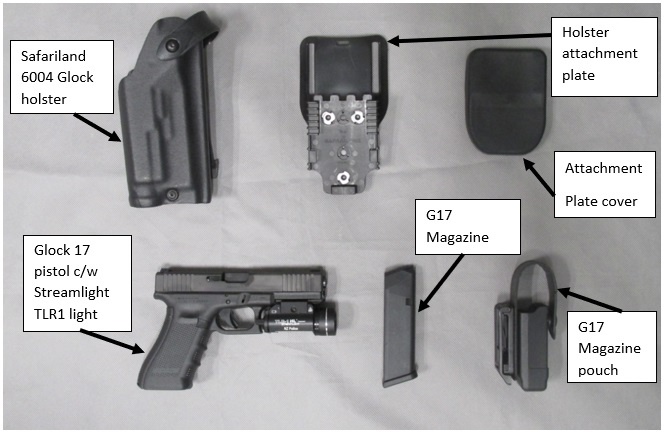
Firearms
he two approved firearms, and associated equipment for use by constables are the Glock 17 pistol and the Bushmaster M4 rifle.
or further information on Police firearms see the ‘Police firearms’ part of the ‘Use of Force’ chapter of the Police Manual.
Bushmaster M4 rifle
Glock 17 pistol
26/36
Approved tactical equipment and carriage for constables and Authorised Officers (non specialist)
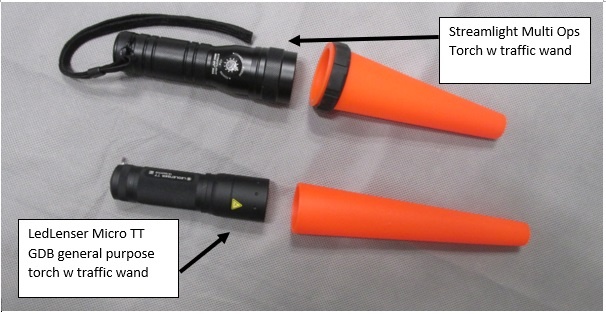
Torches
he two approved torches for use by constables and Authorised Officers are:
‑ Streamlight MultiOps torch, and
‑ LedLenser Micro TT.
Streamlight MultiOps torch and LedLenser Micro TT with traffic wand
27/36

Approved tactical equipment and carriage for constables and Authorised Officers (non specialist)
Ammunition
he approved ammunition types for use in General Duties Police operational firearms are:
‑ M4 Rifle ‐ .223 Federal Fusion MSR 62 grn
‑ Glock ‐ 9mm Federal Hydra‐shok 147 grn
28/36
Approved tactical equipment and carriage for constables and Authorised Officers (non specialist)
Movement of firearms, TASER and ammunition
Procedures for receipt and dispatch of tactical equipment
he procedure for the dispatch and receipt of firearms, TASERs, small quantities of ammunition, and Lithium batteries has two parts:
1. Section 6(c) Official Information Act 1982
2. the use of the Tactical Equipment Record of Movement (TERM) system to record the dispatch and receipt of items.
Districts should appoint suitable people to a portfolio for these tasks. Section 6(c) Official Information Act 1982
person may also be trained in the use of the TERM system. (It is not critical that they
are the same person so long as they work in concert for the dispatch of firearms, etc.).
Movement requirements
All firearms, TASER, or ammunition that are being relocated or permanently moved to another station will be subject to tracking.
irearms and ammunition should be transported separately.
How movements will be managed
All firearms, TASER, and ammunition movements will be managed through the initiation of a task within TERM. Tasks, tracking, and
esults will be monitored and supported by Frontline Capability Group. All movements will be updated daily by the national database
administrator on the national data register.
Any employee can initiate a movement task to facilitate the movement of firearms, TASER, or ammunition between stations, from
stations to the Police Armoury, or any other situation where a relocation or permanent movement is required.
he process will be:
StepAction
1
Individual initiating dispatch of the weapon or ammunition will create a TERM tasking with the details of the dispatch (what?
from whom? to whom?), and the reason for the despatch.
2
The individual receiving the dispatch will complete the Tasking in TERM.
3
The National Administrator will update the database on receipt of the notification of the completion of the tasking.
Personal delivery of firearms is preferred
Firearms, Taser, or ammunition being transported to another location
must, wherever possible, be delivered in person by Police
employees.
Where a personal delivery is not practicable, the approved process for dispatching firearms, TASER, and ammunition must be used.
Section 6(c) Official Information Act 1982
Never send firearms, TASER or ammunition through any postal service.
Preventing complete firearms or TASERs from being lost or stolen
he working parts of Police firearms and the power source from TASERs should be separated when sending through the courier
system.
ake these steps:
‑ the
M4 rifle: remove the bolt carrier group from the rest of the rifle
‑ the
Glock pistol: remove the slide and barrel from the receiver
‑ the
TASER: remove the TASER Cam (power source) from the TASER
29/36
Approved tactical equipment and carriage for constables and Authorised Officers (non specialist)
Send them separately in individual parcels on different days.
The approved courier system
Section 6(c) Official Information Act 1982
he process will be:
30/36
Approved tactical equipment and carriage for constables and Authorised Officers (non specialist)
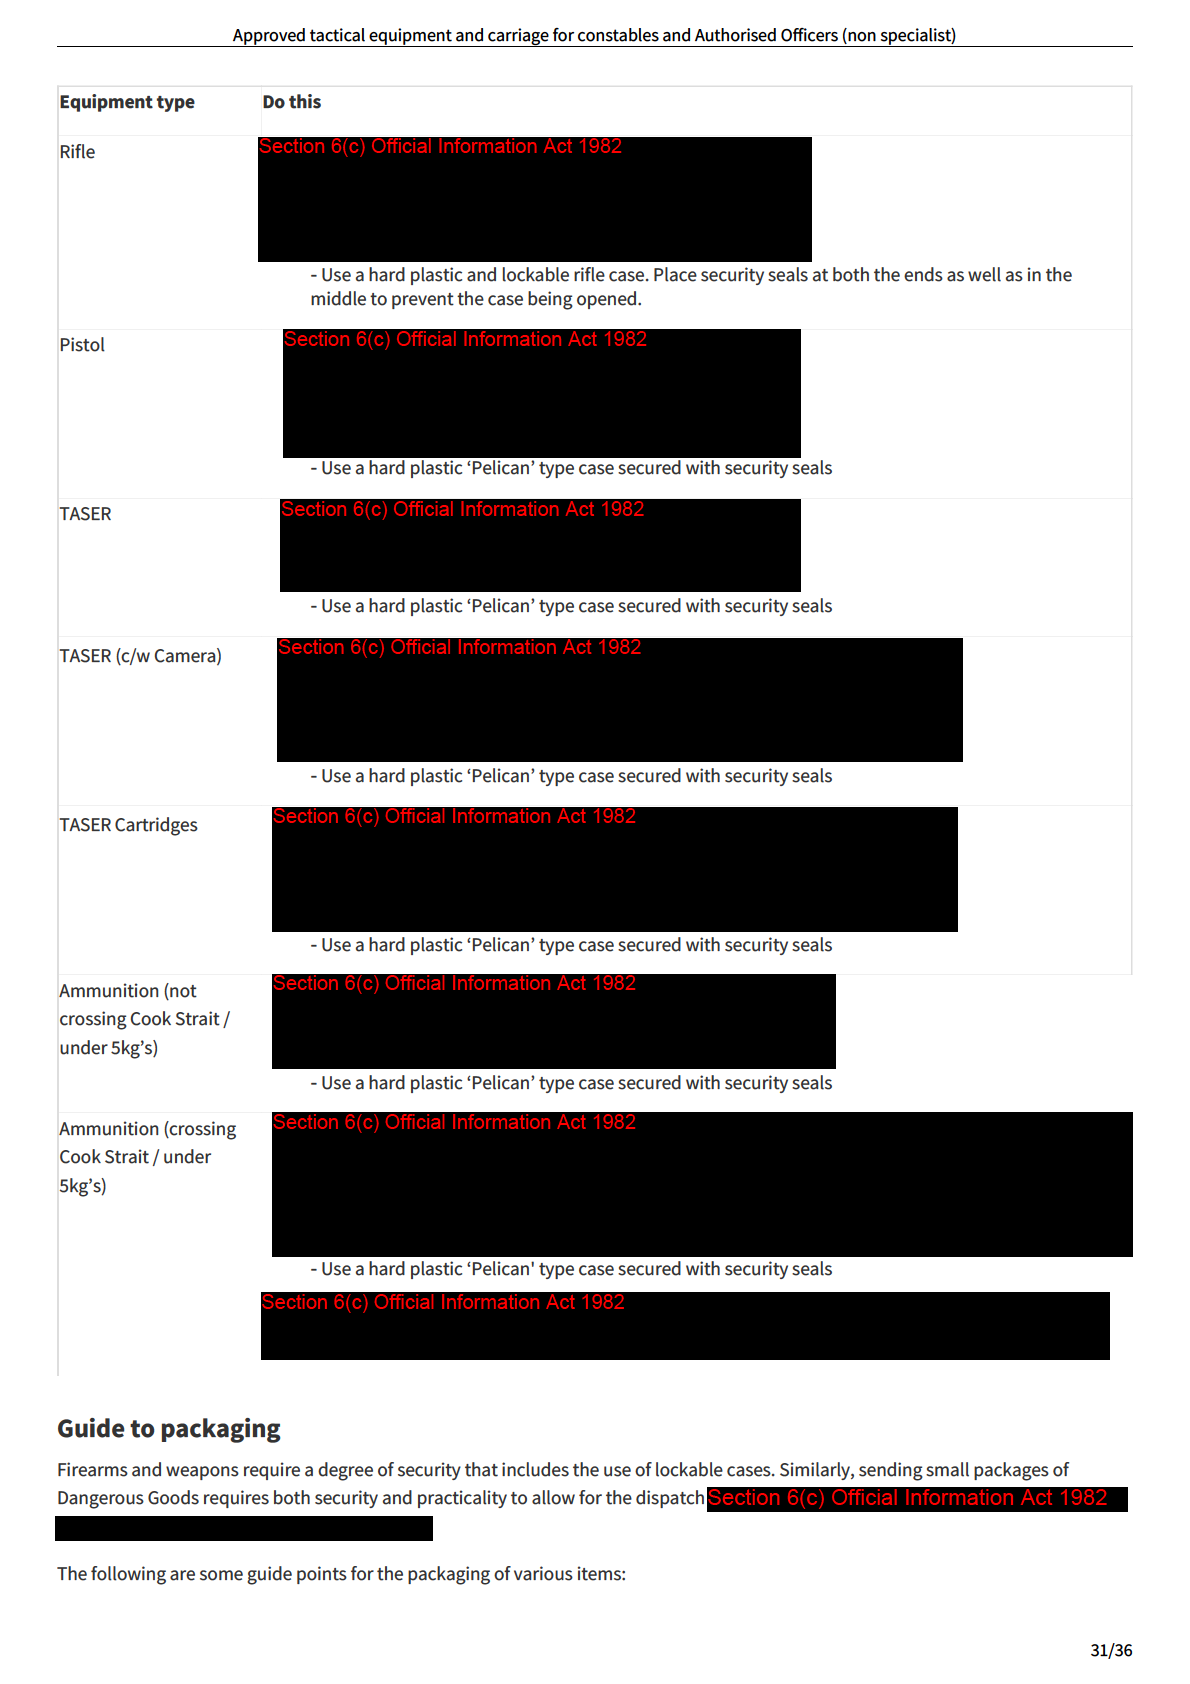
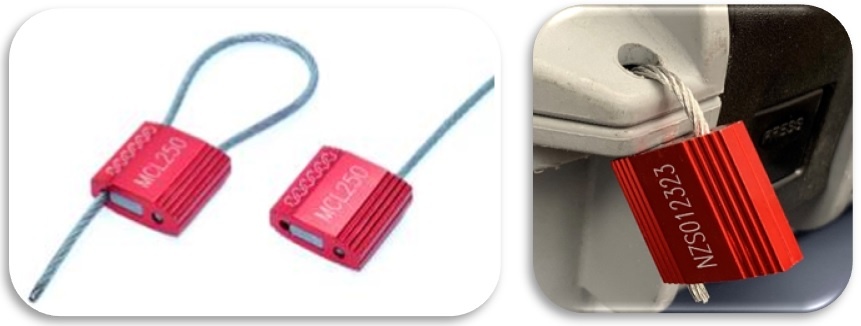
Security seals
Use only approved security seals for locking cases transporting firearms, Tasers and any associated equipment or ammunition.
Order security seals on SAP as a free description item ‐ Security Seals (vendor number: 18053)
Each seal:
‑ has a unique identifying serial number
‑ are secure once the wire has passed through the one‐way locking mechanism
‑ must be adjusted to fit tightly to the application to maximise effectiveness and prevent tampering
‑ are a disposable, single use item that is cut off.
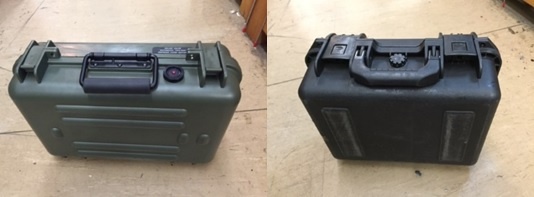
Rifles
he use of a hard plastic rifle case with the ability to place security seals on it must be considered the minimum. Place the security
seals at both the ends as well as the middle to prevent the case being prised open.
32/36

Approved tactical equipment and carriage for constables and Authorised Officers (non specialist)
Pistols and TASERs
Use a hard plastic ‘Pelican’ type case locked with security seals.
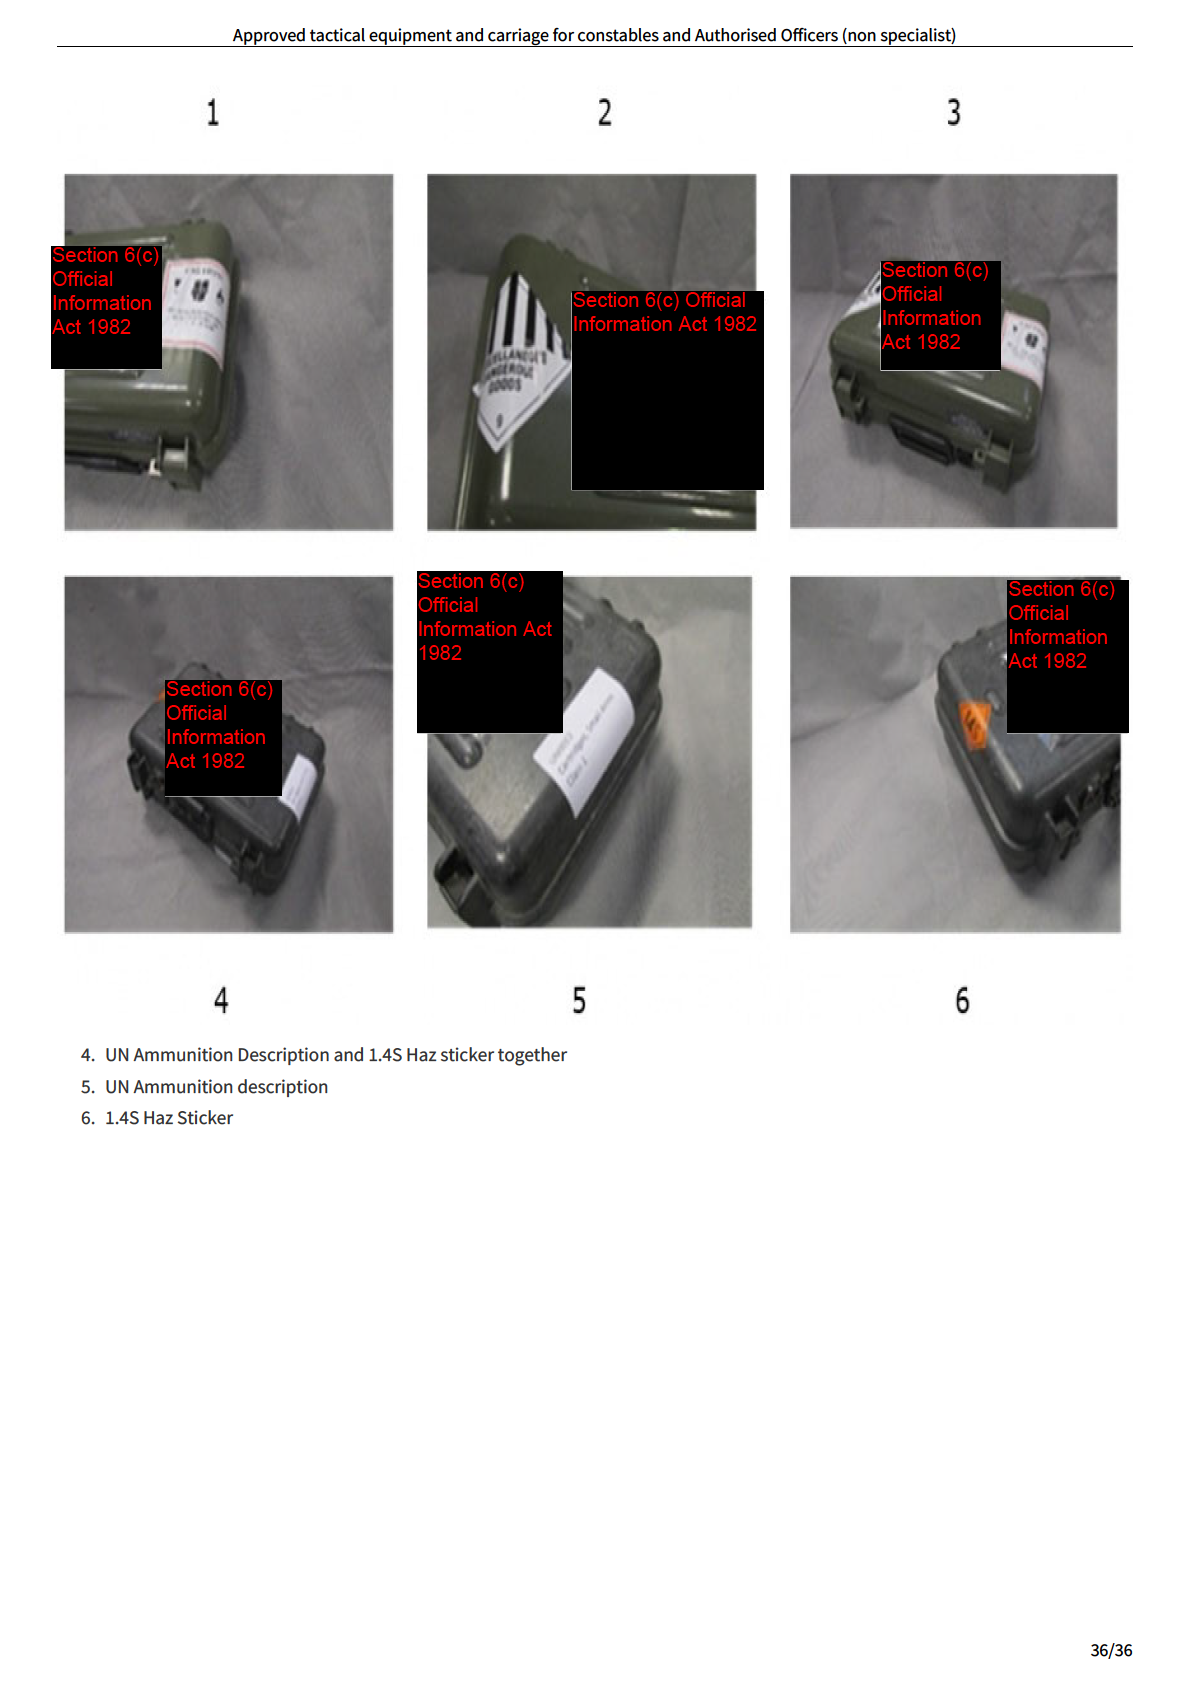
Labels required for Ammunition, TASERs, and TASERs with batteries (Taser cam), and TASER
cartridges alone
Ammunition
1.4s
33/36


Approved tactical equipment and carriage for constables and Authorised Officers (non specialist)
TASER c/w camera (battery)
TASER cartridge
34/36

Approved tactical equipment and carriage for constables and Authorised Officers (non specialist)
Some examples of cases with stickers on
1. TASER c/w Camera (battery) ‐ Lithium Ion battery sticker
2. TASER c/w Camera (battery) ‐ Class 9 Dangerous Goods sticker
3. Class 9 and Lithium Battery stickers together
35/36
Positional asphyxia
Table of Contents
Table of Contents
2
Policy statement and principles
4
What
4
Why
4
How
4
Overview
5
Introduction
5
Purpose
5
TENR
5
Risk factors
6
The risk of positional asphyxia
6
Summary of risk factors and warning signs
6
Actions
8
People at risk
8
Pregnant females
8
Prone position
8
Mechanical Restraint
8
Tactical considerations
9
Monitoring
9
Transporting
9
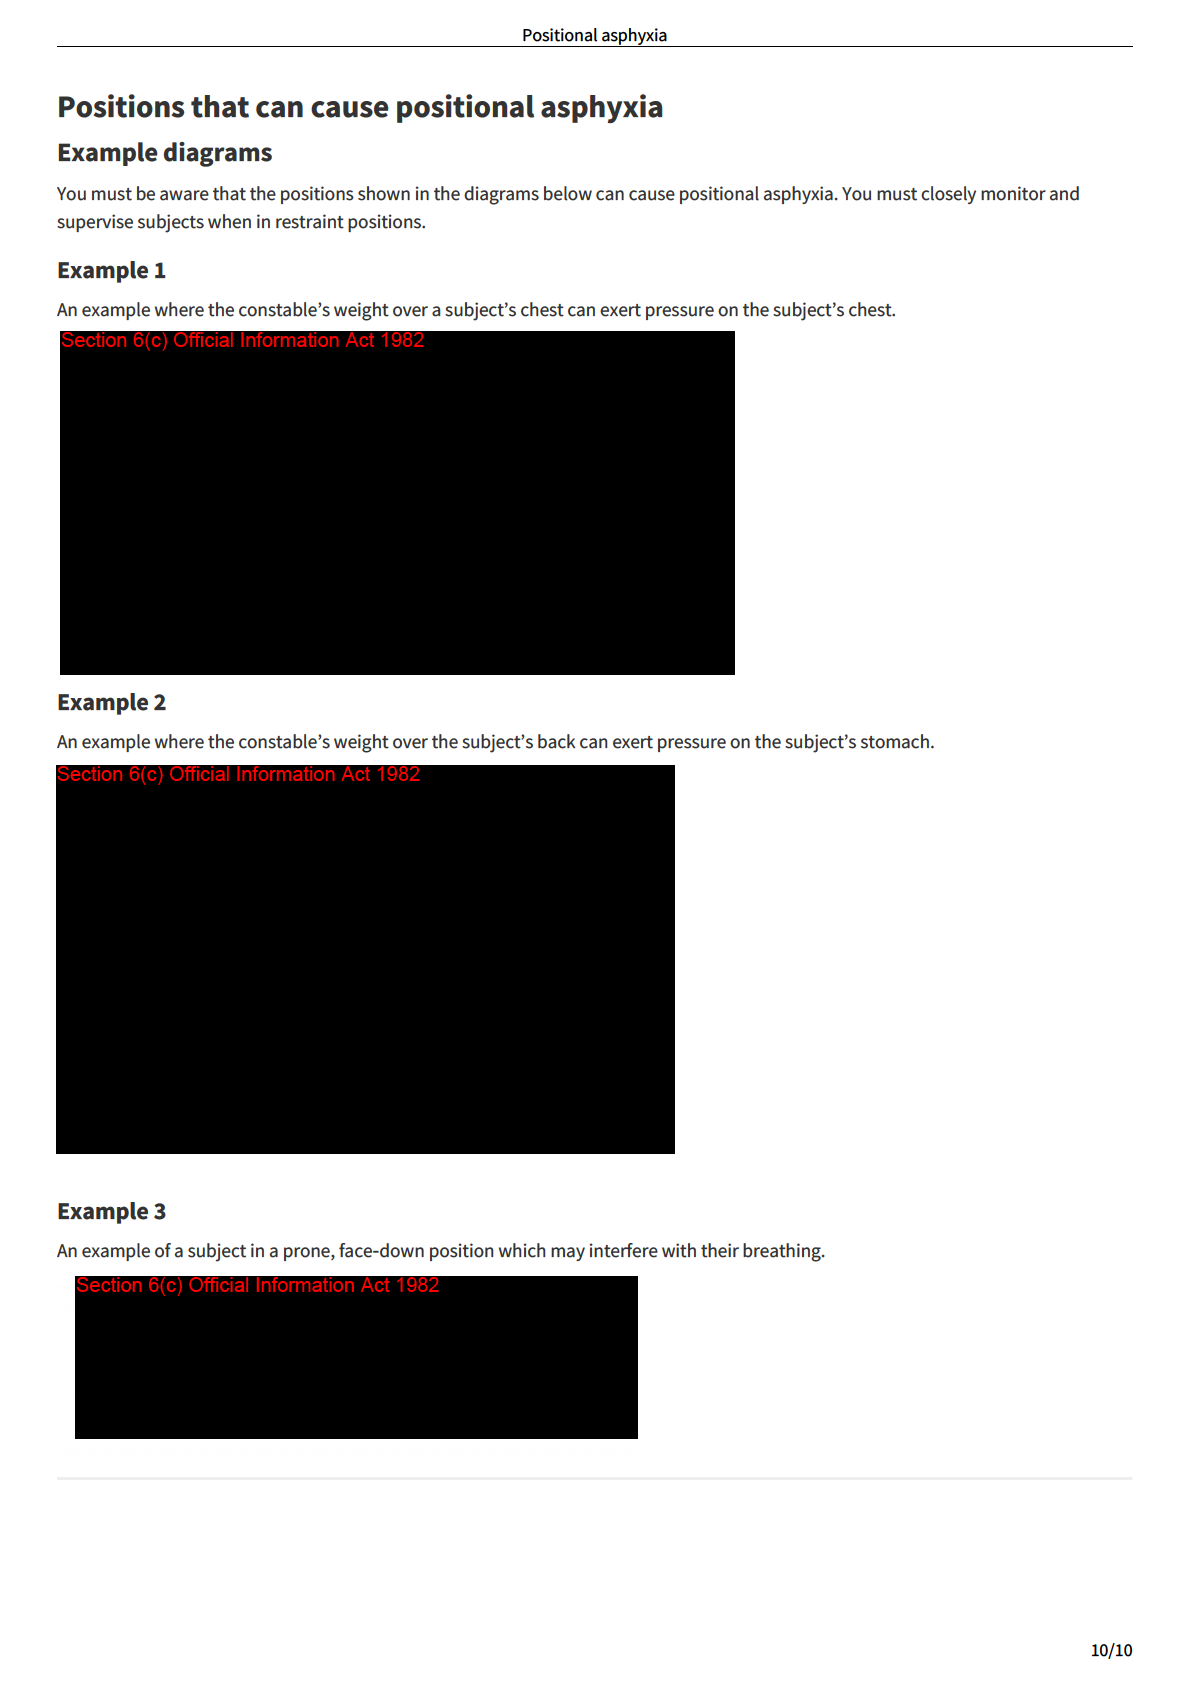
Positions that can cause positional asphyxia
10
Example diagrams
10
Examp e 1
10
Examp e 2
10
Examp e 3
10
Positional asphyxia
Part of the 'Use of Force' chapter
3/10
Positional asphyxia
Policy statement and principles
What
his part of the ‘Use of force’ chapter ensures that Police employees are aware, and can identify the dangers of restraining a person in
a position that could cause positional asphyxia, and how to prevent it.
Why
ailure to identifying the dangers associated with positional asphyxia can lead to serious health outcomes for the subject being
estrained.
How
he key, critical points for staff to note are:
‑
Positional asphyxia arises when any person, due to their body position, is unable to breathe sufficiently to meet their body’s
requirements.
‑
TENR must always be used when considering control techniques and restraints to be used on a subject.
‑
Risk factors include physical exhaustion, excited delirium, pressure on the stomach or chest, restriction of the airway, alcohol or
drug intake, head injury, obesity.
‑
Nobody should be restrained face down for longer than is absolutely necessary to gain control.
4/10
Positional asphyxia
Overview
Introduction
ositional asphyxia arises when any person, due to the position of their body, is unable to breath sufficiently to meet their body’s
equirements.
Extreme physical energy expenditure generates excessive production of adrenalin and noradrenalin (‘catecholamines’). A
progressively increasing amount of these body chemicals in the subject’s system create a ‘hypercatabolic’ state” which weakens all the
body’s muscles ‐ especially the respiratory muscles. This is sometimes referred to as a state of ‘excited delerium’ (see also ‘Use of force
overview’ for more detail about ‘excited delerium’).
his state also stresses the heart by increasing its workload. The heart needs more than normal amounts of oxygen in order to keep
functioning. Therefore, if an individual with severe respiratory muscle fatigue, an increased heart workload, and an increased need for
oxygen, is restrained in a body position that impairs or prevents breathing. It is easy to understand why asphyxia occurs so quickly.
Purpose
his part of the ‘Use of force’ chapter ensures that Police employees are aware, and can identify the dangers, of restraining a person in
a position that could cause positional asphyxia and how to prevent it. See also: 'Mechanical restraints'.
TENR
Assessment of the subject, the operating environment and the intended control techniques and restraints require the use of TENR.
TENR should be used to consider the subjects physical state and behaviours (THREAT), the intended course of action to overcome
those behaviours and the exposure that could occur as a result of that action (EXPOSURE) and the necessity to act given the risk
assessment of threat and exposure (NECESSITY). The response (the control technique or restraint) should reflect the risk of the threat,
exposure and necessity to act.
For further guidance see the ‘TENR’ chapter.
5/10
Positional asphyxia
Risk factors
The risk of positional asphyxia
When applying any restraint technique or mechanical restraint, you must be:
‑
extremely careful and should avoid creating breathing restrictions, especially over a long period
‑
particularly aware of the risk factors and potential adverse effects and symptoms including:
‑
being unable to breathe
‑
feeling sick or vomiting
‑
developing swelling to the face and neck
‑
the developments of petechiae (small blood‐spots associated with asphyxiation) to the head, neck and chest
‑
the person saying they cannot breathe.
If you restrain a person in a position that compromises the airway or expansion of the lungs (i.e. in the prone position) you may
seriously impair a person’s ability to breathe and this can lead to asphyxiation. This includes pressure to the neck region, restriction of
the chest wall and impairments of the diaphragm. If you force the head below the level of the heart, drainage of the blood from the
head is reduced. Look for swelling and bloodspots to the head and neck as warning signs of increased pressure to the head and neck
which are often seen in asphyxiation.
This effect is even more likely to occur in persons:
‑
with angina (chest pain caused by poor blood supply to heart)
‑
who have had a heart attack (myocardial Infarction or previous cardiac arrest)
‑
with high blood pressure
‑
with diabetes
‑
who are older, especially those with hardening of the arteries.
A degree of positional asphyxia can result from any restraint position in which there is restriction of the neck, chest wall or diaphragm,
particularly in those where the head is forced downwards towards the knees. Restraints where the subject is seated require caution,
since the angle between the chest wall and the lower limbs is already decreased. Compression of the torso against or towards the
thighs restricts the diaphragm and further compromises lung inflation. This also applies to prone restraints, where the body weight of
the individual acts to restrict the chest wall and the abdomen, restricting diaphragm movement.
In a situation of risk, the subject must be monitored closely to ensure adequate breathing is maintained. See also: 'Mechanical
estraints'.
Summary of risk factors and warning signs
A person may be predisposed to positional asphyxia and sudden death while under restraint as the result of interplay of several of
6/10
Positional asphyxia
these risk factors:
‑ Physical exhaustion (or any factors that increase the body’s oxygen requirements, for example anxiety in a highly stressed or
struggling individual).
‑ Excited delirium.
‑ Pressure on stomach and chest areas restricting breathing.
‑ Restriction of the airway (including covering the face).
‑ Alcohol or drug effects reducing the subject’s ability to breathe sufficiently even if they are not obviously drugged (because
sedative drugs and alcohol act to depress breathing so reducing oxygen taken into the body).
‑ Position of the body interfering with breathing. This position may be the result of a mechanical (handcuffs) or physical restraint
(being held), especially in a prone, face‐down position.
‑ Concussive head injury or physical disability. One or more of these contributory factors may also help explain the subject’s
inability to change the position of their body, which can have fatal consequences.
‑ Obesity (a large stomach will interfere with breathing when the person is lying in a face‐down position).
‑ An object pushing on the stomach area will reduce the body’s ability to breathe.
‑ Wild, threatening or bizarre behaviour with possible mental disturbances.
‑ Violent behaviour and/or resistance.
‑ Being male.
‑ Physically ill persons (for example, hay fever, sinusitis, asthma).
‑ Mentally impaired persons.
Warning signs related to positional asphyxia:
‑ An individual struggling to breathe
‑ Complaining of being unable to breathe
‑ Evidence or report of an individual feeling sick or vomiting
‑ Swelling, redness or bloodspots to the face or neck
‑ Marked expansion of the veins in the neck
‑ Individual becoming limp or unresponsive
‑ Changes in behaviour (both escalative and de‐escalative)
‑ Loss of, or reduced levels of, consciousness
‑ Respiratory or cardiac arrest.
7/10
Positional asphyxia
Actions
f after restraint a subject exhibits signs of positional asphyxia then immediate action is required:
‑ release or modify the restraint as far as practicable to effect the reduction in body wall restriction and improve breathing;
‑ summon medical attention as soon as possible;
‑ remove any restrictive items of clothing;
‑ administer first aid.
People at risk
If time allows, ensure the risk factors and warning signs have been identified and considered and appropriate restraint options
considered prior to restraining a person.
Pregnant females
Females believed to be pregnant should never be restrained in the prone position, unless restraint cannot be achieved otherwise.
When this occurs the restraint must be for no longer than is absolutely necessary to gain control. There must be continuous
observation until such time as the person is no longer lying face down or on their side.
Prone position
Nobody should be restrained face down for longer than is absolutely necessary to gain control. There must be continuous observation
of a person in the prone position until such time as the person is no longer lying face down.
Mechanical Restraint
A person whose legs and wrists are restrained has an increased risk of asphyxiation. See also: ‘Mechanical restraints’.
Note: There is a common misconception that if a person can talk then they are able to breathe, this is
not the case.
Remember: Never
assume you know better ‐ if an offender is complaining of difficulty breathing or feeling sick, seek medical attention immediately!
8/10
Positional asphyxia
Tactical considerations
Monitoring
f there is a requirement to use force to restrain a subject mechanically (by a mechanical restraint) or physically (being held) you must:
‑ be aware that a person who has been violent or in a physical confrontation is likely to have tired breathing control muscles
‑ closely monitor and supervise any person considered to be a potential risk while in Police custody
‑ when it is necessary to use the weight of several people to subdue someone for cuffing, free that person from the weight at the
first opportunity to allow them to breathe freely
‑ monitor the person’s breathing closely and abandon a restraint at any sign of breathing difficulties or lack of pulse
‑ position the person on their side or into a sitting position as soon as possible but note that positional asphyxia can also occur in
the sitting position, so you should monitor closely while in this position
‑ proceed to CPR in the event of respiratory or cardiac arrest and seek medical help immediately.
Transporting
When transporting persons considered at risk from positional asphyxia you must:
‑ take the utmost care to ensure the safety of all persons involved
‑ give particular consideration to the most appropriate vehicle to use
‑
not leave a restrained person unattended in a Police vehicle
‑ under no circumstances, allow such a person to lie prone, face down, in a vehicle
‑ in all other cases, whether an individual is cuffed hand or foot (or both), ensure that the person’s breathing is not impeded in
any way.
9/10
Identification of offenders
Table of Contents
Table of Contents
2
Policy statement and principles
3
What
3
Why
3
How
3
Introduction
4
Caution required when relying on identification evidence
4
Health and safety duties
4
Formal visual identification
5
Definition of visual identification evidence
5
Admissibility of visual identification evidence
5
Caselaw related to admissibility of visual identification evidence
5
What are formal visual identification procedures
5
Requirements for formal procedures
5
Reasons for not following a formal procedure
6
Exp anat on requ red f a forma procedure s not fo owed
6
Set‐ups are inadmissible
6
Examp e when ev dence was adm ss b e
6
Photo lineups
7
Creating the photo lineup
7
L neup content
7
Maintaining good quality
7
Conducting the photo lineup
7
ID parades
9
Attendance at identification parade
9
Charged w th an offence
9
Refusa to part c pate n a forma procedure
9
Preparing for and conducting an ID parade
9
Procedure
9
After the parade
10
Wording for certifying a pictorial record
11
Identification witnesses to provide particulars
11
Voice identification
12
Voice identification evidence defined
12
Admissibility of voice evidence
12
Examp e of adm ss b e vo ce dent f cat on ev dence
12
Statements describing offenders
13
Admissibility of statements describing offenders
13
Fingerprint and DNA identification
14
Fingerprints
14
DNA
14
Identification of offenders
Policy statement and principles
What
The functions of the Police include maintaining public safety, law enforcement, and national security.
Key to the success of Police investigations and subsequent prosecutions is the correct and lawful identification of offenders. The
Evidence Act 2006 details the requirements to be met for establishing evidence of identity.
The law and procedures relating to the identification of offenders are covered in this chapter.
Why
If
the evidence of the defendant’s involvement in a crime is based principally on evidence of the defendant’s identity and the defendant
disputes that evidence, the court must be cautious about convicting them solely on the basis of that evidence.
The procedures for identification are designed to minimise the possibility of miss‐identification.
Evidence of identity will be deemed by a court to be inadmissible if not lawfully obtained.
How
Police:
‑ may use a variety of procedures to identify offenders including formal visual identification (eg. identity parades and photo
lineups), voice identification, a witness's description of the offender and related statement, fingerprints and DNA.
‑ exercise caution when relying on identification evidence to establish the defendant’s involvement in a crime
‑ ensure formal visual identification procedures meet the requirements detailed in the Evidence Act 2006, and occur as soon as
practicable after the offence is reported
‑ follow formal procedures for identifying offenders unless there is a good reason not to
‑ use employees trained in using the Photo Manager application to create photo line ups
‑ use appropriate written records detailing the identification procedure used and have these certified in accordance with the
requirements of the Evidence Act.
3/18
Identification of offenders
Introduction
Caution required when relying on identification evidence
Where evidence of the defendant’s involvement in a crime is based principally on evidence of the defendant’s identity, and the
defendant disputes that evidence, the court must be cautious about convicting them solely on the basis of that evidence.
(s126(3) Evidence Act 2006).
In a criminal proceeding tried with a jury in which the case against the defendant depends wholly or substantially on the correctness of
one or more visual or voice identifications of the defendant or any other person, the judge must warn the jury of the special need for
caution before finding the defendant guilty in reliance on the correctness of any such identification.(s126 Evidence Act 2006)
Health and safety duties
The expectation of the Commissioner and the Health and Safety at Work Act 2015 is that employees working in the identification of
offenders will take reasonable care to ensure that their acts or omissions do not adversely affect the health and safety of themselves or
others, comply as far as they are reasonably able to with any reasonable instruction that is given to adhere with the Act and its
regulations.
A key enabler is the application of the TENR‐Operational threat assessment in the workplace. See also ‘Health, safety and wellbeing’
for keeping our communities safe, and ensuring our people are safe and feel safe.
4/18
Identification of offenders
Formal visual identification
Definition of visual identification evidence
‘Visual identification evidence’ means evidence that is:
‑ an assertion by a person, based wholly or partly on what that person saw, to the effect that a defendant was present at or near a
place where an act constituting direct or circumstantial evidence of the commission of an offence was done at, or about, the time
the act was done, or
‑ an account (whether oral or in writing) of an assertion of the kind described above.
(s4 Evidence Act 2006)
Admissibility of visual identification evidence
If a formal procedure is followed to obtain visual identification evidence of the defendant’s involvement in an offence, or there is good
reason for not following a formal procedure, that evidence is
admissible in the court proceedings unless it is proven on the balance of
probabilities that the evidence is unreliable.
If a formal procedure is not followed and there was no good reason for not following it, that evidence is
inadmissible in court
proceedings unless it is proven beyond reasonable doubt that the circumstances of the identification have produced a reliable
identification.
A formal identification procedure should therefore be used to obtain visual identification evidence unless there is a good reason not to.
The reason must be presented to the court or the evidence may be excluded on grounds of fairness.
(s45 Evidence Act 2006)
Caselaw related to admissibility of visual identification evidence
Caselaw assists with determining how the Courts may rule as admissible or inadmissible identification evidence of offenders. See these
cases for guidance:
‑ In Keil v New Zealand Police [2017] NZCA 430 the Court of Appeal held that a constable’s evidence of identifying the defendant
from viewing CCTV stills on a Police bulletin notice with previous encounters the constable had with the defendant as irrelevant
and unfairly prejudicial to the defendant. If an offender is identified from CCTV footage, it is unlikely that identification by an
officer will be admissible unless there are particular characteristics of the case that place the officer in a superior position to
identify the defendant than the fact‐finder. Characteristics that make the officer's evidence admissible may be if the officer is an
expert on the defendant's identity or if the defendant's appearance has significantly altered making identification difficult or
impossible for the fact‐finder.
‑ The Judge in Stanley
‐Hunt v R [2019] NZHC 2274 ruled on the reliability of identification evidence under section 45 of the
Evidence Act 2006 where a formal identification process was not followed. The Judge ruled the identification evidence of three of
the witnesses inadmissible under section 45(2).
‑ The case of Dey v The Queen [2021] NZCA 342 involved anticipating whether visual identification under section 45 of the
Evidence Act 2006 may be an issue at trial. The Court of Appeal was satisfied there was good reasons why Police did not to follow
a formal identification procedure and upheld the trial Judge’s decision. The appeal was dismissed.
‑ A v The Queen [2021] NZCA considered the admissibility of visual identification evidence under section 45 of the Evidence Act
2006, obtained through a flawed photo board identification procedure. The appeal was allowed, and the visual identification
evidence was ruled inadmissible at trial. This case indicates that when conducting a photo board identification procedure,
officers should ensure that all the photos are sufficiently similar in appearance with the suspect’s photo, including the person’s
physical features and ethnicity. They should also ensure that there are no other discrepancies that would draw greater attention
to the suspect, such as the photo’s background colour.
‑ The Iraia v The Queen [2021] NZCA 698 case involves admissibility of visual identification evidence from Corrections officers who
viewed stills taken from CCTV footage. The Court of Appeal agreed with the District Court that the evidence was relevant under
section 7 of the evidence Act 2006. Section 8 of the Act related to whether the probative value of evidence is outweighed by the
risk that the evidence will have an unfairly prejudicial effect on a criminal proceeding was also considered. The appeal was
dismissed. For another case related to CCTV footage evidence, refer to Keil v New Zealand Police [2017] NZCA 430 above.
What are formal visual identification procedures
Formal visual identification procedures include ID parades and photo lineups.
Requirements for formal procedures
5/18
Identification of offenders
A formal procedure is a procedure for obtaining visual identification evidence that meets these seven requirements:
‑ it occurs
as soon as practicable after the offence is reported
‑ the suspect is compared to no fewer than seven others, who are similar in appearance to the person to be identified
‑ no indication is made to the person making the identification about who among the people in the procedure is the suspect
‑ the person making the identification is informed that the suspect may or may not be among the people in the procedure
‑ a written record of the procedure followed is sworn to be true and complete by the officer who conducted the procedure, and is
provided in court to the judge and defendant
‑ a pictorial record of what the person making the identification looked at is prepared and certified to be true and complete by
the officer who conducted the procedure, and is provided in court to the judge and defendant
‑ the procedure complies with any relevant regulations.
(s45(3) Evidence Act 2006)
Reasons for not following a formal procedure
The six good reasons for not following a formal procedure are:
‑ the suspect refuses to take part in a formal procedure and Police do not already hold a photograph or video that shows a true
likeness of the suspect
‑ the suspect has a singular appearance (it cannot be disguised to make it similar to those the suspect would be compared to)
‑ the suspect has substantially changed their appearance after the offence occurred and before it was practical to hold a formal
procedure
‑ no officer involved in the investigation or the prosecution of the offence could have reasonably anticipated that identification
would be an issue at the trial
‑ an identification of the suspect was made to an officer soon after the offence was reported and in the course of the initial
investigation
‑ an identification of the suspect was made to an officer after a chance meeting between the person who made the identification
and the suspect.
(s45(4) Evidence Act 2006)
Explanation required if a formal procedure is not followed
If you do not follow a formal procedure, you must explain on the prosecution file why it was not possible.
Set‐ups are inadmissible
Identification evidence from engineering a suspect into a certain place at a certain time is inadmissible.
Example when evidence was admissible
A victim identified the offender for one offence while he sat in court charged with another offence. This evidence was admissible,
because the situation was not engineered by police to circumvent the accused’s refusal to undergo an ID parade.
R v Tuboe (1988) 3 CRNZ 581 (HC)
Note: Such an informal ID in court is likely to be considered a good reason under s45(4) for not following a formal ID procedure only if it
happens by chance.
6/18
Identification of offenders
Photo lineups
Creating the photo lineup
Most lineups should be created by district staff. The National Biometrics Information Office (N‐BIO), Photo Manager Office does offer a
back‐up service on a case by case basis to districts on request if you need assistance:
‑ as an emergency response involving serious/serial offences
‑ with large scale operations involving multiple suspects
‑ improving poor quality images
‑ to locate ‘similar’ images because the candidate has unusual features
‑ enhancing filler images by digitally adding unique features such as scars, marks, or tattoos (SMT) that are present in the
candidate’s image but which cannot be located in the subset of potential filler images. This assists the witness to identify the face
rather than the unique feature. This is labour‐intensive work restricted to high level offences only
‑ the station is small and it is impractical to have the lineup created locally.
Lineup content
The photo lineup should contain, in addition to the suspect, photographs of no fewer than seven people who are of similar appearance
to the suspect. For example, if the suspect is a bearded Caucasian male, the people in the photographs must be bearded Caucasian
males.
Maintaining good quality
A poor quality lineup will be challenged in court and could potentially result in failure to obtain a conviction.
This table outlines issues that may impact on the quality of your photo lineup and their solutions.
Possible issue
Solution
The desired
Before saving any lineup:
objectivity by the
witness when
‑ crop the images so that the faces are the same size
viewing a lineup is
‑ adjust the brightness/contrast/saturation so that the images are within the same tonal range (they do not
have to be identical)
compromised
‑ avoid replacing backgrounds by selecting filler images from stations that share a similar background
shade to that of the candidate
‑ check that there is only one candidate in the lineup and that the image has been <marked as candidate>.
There are two or
If there is:
more offenders or
suspects
‑ more than one offender, put each one into a separate lineup
‑ one offender but two or more nominated suspects, they may appear in the same lineup provided their
demographic data matches.
Use this format as
Use this format to save the lineup:
the lineup
description
‑ NIA ID number for the candidate [space] your station code [space] your QID.
The creator of any lineup may be required to give evidence if the lineup is subject to a challenge. Photo Manager
provides the ability to search for lineups created by a specific QID but not to locate a saved lineup to identify its
creator. This format will assist any user to readily identify who created a specific lineup. There are many hundreds
of users throughout the country and many saved lineups can be re‐used.
If you have any issues creating the photo lineup, call the Photo Manager Office or email the Photo Manager mailbox for advice. See the
Photo Manager User’s Guide.
Conducting the photo lineup
7/18
Identification of offenders
There are two options for conducting a photo lineup:
‑ as printed copy showing all eight images on the one page, or
‑ via 1:1 sequential viewing using the ‘Witness View’ option in Photo Manager.
Follow these steps when conducting a photo lineup and ensure adequate records of the lineup are kept.
StepAction
1
Refer to the instruction sheet that accompanies lineups created within the Photo Manager application.
2
Ensure all names of people in the photos and other indications of identity are kept out of sight.
3
Do not help or consult with the witness.
4
After the witness has completed the identification procedure:
If the photo lineup was generated using Photo
If the photo lineup was NOT printed from Photo Manager:
Manager:
‑ the witness completes the Witness Record of
‑ take a statement from the witness about the process, including in
Procedure that is automatically generated by
the statement this declaration:
Photo Manager (page 3)
‑ the officer conducting the photo lineup “I was told by the Constable before I viewed the photographs that the
suspect may or may not be featured. I was also told that I was under no
‑ certifies the court copy of the formal photo
pressure to indicate anyone and that my best recall of the person I saw
lineup, along with the
blank court copy of the was what I was using to guide me in my decision.”
Witness Record of Procedure
‑ has the Sworn Record of Formal Identification
‑ complete the Sworn Record of Formal Identification Procedure
Procedure (POL 2025 ‐ in Police
(POL 2025) and Pictorial Record of Formal ID Procedure (POL 2026)
Forms>Prosecutions>Evidence Act) sworn in
(in Police Forms>Prosecutions>Evidence Act)following the
front of a court registrar or solicitor (not a
instructions for After the parade.
Police employee).
5
Place the Record of Formal Identification Procedure (POL 2025) and the certified Witness Record of Procedure (from Photo
Manager) or certified Pictorial Record of Formal ID Procedure (POL 2026), whichever is applicable, on the prosecution file (this
will be supplied to the judge and the defence).
If ‘Witness View’ has been selected, create an Enhanced Witness Report and attach to the prosecution file.
6
Record on the file or in your notebook the identities of the people in the photographs and the details of the photograph from
which the witness made a positive identification (if any).
8/18
Identification of offenders
ID parades
Attendance at identification parade
No person charged with an offence can be compelled to attend an identification parade. If they refuse to attend, no comment adverse
to the person charged can be made.
Any person charged with an offence who attends an identification parade is entitled to have their solicitor present.
(s344B Crimes Act 1961).
An accused person must be advised of their rights in relation to the identification parade.
R v Mei (1990) 3 NZLR 16, 24‐25 (CA)
'Charged with an offence'
‘Charged with an offence’ is restricted to the offence for which evidence of identification is required.
For example, a suspect who refused to take part in an identification parade was placed among a group of people at a periodic
detention centre, where he was informally identified by a witness. The court refused to admit the evidence because he had been
charged with an offence and had not been free to object to an identification taking place for that offence.
R v Curran (1988) 3 CRNZ 631, 633 (HC)
Refusal to participate in a formal procedure
Photo lineups and ID parades are equally valid formal identification procedures. If a suspect refuses one, they may be asked to
participate in the other. Refusal of both methods may, in the absence of a reasonable photograph, be a good reason not to carry out a
formal procedure.
If you do not have a photograph of the suspect, you should ask the suspect to allow you to take one. If the suspect refuses, document
the refusal and make a note on the file of the reason no formal identification procedure was followed.
Preparing for and conducting an ID parade
The identification parade should, if possible, be conducted by an employee with the position level of sergeant or senior sergeant. The
O/C case can be present, but must not take part in the proceedings.
Procedure
Follow these steps when preparing for and conducting an ID parade.
9/18
Identification of offenders
StepActions (O/C parade)
1
Before the parade, choose seven or more other participants who are:
‑ of the same race as the suspect (in these procedures, the term ‘suspect’ includes people who have been charged)
‑ of similar age, height, general appearance and social grouping as the suspect
‑ not Police employees.
If the same witness is to view more than one parade, different participants must be used in each.
2
Advise the suspect that:
‑ they are entitled to:
‑ refuse to take part in the parade
‑ have a solicitor present
‑ the parade will, where practicable, be photographed.
3
The witnesses must not be:
‑ allowed to see the suspect before they are placed in the parade
‑ influenced by any opinion, or written or verbal description, from the Police
‑ asked any leading questions that would draw their attention to any distinctive physical characteristic of the suspect.
4
If a witness does not feel able to face the participants directly, use a one‐way glass viewing facility where available, and adapt the
following procedures accordingly.
5
Ask the participants to stand about one metre apart and, if it will assist the witness, to:
‑ wear or remove their hats
‑ speak
‑ walk individually.
6
Ensure a pictorial record (photo or video) is taken of the parade and that the venue has good light.
Tell the participants the reason for being photographed and assure them that the prints will be appropriately secured and
destroyed when no longer required.
7
The suspect must be:
‑ asked if they object to any of the participants or the way they are arranged
‑ invited to stand where they wish and change position after each witness has viewed the parade.
8
The witnesses must be:
‑ told the person they are to identify may or may not be in the parade
‑ told not to hurry
‑ accompanied along the parade by the O/C parade
‑ brought in one by one and asked to stand in front of, and point, to the person they identify
‑ prevented from communicating with waiting witnesses when they leave.
9
If a witness indicates a person but cannot make a positive identification, or picks out someone other than the suspect, ensure
that this is recorded.
After the parade
The O/C parade takes these steps after the ID parade.
10/18
Identification of offenders
StepAction
1
Make a written record detailing the procedure used and:
‑ the time, date and place of the parade
‑ the name of the witness.
This must be completed using the Sworn Record of Formal Identification form (POL 2025) (available in Police
Forms>Prosecutions>Evidence Act). It must be sworn in front of a court registrar or solicitor (not a Police employee) and placed
on the prosecution file.
2
Record details of the witness and the participants (i.e. names, ages, occupations and addresses) on the file or in your notebook.
3
Put a certified pictorial record of what the witness looked at on file.
Certify the pictorial record by writing or stamping the words below on it, e.g. on the back of a photograph:
The certified pictorial record will be supplied to the judge and the defence, but not the jury (if any). When the case is over, it will
be retained on the file.
Wording for certifying a pictorial record
I, (Here insert name of police officer who conducted the formal ID procedure), of (Here insert address and occupation, e.g. Wanganui,
Police Constable), do certify that this is a true and complete pictorial record of what the witness (Here insert name of witness) looked
at when I conducted the formal visual identification on (Here insert day, month and year), at (Here insert time) am/pm.
Note: this text is provided in the Pictorial Record of Formal ID Procedure form (POL 2026 in Police Forms>Prosecutions>Evidence Act)
and also appears in all printed lineups that are created within the Photo Manager application.
Identification witnesses to provide particulars
If the defendant or person acting on their behalf so requests, the prosecutor must supply:
‑ the name and address of each identification witness (a person who claims to have seen the offender in the circumstances of the
offence), whether or not that witness will be called
‑ each witness’ written description of the offender
‑ a copy of any identikit picture or other drawing made by any such witness.
The judge may make an order excusing the prosecutor from supplying the name and address of an identification witness if they are
satisfied that the order is necessary to protect the witness or any other person.
(s14A Criminal Disclosure Act 2008)
11/18
Identification of offenders
Voice identification
Voice identification evidence defined
‘Voice identification evidence’ means evidence that is an assertion by a person to the effect that a voice, whether heard first‐hand or
through mechanical or electronic transmission or recording, is the voice of a defendant or any other person who was connected with an
act constituting direct or circumstantial evidence of the commission of an offence.
(s4 Evidence Act 2006)
Admissibility of voice evidence
Voice identification is inadmissible unless the prosecution can prove on the balance of probabilities that the circumstances giving rise
to the identification were reliable.
(s46 Evidence Act 2006).
Example of admissible voice identification evidence
R v Waipouri (1992) 3 NZLR 450, 454 (HC) provides an example of what may be required to prove reliability. The judge admitted voice
identification evidence because:
‑ the victim had ample opportunity at the scene to become familiar with the suspect’s voice, and
‑ the identification occurred only two days after the incident, and
‑ the victim recognised the voice immediately, and was quite sure it was that of the offender.
12/18
Identification of offenders
Statements describing offenders
Admissibility of statements describing offenders
It is important to obtain from a witness, as soon as possible after the offence is committed, a written statement describing the offender.
(See the Investigative interviewing witness guide for information about taking statements).
Such a statement is crucial in these circumstances:
If a witness…
Actions / Comment
varies evidence If a witness’s evidence varies from that recorded on the statement because they genuinely cannot recall some detail
because their
that was included, the statement can be admitted in evidence to prove the truth of the contents.
memory fails
(s35(3)(b) Evidence Act 2006)
refuses to give
In this situation, the prosecutor should apply to have the witness declared hostile under s94 Evidence Act 2006 (note
evidence, or
the wide definition of ‘hostile’ in s4 of the Act). The prosecutor then needs to prove the previous inconsistent
deliberately
statement was made by the witness and produce the previous inconsistent statement into evidence. The proven
gives
previous inconsistent statement becomes admissible as to the truth of its contents due to s7 of the Act.
inconsistent
evidence
dies
If a witness dies before the court proceedings, the statement is admissible as a hearsay statement.
(ss16 & 18 Evidence Act 2006)
13/18
Identification of offenders
Fingerprint and DNA identification
Fingerprints
If a fingerprint is to be relied on for evidence, the suspect must be fingerprinted at the time that they were arrested for the offence. If
the suspect is already in prison for another offence, the fingerprinting must be arranged when they are interviewed.
For further information, see the Fingerprints Police Manual chapter.
DNA
Under certain circumstances, Police have the authority under the Criminal Investigations (Bodily Samples) Act 1995 to take buccal or
blood samples for use in criminal investigations and prosecution, and in a DNA profile databank.
For detailed information about this Act and related procedures, refer to the DNA Sampling Police Manual chapter.
14/18
Identification of offenders
15/18
Identification of offenders
16/18
Identification of offenders
17/18
Identification of offenders
18/18
Selection of operation names
Table of Contents
Table of Contents
2
Policy statement and principles
3
Purpose
4
Names for major operations
5
Names for lower level operations
6
How to use the ONM
7
Selection of operation names
Policy statement and principles
olice employ operation names for a variety of tasks ranging from community service and logistical work such as Christmas parades to
serious crime such as sexual assault and homicide investigations.
Selection of an inappropriate operation name has the potential to adversely reflect upon the prosecution during trials and can
undermine the professionalism of Police and the Crown.
o ensure that operation names and associated processes can withstand all levels of scrutiny and cross examination, the Operation
Name Manager application (ONM) (login required) has been developed which:
‑ facilitates the selection of operation names from a pre‐approved pool of names
‑ is accessible to all staff via the Police Intranet (this includes detailed user instructions).
3/7
Selection of operation names
Purpose
he purpose of this chapter is to provide you with direction on the selection of operation names.
4/7
Selection of operation names
Names for major operations
When selecting operation names, you must use the ONM:
‑ for inter‐district, regional or national operations
‑ when the activity or investigation is likely to end up in the public domain, for example a district or high court trial
‑ when the operation is of a nature that is likely to attract public and media interest and scrutiny
‑ where the operation requires a project code.
Considering the known circumstances of the operation, carefully scrutinise the operation name allocated by the ONM to ensure that
the name allocated is not inappropriate.
5/7
Selection of operation names
Names for lower level operations
You may select names for lower level operations run at station, area or district level that do not otherwise meet the criteria above on
an ad hoc basis.
However, when you generate names for lower level operations you must ensure the name selected can withstand scrutiny and does
not reflect adversely on the professionalism of Police.
6/7
Selection of operation names
How to use the ONM
See the Operation Name Manager User Guide.
7/7
CS gas
Table of Contents
Table of Contents
2
Using CS (chlorobenzalmalononitrile) gas
3
Reporting the use of CS gas
3
Issue, storage and security of CS gas
3
CS gas
Part of the 'Use of Force' chapter
Using CS (chlorobenzalmalononitrile) gas
CS gas and allied equipment must only be used in these situations by Armed Offenders Squad members or other employees who have
had specific training in its use.
Situation...
Must be authorised
by...
Against person(s) believed to be armed or otherwise potentially dangerous, when the situation and
‑ The Incident
perceived risk (TENR) is serious enough to warrant its use. Examples are:
Controller, and
‑ O/C Armed
‑ Where an offender fails to comply with lawful instructions to leave an address, and they pose an
Offenders Squad,
unacceptable risk to staff (and others) by entering that address to arrest them.
or O/C STG.
‑ Where there are reasonable grounds to believe an offender is in an address, but there is an
unacceptable risk to staff (and others) in entering or approaching that address to search for that
offender.
‑ To facilitate either immediate or deliberate action against an offender(s) in a building/vehicle when
necessary to prevent death or serious injury.
Note: When deploying CS gas into an address, and if the situation allows, consideration should be given to
arranging attendance of the Fire Service and Ambulance or medical assistance prior to deployment.
Reporting the use of CS gas
Step Action
1
Include details of the use of CS gas in:
‑ the AOS operation report, or
‑ if use was not part of an AOS operation, in a detailed report from the O/C Incident to the relevant District Commander.
2
Send a copy of the report to the Director: Capability, Police National Headquarters, as soon as practicable.
Issue, storage and security of CS gas
CS gas and equipment, including weaponry used for the discharge of CS gas, must only be issued to Armed Offenders Squads and
sections, except for respirators which may be issued to stations on the approval of District Commanders.
District Commanders must arrange for the nearest O/C Armed Offenders Squad or Section to be delegated responsibility for the safe
and secure storage of CS gas and allied equipment within districts where stocks are held.
3/3