 Weathertightness:
Guide to the Diagnosis
of Leaky Buildings
Weathertightness:
Guide to the Diagnosis
of Leaky Buildings
This document is issued under section 175 of the Building Act 2004 and is intended as guidance only. While the
Department has taken care in preparing the document, it should not be relied upon as establishing compliance
with all the relevant clauses of the Building Act or Building Code in any particular circumstances that may arise.
This document is not a Compliance Document and may be updated from time to time. The latest version is
available from the Department’s website at www.dbh.govt.nz
Contents
introDuction 3
Purpose 4
audience 4
scope 4
the assessor 5
additional specialist expertise 6
continuous re-evaluation throughout the diagnosis 6
the diagnostic process 6
steP 1 – Pre-site Work anD visuaL investiGation 9
1.1 Pre-site work 10
1.2 site visits 10
1.2.1 Building occupant comments
11
1.2.2 Visual investigation for evidence of leaks
11
1.2.3 Building design assessment
12
1.2.4 Monolithic wall claddings
15
steP 2 – non-invasive investiGation 17
2.1 Moisture detection 18
2.2 Water ingress path identification 19
2.3 records 19
steP 3 – invasive investiGation 21
3.1 Moisture content testing 22
3.1.1 Electrical resistance moisture meters
22
3.1.2 False negative or misleading moisture readings
22
3.1.3 Control points
23
3.1.4 Moisture content thresholds
23
3.1.5 Different timber species
23
3.2 timber decay testing 23
3.3 records 24
steP 4 – Destructive investiGation: cut-outs anD saMPLes 25
4.1 health and safety 26
4.1.1 Keeping an overall perspective
27
4.2 cut-outs 27
4.2.1 Temporary patches
27
4.3 samples 28
4.3.1 Size and nature of samples
28
4.3.2 Photographs
29
4.3.3 Record investigation maps/drawings
29
WeathertiGhtness : GuiDe to the DiaGnosis of Leak y BuiLDinGs 1
4.4 identifying timber treatment 29
4.4.1 Samples of untreated timber
29
4.4.2 Samples of treated timber
30
4.5 Moulds and fungi 30
4.6 types of decay 31
steP 5 – Defect anaLysis 33
5.1 analysing the evidence 34
5.1.1 Potential future damage
34
5.2 results 35
steP 6 – DeveLoPinG the reMeDiation recoMMenDation 37
6.1 strategies 38
6.2 Balancing risk 38
6.3 risk matrix assessment 39
6.4 relevant Building act 2004 requirements 39
6.5 remediation options 40
6.5.1 In situ timber treatment
40
6.5.2 Targeted repair
40
6.5.3 Partial reclad
41
6.5.4 Full reclad
42
6.6 other issues to consider 42
6.6.1 Structural problems
42
6.6.2 Other building defects
43
6.6.3 Incidental design impacts
43
6.7 estimating the cost of remediation 43
steP 7 – the DiaGnostic rePort 47
aPPenDices 49
appendix i: indicative history of timber treatment in new Zealand 50
appendix ii: critical moisture content of timber framing 51
appendix iii: investigative tools and practices 53
Moisture detection tools that are often useful
53
Moisture detection tools that are occasional y useful
55
Treatment detection tools that are often useful
57
Decay detection tools that are often useful
57
Decay detection tools that are occasional y useful
58
appendix iv: Worked example of a diagnostic investigation 59
appendix v: further resources 68
appendix vi: Glossary 70
2 WeathertiGhtness: GuiDe to the DiaGnosis of Leaky BuiLDinGs
Introduction
Purpose 4
audience 4
scope 4
the assessor 5
additional specialist expertise 6
continuous re-evaluation throughout the diagnosis 6
the diagnostic process 6
WeathertiGhtness : GuiDe to the DiaGnosis of Leak y BuiLDinGs 3
Introduction
PurPose
The purpose of this document is to provide guidance on diagnosing weathertightness
defects in buildings to:
• help set good practice standards to be fol owed by those diagnosing
weathertightness defects, and
• contribute to the efficient and effective repair of buildings that are leaking.
Accurately diagnosing a leaking building requires a high degree of skil , experience and
knowledge – this guidance does not replace the need for those carrying out this work
to have undertaken thorough professional development with regular training updates
and on-site experience.
This guidance is not confined to the procedures of any particular agency or organisation.
Note, however, that when preparing a diagnostic report, the assessor should be
aware of the context. If there is a possibility that the report will be used in a claim
under the Weathertight Homes Resolution Services Act, for example, or even in
court, the assessor should ensure the report will be fit for that purpose.
Because any guidance can only apply general y, anyone using this guidance must take
account of the particular circumstances and should not rely on this guide as the sole
source of information for assessing leaky buildings.
auDience
This guidance is intended for those who diagnose weathertightness defects in leaking
buildings, for example building assessors or building surveyors (referred to generical y
as the ‘assessor’ throughout this guidance). While the information here will not be
new to experienced assessors, it describes a benchmark for good practice currently
accepted within the sector.
The guidance will also be useful for those training to become assessors and those
who use and read diagnostic reports on leaking buildings, such as homeowners
(referred to as the ‘owner’), remediation designers and building consent officials.
The use of this guide does not relieve the users of their responsibility to comply
with the Building Act 2004, the Building Code or any other regulatory obligation.
scoPe
The process of diagnosing a leaking building is like all diagnostic activities – it aims
to balance gathering sufficient information to form the basis of robust conclusions
while avoiding excessive cost or undertaking too much destructive examination.
This guidance will help an assessor address the fol owing aspects of the diagnosis
of a leaking building.
• Is the building leaking?
• Where does it leak and why?
• What damage has been caused by the leaks?
4 WeathertiGhtness: GuiDe to the DiaGnosis of Leaky BuiLDinGs
• Where and why might it leak in the future?
• What damage is likely to be caused in the future?
• What remediation work is recommended?
• What is the estimated cost for the recommended remediation?
This guidance provides technical advice and is in no way intended to provide advice
on claims or liability. Any person with concerns or questions about a claim should
seek independent legal advice.
The guidance covers fact-finding, and investigation of and producing reports
on leaking buildings to provide a clear starting point for the next, separate stage
of detailed remediation design.
In this document, a ‘leaking building’ refers to the penetration of water/moisture
(either unintended or greater than intended) that results in damage to the building.
While damage may not necessarily compromise the structural integrity of the framing,
it can result in physical change to the building materials. Such changes may include
the presence of significantly higher moisture levels than would normally be expected
in the circumstances, saturated cladding or surface bubbling, and the loss of
usefulness of particular materials.
This guidance covers primarily timber-framed buildings that general y fall within the
scope of NZS 3604.
A large proportion of the NZS 3604-type buildings that have been assessed during
the last decade have been private residences with monolithic cladding systems that
were constructed in the early 1990s through to the mid-2000s. Some of the leaks
affecting these buildings arise directly from failures of the monolithic cladding system,
while the frequent use of untreated, kiln-dried radiata pine framing has exacerbated
the damage caused by leaks.
With suitable expertise and experience, the principles of diagnosis in this guidance
may also be applied to buildings outside the scope of NZS 3604 or multi-storey
apartment buildings that are either timber-framed or contain some timber framing.
Refer to Appendix III for more information.
This guidance provides advice on technical areas and practices that are current at the
time of publication, however these are continual y developing. This document is based
on, but does not reproduce, scientific principles and knowledge that are fundamental
to the understanding and remediation of leaking buildings, such as weathertightness
science or the movement characteristics of water.
the assessor
A competent assessor of leaking buildings will need to have appropriate knowledge,
skil s and experience to carry out accurate investigation and reporting. These include:
• a sound knowledge of the New Zealand Building Act, the New Zealand Building
Code, Compliance Documents and relevant Standards, including an understanding
of construction methods and systems used in New Zealand, and
• an understanding of water management principles, including the ‘4Ds’
of weathertightness design (Deflection, Drainage, Drying and Durability), and
• experience with on-site diagnosis and writing clear technical reports and, ideal y,
experience on successful remediation projects.
WeathertiGhtness : GuiDe to the DiaGnosis of Leak y BuiLDinGs 5
Assessors need to be able to show ongoing competency and expertise. This might
include membership of a professional organisation and undertaking specific training
in assessing leaking buildings (such as training offered by the New Zealand Institute
of Building Surveyors – NZIBS).
In addition, an assessor may wish to engage a more experienced assessor to review
their work, in particular the analysis of defects and assessment of resulting damage
and any potential future damage. Checking the recommendations against the basis
of the investigation and defect analysis may also be helpful.
aDDitionaL sPeciaList exPertise
There are various aspects of a diagnosis where additional specialist expertise
is likely to be required, including advice on both weathertightness and non-
weathertightness matters.
For weathertightness matters, these may include expertise in mould/fungi,
biodeterioration, façade engineering, external joinery manufacture and instal ation,
corrosion or material science. Expertise for non-weathertightness matters may
include structural or fire engineering, health and safety, or insulation advice.
In terms of health and safety, the fol owing two aspects are particularly important.
• Hazardous moulds – Assessors often discover moulds which may affect the
health of building occupants or those working in the building. It is important to
send samples of any moulds to which building occupants or workers may be
exposed to a specialist laboratory for identification and/or arrange for air sampling
by a specialist organisation to ensure appropriate safety precautions are taken.
• Imminent structural failure – Where the assessor considers there is any
likelihood of imminent structural failure of a building or part of a building,
a structural engineer should be consulted promptly. The assessor should also
alert the building owner of the dangers and may need to notify the relevant
territorial authority as well as any occupants.
continuous re-evaLuation throuGhout the DiaGnosis
Assessors need to continual y test their understanding of how water has penetrated
the exterior envelope and caused damage. Initial hypotheses often prove to be
inaccurate, so repeated re-evaluation is necessary before conclusions can be reached
and substantiated.
Weathertightness problems often arise from a combination of issues rather than from
the failure of one individual product or detail. Practice also shows that the steps for
evidence collection and analysis may not be strictly sequential.
the DiaGnostic Process
This document sets out the process for a full diagnostic weathertightness investigation.
This involves a detailed investigation and report to assess where and why a building
is leaking, with an initial repair proposal, and estimated costs to remediate the
weathertightness defects and damage. It will also include an assessment
of work to prevent potential future damage.
6 WeathertiGhtness: GuiDe to the DiaGnosis of Leaky BuiLDinGs
Note that this guidance only provides technical advice on carrying out investigation
and reporting, and is in no way intended as advice on claims or liability.
The diagnostic process in this guidance is summarised as a series of steps
in Figure 1 below.
Figure 1: The diagnostic process
step 1: Pre-site work and visual investigation
Receiving owner’s briefing, sourcing documents, meeting building occupants,
visual building inspection inside and out
step 2: non-invasive investigation
Non-invasive investigation to identify potential problem locations that require further
investigation
step 3: invasive investigation
Invasive tests to determine moisture levels and presence of timber decay
step 4: Destructive testing
Cut-outs for inspecting construction detailing and framing, with timber sample collection
for on-site and laboratory analysis
step 5: Defect analysis
Evaluating evidence to identify causes and consequences of moisture entry,
the extent of the damage and potential for future damage
step 6: remediation recommendation
Developing a cost-effective remediation proposal which meets the relevant regulatory
requirements, with cost estimates
step 7: reporting
Assembling the investigation, evidence and recommendation into a logical and
comprehensive report
WeathertiGhtness : GuiDe to the DiaGnosis of Leak y BuiLDinGs 7
8 WeathertiGhtness: GuiDe to the DiaGnosis of Leaky BuiLDinGs
s
te
P 1
Step 1 – Pre-site work and
visual investigation
1.1 Pre-site work 10
1.2 site visits 10
1.2.1 Building occupant comments
11
1.2.2 Visual investigation for evidence of leaks
11
1.2.3 Building design assessment
12
1.2.4 Monolithic wall claddings
15
WeathertiGhtness : GuiDe to the DiaGnosis of Leak y BuiLDinGs 9
Step 1 – Pre-site work and visual
investigation
At the commissioning stage for the diagnostic report, it is important to establish
a clear brief. This includes understanding the building owner’s requirements for
the scope and purpose of the investigation, and any limitations they may have
(such as timing or financial constraints). The assessor should confirm the extent
of the investigation with the building owner, including obtaining their consent for
any required destructive testing, cladding removal and sampling. Where there is
more than one owner, the assessor should clarify at the outset who has the authority
to represent all owners.
The assessor’s role is to be an impartial expert and not an advocate for any particular
interested party.
1.1 Pre-site Work
The assessor should look for any relevant information about the building’s
construction. Useful sources include:
• consent documentation and inspection records
• producer statements and warranties
• manufacturers’ publications
• the Building Code and relevant Acceptable Solutions at the time of construction
• Standards or codes of practice
• BRANZ publications or library materials
• consultants who may have been involved in previous repairs.
The assessor should read the building consent documentation before inspecting
the site and note any significant design/specification items for weathertightness.
The assessor should try to ascertain whether there have been any previous
leaking problems and repair attempts and, if so, what work was done and when.
Site investigations and discussions with building occupants and owners may
provide information about previous leaks and repairs.
1.2 site visits
Appropriate access and entry approvals should be obtained from the owner and
any occupiers (and neighbours, if necessary to gain access) before going on site.
Any difficulties accessing parts of the building, such as roof areas, sub-floors
or adjacent tenancies, should be noted.
Weather conditions during the previous month, and those at the time of each site
visit, should be recorded.
The assessor should identify any potential hazards likely to be encountered during
the investigation and take the necessary safety precautions. This includes precautions
to protect both themselves and the building occupants when extracting mould
and fungi samples. The assessor should look out for any likelihood of imminent
structural failure, in which case a structural engineer should be consulted promptly.
10 WeathertiGhtness: GuiDe to the DiaGnosis of Leaky BuiLDinGs
The assessor should also alert the building owner to the dangers and may need
to notify the relevant territorial authority as well as any occupants.
1.2.1 Building occupant comments
Information gathered from the building occupants and owners can provide useful
background information about when leaks were first noticed, where leaks appear,
the incidence of leaks in different wind directions and if there are other signs of
moisture inside the building.
Past attempts may have been made to fix leaking (such as inserting more sealant).
Occupants may be able to provide information about any changes in leak patterns
fol owing repair attempts. This can be useful fol owing a prolonged dry period when
moisture cannot be readily detected using moisture meters.
However, not all observations of high moisture contents may be weather-related.
For example, they may be caused by leaking plumbing pipes or high moisture build-up
within internal spaces such as in bathrooms.
The fol owing questions may be useful as a starting point for discussions with
building occupants.
• What leaks or water damage are evident?
• When did you first notice the leaks?
• Do leaks vary depending on the wind direction and strength?
• What changes have resulted from any past attempts to fix leaks?
• Who was involved in altering or repairing the building?
• Is there any other relevant information available?
Notes should be kept of conversations with occupants, including who the assessor
spoke to and when, as these can be valuable for any later reference.
1.2.2 visual investigation for evidence of leaks
Damage is usual y hidden and may not be obvious during a visual examination.
Indications of moisture problems can include:
• sagging ceiling linings
• sagging or uneven floor surfaces
• stained or rotting carpet or rusting of carpet fixings
• lifting of vinyl floors
• swelling of skirtings or other trims
• dark staining on materials or finishes
• bubbles forming under paintwork and other deterioration of paintwork
and substrate materials
• mould and mildew growth on surfaces
• musty smells
• efflorescence
• cracks
• corrosion of fixings
• ants, slaters or borer (in some situations)
• water dripping from soffits or behind the bottom of wall claddings long after
rain has stopped.
WeathertiGhtness : GuiDe to the DiaGnosis of Leak y BuiLDinGs 11
 1.2.3 Building design assessment
A general visual assessment should be carried out to gain an overall appreciation
of the risk factors relating to the building’s design. A number of factors contribute
to the risk of water penetration, such as design features, detailing and complexity,
location, orientation, weather exposure, build quality and maintenance.
Any variation in the as-built work from the consent and relevant technical information
should be noted, especial y where these may have contributed to leaks and
consequent damage.
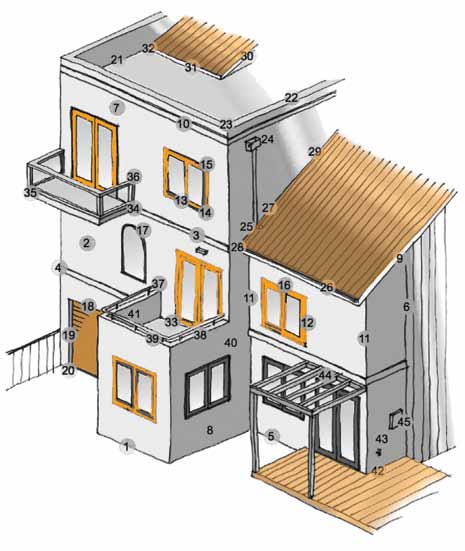
Common areas of weathertightness risk features in a building are il ustrated in
Figure 2 and described in Table 1. This is not an exhaustive summary. For example,
retaining wal s (tanking problems, poor drainage) or columns (inadequate top flashings
or bottom clearances) may also be problematic.
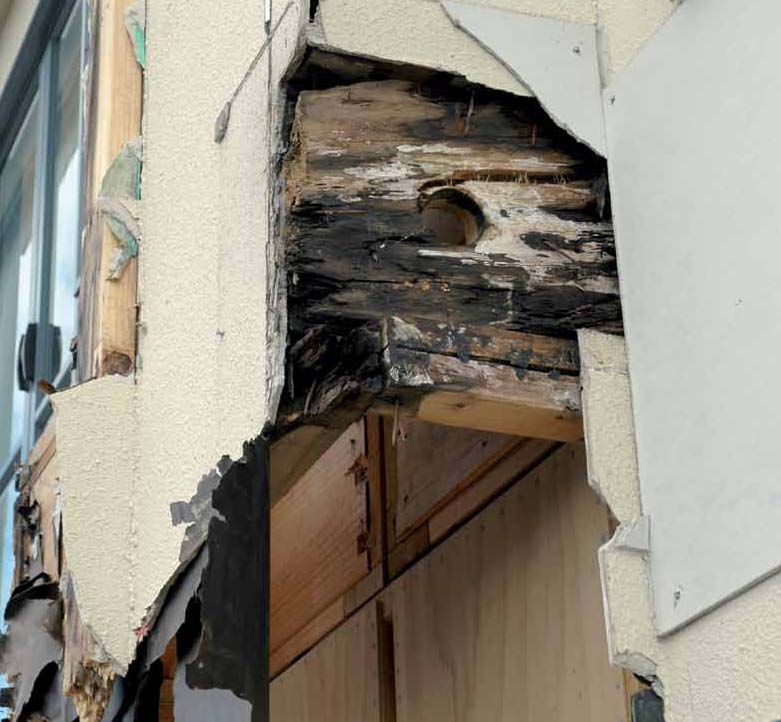
After a general assessment of the building, any high-risk design features can be
investigated in greater detail. Areas such as head flashing projections, cladding base
details and clearances, apron flashings with kickouts and sealing of penetrations
can indicate both the quality of workmanship and how well the designers and builders
have understood detailing for weathertightness.
Figure 2: Common areas of weathertightness risk
12 Weathertightness: guide to the diagnosis of Leaky BuiLdings
Table 1: Common areas of weathertightness risk
Description
Potential deficiencies
cladding – general
1
Base clearances
Inadequate cladding clearance (to ground, paving
or decks) and fall away from building perimeter
Insufficient floor height above ground, paving or decks
2
Body of cladding
Cracking
Vertical control joints
Lack of or poor control joints
3
Horizontal and inter-storey
No control joints, lack of flashings at joints
control joints
Poor overlaps, flashing traps moisture
4
Horizontal joints – corners
Gaps, poor seals, no soakers
5
Cladding base
No anti-capil ary offset/poor overlap
No plaster drip edge
Inadequate ground clearance
6
Inter-cladding junctions
No back-flashing, scribers etc
7
Sheet joints
Joints cracking/pouting, nails popping
Joints lining up with window jambs
8
Material quality
Sub-standard solid plaster, reinforcing placement
incorrect
Unsuitable weatherboard profiles for the conditions
Waterproof paint coating/sealer defects, lack of
maintenance
9
Cladding top
Poor barge flashings
Inadequate overlap/no drip edge
Unsealed behind fascias or embedded
10
Decorative bands
Unsealed fibre-cement under bands, lack of inter-storey
flashing under bands
Flat top/cracks
11
Corners
No back-flashing, scribers etc
Windows/doors
12
Jambs
Cladding unsealed under jamb flanges
No jamb flashings where needed
13
Sills
No drainage gap at sill flashing
No/inadequate flashing or flexible flashing tape
if applicable
14
Sill/jamb junctions
Poor seals/no soakers where needed
No sill flashing turn-ups
15
Head/jamb junctions
Inadequate/unsealed head projection
No turn-ups to the ends of head flashings
16
Heads
Lack of clearance from cladding to flashing
Inadequate head flashing
Flashing instal ed over wall underlay
17
Curved/raked heads
Inadequate head/jamb junctions
WeathertiGhtness : GuiDe to the DiaGnosis of Leak y BuiLDinGs 13
Description
Potential deficiencies
18
Garage heads
No head flashing, no drip edge
19
Garage jambs
Unsealed/unflashed jamb liners
20
Garage jambs – bottom
Insufficient clearance from paving
roofs
21
Parapet/roof junctions
Inadequate flashings
22
Parapet tops
No capping, flat top, top fixings
23
Parapet tops – corners
Poor capping joints
24
Rainwater outlets
Inadequately weatherproofed scuppers
Lack of or inadequate overflow provisions
Inadequately sized gutters – internal or external
25
Downpipe spreaders
Lack of or inadequate spreaders
26
Roof edge/gutter
Inadequate overhang stop-ends/turn-downs, gaps etc
Building paper not overlapping gutters and fascias
27
Wal /roof apron flashings
Inadequate upstands/overlaps
28
Apron flashing – bottom
No kickout, poor sealant application, gaps, bare fibre-
cement/exposed framing etc
Gutters/fascias buried within cladding plaster/finishes
29
Roof/wall clearance
Inadequate clearance to apron
30
Other roof flashings
Inadequate overlaps, poor sealant application
31
Inter-roof claddings
Inadequate overlaps, poor sealant application
Roof pitch too low, or inadequate fal s to decking
32
Inter-roof/wall junctions
Inadequate flashings
Decks
33
Solid (enclosed) deck floor/wal
Poor cladding clearance, inadequate overlaps or upstands,
junctions
capil ary gaps, inadequate threshold clearance
Solid deck surface
Inadequate fal s and drainage, membrane damage, failing
joints, poor substrate fixings
34
Solid (enclosed) deck edge/wall
Inadequate flashings, poor upstand height
junctions
35
Open balustrade – solid deck
Poor membrane overlaps
perimeter
Balustrade penetrations
36
Open balustrade/wall junction
Unsealed fixings
37
Clad (enclosed) balustrade/
No saddle flashings
wall junction
38
Clad balustrade top
No slope to tops
No capping
Poor capping/capping joints
39
Clad balustrade – handrail fixings
Handrail penetrations through tops or horizontal surfaces
40
Clad balustrade – drainage/
Inadequate overflow/drainage, outlets too high,
overflows
membrane not sealed to outlets
Inadequate fal
14 WeathertiGhtness: GuiDe to the DiaGnosis of Leaky BuiLDinGs
Description
Potential deficiencies
41
Clad balustrade/deck junction
Poor cladding clearance above deck
Inadequate overlaps, capil ary gaps
42
Timber slat decking/wall junctions
No drainage gaps
Decking buried within cladding plaster/finishes
Penetrations
43
Pipe penetrations, cable entry
Poor seals
44
Pergolas, beams etc
No flashings, cladding not sealed behind fixings, fixings
penetrating cladding
45
Meterboxes/gril es etc
No top flashings
Poor sealant application/gaps/cracks etc
1.2.4 Monolithic wall claddings
There are a number of common problem areas to particularly look out for when
investigating monolithic wall claddings.
Monolithic wall claddings generally
• Lack of, or inadequate kickouts to apron flashings terminating within wall
• Poor detailing at abutments (lack of saddle flashings)
• Lack of clearance to ground level
• Failed or poorly maintained waterproofing coatings and joints
• Impact damage to coating or backing sheets
• Wicking of water behind cladding
• Junctions that rely on paint, texture coating or incorrectly applied sealant to seal
window facings to claddings
• Lack of ongoing, proper maintenance
Other factors particular to flush-finished fibre-cement
• Cladding application, including joints, junctions, flashings, not in accordance with
manufacturer’s specifications
• Framing and/or backing sheet with moisture content too high at time of
construction
• Lack of adequate control joints – typically these should be at 5.4 m centres
vertical y and at the inter-storey level
• Sheet joints not located over solid framing or not made away from line of window
or door jambs
• Unfinished joints, or uncoated fibre-cement behind fascias, barge boards,
bands or other trim
• Poor application of stopping and flushing, and of textured coatings
• Back and edges of fibre-cement left unsealed, for example at joints, edges,
penetrations
• Dark paint colours
WeathertiGhtness : GuiDe to the DiaGnosis of Leak y BuiLDinGs 15
Other factors particular to stucco
• Lack of continuous foundation
• Lack of adequate framing support
• Lack of adequate backing or lack of slip layer
• Reinforcing not properly spaced off backing or fixed to framing
• Reinforcement fixings penetrating membrane on sloping surfaces
• Reinforcement corroding due to inadequate thickness of galvanising
• Lack of adequate control joints – these should be instal ed at 4 m maximum
spacing, including horizontal joints at inter-storey floor levels and vertical joints
at the sides of openings
• Substandard plaster mix including:
– sand in mix not clean, sharp and well graded
– incorrect additives, or combinations of incompatible additives
• Plaster not applied evenly or thinner than the required 21 mm thickness
• Insufficient curing
Other factors particular to EIFS
• No back-blocking for fixings or penetrations
• Cladding application, including joints, junctions, flashings, not in accordance
with manufacturer’s specifications
• Lack of control joints
• Corrosion of fixings
• Dark paint colours
• Failure of paint and textured coating systems
steP 1: suMMary of inforMation to coLLect
List of issues reported by the owner and/or occupants
Description of current and recent weather conditions
Relevant construction documentation and manufacturers’ information
Relevant reports and documents by other experts
Photos of the building elevations and design risk features
Photos and description of visual evidence of leakage
Photos and description of damage
Record of any health and safety issues
16 WeathertiGhtness: GuiDe to the DiaGnosis of Leaky BuiLDinGs
Step 2 – Non-invasive investigation
s
te
P 2
2.1 Moisture detection 18
2.2 Water ingress path identification 19
2.3 records 19
WeathertiGhtness : GuiDe to the DiaGnosis of Leak y BuiLDinGs 17
Step 2 – Non-invasive investigation
The aim of non-invasive investigation is to identify areas of potential water ingress.
During this stage of the investigation, the assessor should start to consider possible
causes of moisture ingress and keep questioning any assumptions. Moisture travel
paths should be considered. Problems can occur remotely from leak sources, so it is
important to al ow for the likelihood that there may be evidence of moisture in
unexpected positions and/or evidence may be concealed.
The typical process is to:
• look for risk features and evidence of leaks
• evaluate the area surrounding any moisture ingress
• identify areas for more detailed examination.
Appendix III provides a summary of tools that will be useful during the investigation.
2.1 Moisture Detection
A capacitance moisture meter is useful for checking risk areas identified during
the visual investigation and to identify areas for further exploration and invasive
examination. It is best used from the outside where it is more likely to detect
moisture directly behind the cladding, but may also be used within the building
on inside surfaces of exterior wal s.
However, capacitance moisture meter readings should be treated as indicative only,
as they do not measure actual moisture contents. They are comparative and therefore
only give an indication of where to consider invasive examination. They are also
subject to a number of limitations which are described in Appendix III.
A number of other tools for checking moisture presence are described in Appendix III.
These include:
• infra red cameras
• relative humidity sensors
• microwave meters.
18 WeathertiGhtness: GuiDe to the DiaGnosis of Leaky BuiLDinGs
2.2 Water inGress Path iDentification
Indications of water damage, such as stains and cracks in the cladding, are often the
starting point for tracking the water and moisture path, keeping in mind that water
movement paths can be complex and may not be immediately obvious. For example,
internal building elements such as bottom plates and framing dwangs can inhibit and/
or redirect water flow towards unexpected locations in the building structure.
Dyed water testing is a common tool for identifying leakage paths and helps identify
causes of the problem. Results can be easily photographed. Materials that are highly
absorbent will cause different water movement behaviour from materials that are
repellent. Care is needed in using this method as overflow of the dyed water can stain
furnishings and fittings.
Damage in a particular location may be caused by more than one leak. Using different
fluorescent dyed water colours can help isolate leak locations or contributing leaks.
Confirmation of leak paths may not be available until cut-outs are made.
2.3 recorDs
The assessor should keep clear records of the investigation, findings, site notes and
photographs for future reference and inclusion in the report, as required. Photographs
of a minimum of three megapixels will normally suffice and automatic camera date
and time stamps will assist in organising photos later on.
WeathertiGhtness : GuiDe to the DiaGnosis of Leak y BuiLDinGs 19
steP 2: suMMary of inforMation to coLLect
Notes of capacitance meter readings for reference
Records of any other moisture readings with their locations
Indications from dye water testing with location photos
Results from any other non-invasive investigation
Records and photographs
20 WeathertiGhtness: GuiDe to the DiaGnosis of Leaky BuiLDinGs
Step 3 – Invasive investigation
3.1 Moisture content testing 22
3.1.1 Electrical resistance moisture meters
22
3.1.2 False negative or misleading moisture readings
22
3.1.3 Control points
23
3.1.4 Moisture content thresholds
23
3.1.5 Different timber species
23
3.2 timber decay testing 23
s
te
3.3 records 24
P 3
WeathertiGhtness : GuiDe to the DiaGnosis of Leak y BuiLDinGs 21
Step 3 – Invasive investigation
The aim of invasive investigation is to locate and confirm the causes of leaks,
to start to identify the extent of damage and begin to detect what parts of the
framing may be affected by moulds, fungal infection and decay.
Appendix III includes detailed information on various tools and methods for invasive
investigation and how to apply them.
3.1 Moisture content testinG
It is normal for the moisture content of timber framing in buildings to vary with
the seasons and according to the degree of enclosure of the framing and its location
in the building. The indicative nature of site-recorded moisture readings means
that the particular circumstances on site at the time of the investigation need
to be considered, such as recent weather conditions. For more information,
refer to Appendix II.
3.1.1 electrical resistance moisture meters
Electrical resistance moisture meters are the most common tool for taking readings
in areas of suspected water ingress.
It is often necessary to take readings in suspected or high-risk locations even where
there have not been any abnormal capacitance readings.
Resistance meter readings are indicative to some degree and should be treated
as just another step in the diagnostic process. The readings should be noted
and used comparatively only to indicate possible moisture ingress for further
invasive examination.
It is usual to record just the actual meter readings on the day. In most situations
it is too complex to try to reconcile corrections on site for temperature variations,
treatment type or for timber species that may change from place to place within
the building and that are usual y unknown on site at the time of the investigation.
3.1.2 false negative or misleading moisture readings
Moisture content will vary over time depending on the source and frequency
of water ingress.
• Circumstances such as long periods of dry or hot weather, particularly when
combined with a type of construction that aids drying, or repairs, can cause
previously wet and decaying timber to lose much of its moisture content,
resulting in false or misleadingly low readings in leaking buildings.
• Low readings in leaking buildings can also be due to decayed timber that
has shrunk away from a leak path and is no longer wet.
22 WeathertiGhtness: GuiDe to the DiaGnosis of Leaky BuiLDinGs
Conversely, some circumstances may result in misleadingly high readings, for example:
• if the probe insulation is damaged, or wet through, a partial short circuit occurs
and the meter registers a lower resistance circuit through wet plasterboard,
cladding or other material – this is a particular risk with driven probes
• if the measurements are made very close to the external surface of framing
that is subject to condensation – this is a risk with short probes.
Any of these circumstances can result in ’false negative’ or misleading moisture
content readings, even though advanced levels of decay may actual y exist.
Assessors should look for subtle variations in moisture contents, even if readings
are within acceptably dry limits.
3.1.3 control points
Moisture readings are recorded as percentages of moisture by weight in the timber
in comparison with an appropriate control point on the building. The control point
is a point of reference that is highly unlikely to be affected by moisture ingress,
for example a suitable location might be beneath sheltered eaves or in a porch.
If necessary, a separate control point should be used on each elevation.
Readings from a control point provide the equilibrium moisture content as
a basis to reference against. The moisture content will typical y be in the range
of 9–14 percent at these control points.
3.1.4 Moisture content thresholds
To help clarify the significance of moisture readings, it is useful to work to a range
of moisture content thresholds. These should be used consistently throughout
the diagnosis and in the subsequent report.
Appendix II lists typical moisture readings that are reflective of industry experience
and how they should be interpreted in terms of timber decay.
3.1.5 Different timber species
It is not usual y necessary to correct on-site moisture content readings for timber
species, as it is the relative values compared with the control point reading that
are important. This does however assume that all timber in the building has had
the same treatment (or lack of treatment) and that environmental factors are
the same during testing.
3.2 tiMBer Decay testinG
There are a number of useful site techniques for detecting timber decay.
Results should be confirmed by laboratory testing with representative samples.
WeathertiGhtness : GuiDe to the DiaGnosis of Leak y BuiLDinGs 23
• The drilling process even prior to inserting the meter probes can provide useful
information about the state of the timber, such as wetness, smel , colour, decay
or hardness.
– Sometimes, the drill may appear to have missed the stud or bottom plate
altogether, but where examination of the drill bit shows that the drill position
is correct, this indicates the timber is so decayed that it has practical y
no resistance to the drill bit.
– The nature of the timber dril ings can often give a good indication of moisture
content and degree of decay, particularly in comparison with dril ings from
a dry, undamaged control sample. However, this must always be checked
by taking sufficient samples of other wood for laboratory testing.
• Probing timber with a sharp tool such as a chisel: if the timber breaks off into
short splinters (‘brashness test’) when levered by the probe, this is usual y an
indication of decay and loss of strength. Softness of the timber is also a useful
indicator of decay (although juvenile heartwood may be soft irrespective of the
presence of decay).
• Striking the timber with a hammer or similar: a soft and dull sound from a larger
timber member, or a change in note along a length of timber, might indicate decay.
A number of other methods for timber decay testing are described in Appendix III:
Investigative Tools and Practices, including:
• chemical indicators (for timber treatment identification)
• microscopy
• air sampling.
3.3 recorDs
Records should be kept of moisture readings and their locations, marked up on an
elevation, photograph or sketch drawing as an interim observations map.
If a theory for a likely leak path emerges, it is useful to show where the leak may have
occurred, where the deficiency may have occurred on the particular elevation, how
the moisture may have travelled through the structure, and what damage was caused.
Photos can support the hypothesis and can be used in the written report.
steP 3: suMMary of inforMation to coLLect
Elevations marked up with control points and relevant moisture
meter readings
Photos of timber testing locations (wide angle and close-up) with notes
Notes on observed timber decay including any collected test samples or
timber dril ings (with sample identification, location sketches/photos, etc)
Notes on defects and likely water flow paths, based on evidence gathered
so far
24 WeathertiGhtness: GuiDe to the DiaGnosis of Leaky BuiLDinGs
Step 4 – Destructive investigation:
cut-outs and samples
4.1 health and safety 26
4.1.1 Keeping an overall perspective
27
4.2 cut-outs 27
4.2.1 Temporary patches
27
4.3 samples 28
4.3.1 Size and nature of samples
28
4.3.2 Photographs
29
4.3.3 Record investigation maps/drawings
29
4.4 identifying timber treatment 29
4.4.1 Samples of untreated timber
29
4.4.2 Samples of treated timber
30
4.5 Moulds and fungi 30
s
4.6 types of decay 31
te
P 4
WeathertiGhtness : GuiDe to the DiaGnosis of Leak y BuiLDinGs 25
Step 4 – Destructive investigation:
cut-outs and samples
The aim of destructive investigation is to confirm areas of suspected decay and
moisture ingress/paths, and clarify construction detailing. It also al ows access
for sample collecting.
Destructive investigation involves cutting out sections of existing wall cladding
(and sometimes removing internal linings) and most often will fol ow invasive
moisture testing.
While destructive investigation aims to determine the real extent of decay, the assessor
should be aware that not all decay can be easily identified – it may exist where
the timber appears normal, or can be hidden, for example behind boundary joists.
Timber decay and mould identification are complex aspects of the diagnostic process.
Samples should be examined under a microscope so that the type and extent of
decay can be accurately determined and the appropriate remedial action developed.
It is therefore important to work closely with a specialist laboratory that can advise
on a number of significant aspects of the diagnosis, to help to guide the remediation
repair recommendations, including:
• the type and extent of mould and decay and the presence, type and retention
levels of timber preservative
• types of hazardous moulds, micro-organisms, etc
• how quickly decay will continue to develop
• how much framing needs replacement, the appropriateness of in situ preservative
and the type recommended.
Often, further timber and other material samples will be sent for laboratory analysis
as the building is opened up during the remediation work.
4.1 heaLth anD safety
It can be difficult to assess the potential for adverse health effects from mould
and other micro-organisms (for example, actinomycetes and bacteria) and their
by-products, as this can depend on the amount of affected material and its location,
and the type of micro-organisms. It is advisable to obtain as much information
as possible from all sources, keep people informed of potential risks and seek
expert advice.
When taking samples:
• suitable protective equipment including appropriate breathing masks and gloves
must be worn
• mould and fungi should be disturbed as little as possible. For example,
stachybotrys atra is far more dangerous when it has dried out and the spores
readily become airborne. When wet, the spores tend to stick together and are
less likely to be breathed in by the building user
26 WeathertiGhtness: GuiDe to the DiaGnosis of Leaky BuiLDinGs
• cladding should be removed from the outside of the building rather than from
the inside wherever possible, to al ow any potential y dangerous fungi such as
stachybotrys to be released into the atmosphere rather than inside the house
• any voids that may have been opened up as part of the investigation process
need to be careful y sealed off.
4.1.1 keeping an overall perspective
Subject to the terms of the report commission, it may not be cost-effective
to carry out further detailed investigation if it appears likely at an early stage that
full re-cladding will be needed. This might happen when there is a combination of
untreated timber, a defective cladding system, widespread leaking, and widespread
damage. In such cases, ongoing and detailed checking or laboratory analysis of any
remaining timber would be far more practical during the subsequent repair process
once cladding has been removed.
Conversely, if there appear to be few leaks and little damage, then it is particularly
important to carry out sufficient testing to ensure any recommendations for limited
repair will fix the problem and meet the Building Code. This would include taking
timber samples for laboratory analysis if there is uncertainty about the type
and nature of framing treatment.
4.2 cut-outs
Destructive investigation involves making cut-outs in the cladding (or in some cases
internal lining) to:
• confirm the results of timber drilling
• check underlying construction details and materials
• confirm leak paths and establish the extent of damage
• confirm whether apparent defects have led to actual damage
• check whether repeated details are defective
• take samples of timber and other materials to send for laboratory analysis.
There are no practical rules or ‘square metre rates’ for the number of cut-outs to take.
General y, cut-outs should only be made when there is reasonable probability of
obtaining good evidence of the damage or of the deficiency which caused the damage.
When a cut-out is needed, a sheltered location to minimise further damage to the
building is preferable.
Most owners will want to minimise cut-out sizes. Sometimes it is sufficient to use
a keyhole saw (approx 100 mm diameter), which al ows a neat patch repair. However,
larger holes (up to A4 size) are often necessary for a number of reasons, such as fol owing
the leak path, determining the extent of damage, or checking an as-built detail.
4.2.1 temporary patches
Cut-outs inevitably damage the wall cladding. Temporary cover patches need
to be prepared and applied, as it is seldom possible to re-use the removed cladding.
The building owner should be made aware that any cladding that has had temporary
patches will need proper repairs and should be made weathertight as soon as possible.
WeathertiGhtness : GuiDe to the DiaGnosis of Leak y BuiLDinGs 27
4.3 saMPLes
Samples of timber and/or mould from the cut-out should be taken for analysis.
There are no predetermined rules for the number of laboratory samples to take
as the size and nature of sampling depends on the situation being assessed
and the forensic information required. If the aim is to determine the length of time
that the building has been leaking at a particular location, it may be important
to send a sample from a clearly wet area and one from a reliably dry area.
Other factors which influence the decision as to how many and where samples
should be taken include:
• whether framing is known to be treated
• the estimated length of time the timber has been subject to excessive moisture
• the extent of decay assessed from the on-site investigation so far
• the information available from drilling and other on-site testing
• whether representative sampling will suffice where the same defects are repeated
elsewhere on the building
• whether either a full reclad or targeted repairs seems the more likely
remediation option
• the costs of returning for more samples at a later date if assumptions prove incorrect
• whether initial judgements on decay are confirmed by laboratory analysis.
Ultimately, the decision on whether more cut-outs and samples are required rests
on whether the samples taken will provide sufficient evidence to support the
hypothesis for the cause of the weathertightness defects in the report.
A cut-out table that cross-references to the relevant elevations and photos is most
useful for later analysis. This should show where cladding cut-outs and laboratory
samples were taken from and record observations.
4.3.1 size and nature of samples
A sample of surface mould can be taken using adhesive tape. A piece of sticky tape
pressed down on the mould or fungi and transferred to a grease-proof paper envelope
can be sufficient for laboratory analysis.
However, more useful forensic information can be obtained by sending a sample
of the actual material to the laboratory for analysis (for example, building paper
or plaster board) with the mould attached.
Normal y a 100 mm length of 100 mm x 50 mm framing will maximise the potential
forensic information. However, analysis of very small samples may be possible.
Augur drill fragments (using a slow speed wide/flat-ended auger bit) are the smallest
size of sample that could be collected. Hole saw cores (15–50 mm) are preferable.
Chiselled samples can also be used. Small samples of this type minimise the damage
to the cladding.
It is important to include samples of the timber that is considered to be least decayed
to provide benchmarks.
28 WeathertiGhtness: GuiDe to the DiaGnosis of Leaky BuiLDinGs
4.3.2 Photographs
When sending samples to the laboratory, it is helpful to provide photographs showing
where each sample has come from. Photographs from both close up and further
away are useful to show the relative locations of samples on the building.
Photographs should also be provided that give an overall perspective of the type
of building under investigation (such as showing the elevations, cladding type,
junction details), to assist with the forensic analysis of samples and interpretation
of test results.
4.3.3 record investigation maps/drawings
A record of where cut-outs were made and laboratory samples taken from, and that
cross-references to the relevant elevations and photos, is useful for later reference
and analysis and for inclusion in the report.
4.4 iDentifyinG tiMBer treatMent
Site testing for boron or copper-based preservatives can have some success if accepted
procedures are fol owed, although the most reliable boron spot test is highly toxic and
general y unsuitable for site testing.
Boron spot tests can give false positive readings. These are very common if only
old surfaces are tested, leading to untreated wood being misdiagnosed as H1 or H1.2.
In situ treatment can also be confused as being H1 or H1.2.
There is no reliable on-site test for H1.2 LOSP and H3.1 LOSP tin, so test samples
for oven-drying are required. H1 permethrin and H1.2 permethrin plus IPBC cannot
be tested using rapid spot tests. More costly and time-consuming (one to two weeks)
quantitative laboratory analysis is required.
For more information, refer to Appendix III.
4.4.1 samples of untreated timber
The use of untreated kiln-dried timber for external wall framing was common
from 1996 to 2004. LOSP H1 treated timber without a fungicide became common
from 1992 and can be considered the equivalent of untreated timber.
If on-site testing indicates that timber is untreated or LOSP H1 and decay is
widespread, only a few samples may be necessary, as it is likely that a full reclad
and major timber replacement will be needed. In such cases, the main reason
for sampling will be to ensure the building owner has sufficient evidence to support
the need for a reclad. Reasonable evidence of untreated timber includes markings
on the timber and/or spot tests. The laboratory analysis can confirm that the timber
is untreated and also the extent of decay.
An accurate record of sample locations should be kept to help inform the
recommendations for the extent of any timber replacement.
WeathertiGhtness : GuiDe to the DiaGnosis of Leak y BuiLDinGs 29
4.4.2 samples of treated timber
More samples may be needed for treated timber. However, if treated timber shows
widespread decay due to leaks over a long time, a full reclad and major timber
replacement may be inevitable and the assessor may choose to take fewer samples.
Again, sample locations should be recorded to help inform recommendations
for timber replacement or in situ treatment.
If leaking is relatively isolated and there is limited decay, targeted repairs may be
an option. In this case, more samples may be required to determine the extent
of the decay, taking into account the rule-of-thumb practice that all timber within
one metre of the outer limit of the decay must be removed unless laboratory tests
on samples taken inside this distance show no decay.
4.5 MouLDs anD funGi
The accurate analysis of moulds and other fungi found on site can only be undertaken
by experienced laboratory specialists.
Some moulds and fungi can grow on almost any surface and many do not pose health
risks. However, stachybotrys atra and some other types of mould are toxigenic and
have been implicated in sick building syndrome. Stachybotrys atra is most commonly
found on paper lining on gypsum paper board, fibre-cement board, building paper,
and other cel ulose-containing materials.
Some moulds (such as stachybotrys atra and chaetomium globossum) also cause
decay in some situations. Specialist knowledge and experience is necessary
to establish their significance in any given scenario.
Dormant fungi can be a problem. Decay fungi can remain dormant in dry timber
for several years in some situations. Laboratory testing can determine if decay
was recently active.
30 WeathertiGhtness: GuiDe to the DiaGnosis of Leaky BuiLDinGs
4.6 tyPes of Decay
While decay should be identified in the laboratory, the fol owing is a general guide.
• Brown rots (at advanced stages) usual y cause wood to lighten in colour prior
to becoming dark brown, and to crack along and across the grain (although only
once dry). When dry, very decayed timber will crumble to dust.
• White rots at well-advanced stages cause the timber to become lighter in colour
and fibrous in texture without ‘cross checking’ along and across the grain.
• Dry rot is the common term for a brown rot, serpula lacrymans. This is relatively
rare in New Zealand but it is a serious problem when found. It is difficult to
distinguish from other brown rots, so field observations must be backed up
with laboratory testing. Serpula lacrymans does not attack dry wood. It cannot
decay wood at moisture content values below 18 percent. It can, however, move
moisture over considerable distances from wet areas to dry areas via thick visible
mycelial cords and can also spread across wide fronts on initial y dry wood if
very high atmospheric humidity prevails (above 85 percent and optimal y close
to 100 percent) and alkaline conditions are present (such as in fibre-cement
base materials). If the air is moving and relative humidity values are no more
than 75 percent, this is usual y sufficient to retard dry rot growth across dry
wood. The main concern with dry rot is that decay is very rapid once suitable
conditions prevail.
• Wet rot refers collectively to all other brown and white rots.
• When conditions are particularly wet – moisture contents in excess of 60 percent
– soft rot decay may occur. Timber affected by soft rot often shows little outward
sign of decay – the classic softening is absent. Sometimes the timber may
become a dirty grey to brown colour. When a sample at least the size of a
matchstick is broken off, the fracture surface can sometimes look like a broken
carrot (although juvenile wood without decay behaves in a similar fashion).
WeathertiGhtness : GuiDe to the DiaGnosis of Leak y BuiLDinGs 31
steP 4: suMMary of inforMation to coLLect
Cut-out locations, with observations and photo references
Records of suspected and evident extent of timber decay, or of any on-site
testing for timber treatment
Notes on likely decay, and causal links
Extent of repeated defects and potential for future damage
Timber and other material samples ready for laboratory analysis (with
sample identification, locations sketches/photos, etc)
Temporary patches installed over cut-outs
Record of any health and safety issues
32 WeathertiGhtness: GuiDe to the DiaGnosis of Leaky BuiLDinGs
Step 5 – Defect analysis
5.1 analysing the evidence 34
5.1.1 Potential future damage
34
5.2 results 35
s
te
P 5
WeathertiGhtness : GuiDe to the DiaGnosis of Leak y BuiLDinGs 33
Step 5 – Defect analysis
This section considers how to develop a robust theory for the cause of leaking,
the extent of the resulting damage and the potential for future damage. This will form
the basis of recommendations for remedial work.
There is no predetermined correlation between cause of moisture ingress,
consequent damage and the required repairs. Each situation will have a variety
of factors and the diagnosis needs to be on a case-by-case basis.
Significant field experience and specific in-depth training is required to draw valid
conclusions from the evidence observed in steps 1 to 4 of the diagnosis.
5.1 anaLysinG the eviDence
The analysis stage should draw on evidence from all stages of the investigation
so far, including:
• visual investigation – obvious signs of moisture entry inside and out; owner/
occupier comments, overall building design and high risk features (for example
parapets, complex joints and flashings, monolithic cladding, deck penetrations);
any irregularities or complications identified from the consent documentation,
manufacturer specifications, the as-built situation, build quality, etc
• non-invasive investigation – locations and extent of moisture ingress; preliminary
conclusions on water paths and causal links within the building structure
• invasive and destructive testing – faulty construction joints, flashing failures,
timber decay locations and water damage evidence; linkages between defect
and damage; the extent of localised defects; the likelihood of systemic cladding
defects, sampling and testing for potential future damage
• the results of laboratory tests and other specialist reports:
– the presence and description of any mould/fungi
– the potential extent of timber damage and subsequent extent of estimated
replacement framing timber
– the extent and type of timber treatment required for remediation.
5.1.1 Potential future damage
Leaks and/or damage may only be evident in isolated areas at the diagnosis stage.
The assessor needs to make a judgment, based on the building features, evidence
of leaking, moisture content readings and test results, as to whether water ingress
and damage will also occur in similar risk areas in the future even if they are currently
unaffected, such that the building would fail to meet the durability provisions
of the New Zealand Building Code.
Within this guidance document, the terms ‘potential damage’ or ‘potential future
damage’ refer to the consequences of those building defects:
• that are currently causing or contributing to leaks and that will
probably cause
damage in the future, or
• that are not yet causing leaks but are
probably going to cause or contribute
to leaks in the future and cause damage.
34 WeathertiGhtness: GuiDe to the DiaGnosis of Leaky BuiLDinGs
For the purposes of this guidance, ‘probably’ does not mean possibly – it is not
enough that a defect might leak and cause damage. Whether or not something
is probable will be a matter for the assessor to conclude and consider accordingly
in developing the recommendations, based on the circumstances of the particular
building and on the assessor’s knowledge and experience of the consequences
of weathertightness defects. Relevant factors to consider in deciding whether
a defect may cause or contribute to water ingress resulting in damage include
the level of exposure of the building and the design detailing of the defect.
Note – a building detail or design that is not causing or contributing to leaks but
is non-compliant with the current Acceptable Solution is not necessarily indicative
of potential future damage.
5.2 resuLts
The analysis process should:
• identify the building details causing water ingress
• identify the extent of damaged building material
• determine the probability of potential future damage.
At this stage, the assessor should check that adequate moisture content readings
and material samples have been taken to be assured of the accuracy of results,
interpretations and analysis.
Depending on the circumstances, the conclusions from the analysis and the reasoning
for the recommendations may need to be used as evidence in a court. It is therefore
critical to have a clear and logical understanding of the causes of the leaks and damage
and to have sufficient evidence recorded properly in both graphic and text format.
WeathertiGhtness : GuiDe to the DiaGnosis of Leak y BuiLDinGs 35
steP 5: suMMary of inforMation to coLLect
An overview of investigation readings, laboratory results, testing, etc
Understanding the building design risk features
Identifying the defects and leak paths linking to damage
Identifying the types of decay and extent of damage present and suspected
An assessment of potential for future leaks and damage
A schedule of relevant evidence
36 WeathertiGhtness: GuiDe to the DiaGnosis of Leaky BuiLDinGs
Step 6 – Developing the remediation
recommendation
6.1 strategies 38
6.2 Balancing risk 38
6.3 risk matrix assessment 39
6.4 relevant Building act 2004 requirements 39
6.5 remediation options 40
6.5.1 In situ timber treatment
40
6.5.2 Targeted repair
40
6.5.3 Partial reclad
41
6.5.4 Full reclad
42
6.6 other issues to consider 42
6.6.1 Structural problems
42
6.6.2 Other building defects
42
6.6.3 Incidental design impacts
43
6.7 estimating the cost of remediation 43
s
te
P 6
WeathertiGhtness : GuiDe to the DiaGnosis of Leak y BuiLDinGs 37
Step 6 – Developing the remediation
recommendation
The assessor’s remediation recommendation is to inform the building owner of the
anticipated scope and cost of remedial works and should focus on repairs that are
technical y robust, cost-effective and meet the relevant statutory or regulatory requirements.
The assessor’s brief for the report may be to also address other issues beyond technical
weathertightness matters, for example structural, fire or energy efficiency issues.
The owner may separately engage a remediation designer upon receiving this completed
diagnosis and report to explore options for improving their building, and develop the
design and consent documentation. Remediation design is covered in a separate joint
publication by the Department and BRANZ,
Weathertightness: Guide to Remediation
Design, referenced in Appendix V.
6.1 strateGies
The fundamental constraint of the diagnostic process is that assessors have limited
access to evidence. Further evidence may only be discovered once remediation
works are underway with cladding sections removed and framing made visible.
The assessor’s conclusions and recommendations are necessarily based on a limited
amount of information.
There are numerous technical building aspects to consider and balance when
developing a remediation recommendation.
• Design risks – does the building have high-risk design features, for example
complex joints or flashings?
• Cladding – what type of cladding is present?
• Workmanship – what is the quality of existing design detailing, of the build,
and of any maintenance?
• Framing – is wall and roof framing treated to sufficient levels?
• Leaking – are leaks isolated and/or in consistent locations/patterns, are they
systemic around the building?
• Damage: is damage limited or widespread? For how long has the building been
leaking? Is hazardous mould present? How extensive is the damage beyond
those locations examined?
• Potential damage – is there probability of future leaking and damage?
6.2 BaLancinG risk
Unlike a new design, where the designer has the freedom to manage risk through
choice of design and materials, remediation work is restricted by the costs and
complexity of repairing or replacing existing structures, materials and design features.
A remediation recommendation has to achieve Building Code compliance within
these limitations.
38 WeathertiGhtness: GuiDe to the DiaGnosis of Leaky BuiLDinGs
It is useful to think of the 4Ds of weathertightness design (Deflection, Drainage,
Drying and Durability) when considering design options. If the effectiveness of one
or more of the 4Ds is compromised by the original design or the consequences of
leaks, then increasing the effectiveness of the remaining ‘Ds’ can help balance such
shortcomings and reduce the risk of a subsequent failure of the building.
6.3 risk Matrix assessMent
A risk matrix assessment for the weathertightness of a design, as set out in
Acceptable Solution E2/AS1, may be helpful in the analysis and reporting. It can give
an indication of the degree of weathertightness risk of each elevation or part-elevation
for the particular wall cladding instal ation.
To be meaningful, the building needs to fall within the scope of NZS 3604. The scores
should be calculated on individual elevations/wall planes and should not be applied
so broadly that discrete high risk features are disregarded, such that isolated risks
are lumped together and hidden in combined scores. It should be noted that not all
elevations of a building will have the same risk score.
It may be that only parts of an elevation have risk scores that would require a cavity
under E2/AS1. However, it is more practical to install a cavity to a whole elevation/
wall plane than to parts of it. This is because when instal ing a single cladding type
it is simpler and more practical for design detailing, flashing, consenting, fabrication/
instal ation and construction, and it is aesthetical y preferable to have uninterrupted
wall planes.
6.4 reLevant BuiLDinG act 2004 requireMents
As remediation involves repairs and reconstruction, which are alterations under
the Building Act, the work must comply with the Building Code and any recommendation
and estimate of costs in the diagnostic report will need to provide for this. The requirements
of the Building Code and the need for building consent must be considered in light
of the particular circumstances of the diagnosis.
Some remediation works may not require a building consent if the work fits within
an exemption in Schedule 1 of the Building Act 2004. General y, a building consent
will be required for proposed remediation work:
• on a leaking building envelope which is less than 15 years old
• where failure of the building envelope is known to have occurred within 15 years
of construction
• where any structural elements are being replaced due to leaks (for example,
decayed timber framing)
• where repairs are being made to fire separations in non-detached houses.
Repairs and remediation works fall within the definition of ‘alteration’ in the Building
Act 2004 and so section 112 of the Building Act will apply where a building consent
is required. As a starting point, section 112(1) requires that after the alteration:
• the means of escape from fire and access for disabled persons must be upgraded
as nearly is reasonably practicable to meet the current Building Code
requirements, and
WeathertiGhtness : GuiDe to the DiaGnosis of Leak y BuiLDinGs 39
• the rest of the building must continue to comply with the other provisions of the
Building Code to at least the same extent as before the weathertightness failure.
The Department’s
Codewords 32 – October 2008 provides further information
(referenced in Appendix V).
6.5 reMeDiation oPtions
There are many complex factors and interactions at play within a leaking building that
make it impossible for this guidance document to prescribe a remediation solution.
However, there are some general circumstances where different approaches might
be chosen.
Any recommendation depends on careful analysis of the evidence and situation,
assessing the relative risks of possible solutions and weighing up their estimated cost
benefits. The rationale for the recommendations needs to be clearly documented.
Demolishing the existing building and replacing with a new building may also be
an option to consider in specific circumstances, such as in terms of overal cost-
effectiveness. However, this fal s outside the scope of this document.
6.5.1 in situ timber treatment
It is essential to fol ow the advice of an experienced remediation specialist or
laboratory to confirm how much timber to remove and precisely what in situ
treatment and conditions are recommended for the remaining timber.
The durability of undamaged framing that was either untreated or had low
preservative levels will increase with in situ treatment, and this should be applied
whenever this type of framing has been exposed.
Where timber is decayed, in situ treatment can be applied to at least three sides
of each piece of framing (for example, with boron in glycol, or copper naphthenate
in solvent), but this depends entirely on the type and extent of decay and the
corresponding specialist advice. These treatments help to limit the growth of fungal
decay but will not restore strength to damaged timber. It should be noted that in situ
chemical application cannot effectively reach through decayed multiple or laminated
timber members, and these will therefore require removal and replacement.
6.5.2 targeted repair
A targeted or isolated repair may be appropriate for specific and localised
shortcomings of the building envelope where the framing (including wall underlay,
bolts and straps) in adjacent areas is unaffected. It may be appropriate in limited
situations, such as for defective basement waterproofing, a faulty window and/or
flashing instal ation, or leaking around a penetration.
If the framing is damaged, the cladding will need to be careful y removed to expose
the full extent of decay.
40 WeathertiGhtness: GuiDe to the DiaGnosis of Leaky BuiLDinGs
Targeted repairs carry a high risk that further damage may be found during remedial
repair work, necessitating a redesign and greater time and costs to complete the
repair for the owner. The worst case scenario is that a targeted repair may not ful y
identify or fix the problem and that leaking and decay continue undetected, with
the remediation team considered liable.
A recommendation for a targeted repair would need to be supported by a thorough
inspection and investigation of the entire building on all elevations.
6.5.3 Partial reclad
A partial or limited reclad may be appropriate where:
• the investigation demonstrates that defects and/or damage are clearly confined
to a particular elevation (or possibly one particular storey), or to sections of
cladding between corners (ie, the evidence available and analysis show defects/
damage are not systemic), and
• where resulting decay is confined to the framing in the immediate vicinity, and
• where the investigation has shown that adjacent areas of cladding and framing are
free from defects and damage, and therefore from the potential for future damage.
Partial repairs may be successfully carried out to direct-fixed cladding systems in
some limited circumstances, for example with overlapping and small unit cladding
systems (such as weatherboards) where there are numerous joint lines to use as
the boundary of the repair.
With flush-panel (or ‘face-sealed’) monolithic systems, it is more difficult to avoid
failure at the boundaries of the repairs, for example, without introducing complicated
flashings or express joints.
The assessor must be clear and confident about how junctions between the new
and retained claddings are to be formed. This needs to be done without causing
damage to the existing cladding, and so that sufficient laps can be achieved between
new and existing underlays.
Decayed timber will need to be replaced, or treated in situ if it is shown to be
structural y sound and is accessible. Any consequent removal and making good/
reinstatement of linings, joinery, interior trim and finishes will need to be considered.
It is usual practice to remove windows/doors with the cladding, however the assessor
needs to ascertain whether the failure is within the windows themselves, or at the
junction between window and cladding, or both. Once windows are removed,
this provides the added opportunity to reinstate/replace them and to install suitable
flashings, sill support bars, air seals, etc as required.
The assessor should check careful y that a partial reclad solution:
• is cost-efficient compared with full recladding
• will deliver an effective remediation, and
• will address potential future damage.
WeathertiGhtness : GuiDe to the DiaGnosis of Leak y BuiLDinGs 41
6.5.4 full reclad
The decision about how much defective cladding to remove to repair faults and to
access damaged framing depends on various factors and their interactions, such as:
• the degree of risk posed by the existing building design features
• the type of cladding
• the quality of the detailing and build
• the framing treatment
• the leak patterns
• extent of the damage, and
• the potential for future leaks and damage.
Some examples of where recommendations for full recladding are most likely would
be where the investigation demonstrates that:
• there are systemic defects (evidenced by leaks and damage) in the construction
of the cladding system which can only be remedied by removal of all the faulty
cladding, or
• the combination of repairs needed to remedy defects which have caused leaks
and damage, and those defects that will probably cause future damage, can only
be remedied by removing all the cladding, or
• the cost of full recladding is lower than targeted repairs and/or partial recladding
to remedy isolated defects and replace or treat in situ framing that is decayed,
and to remedy those defects that will probably cause future damage, or
• significant overal design changes are needed to reduce the building’s
weathertightness risk to an acceptable level.
In these circumstances, leaving portions of the faulty cladding system in place
would be high risk. It would also make it difficult to effectively assess timber damage,
replace decayed timber, treat any remaining sound timber, remove mould spores,
and install the new cladding and flashing system.
Experience has shown that replacing only sections of affected timber can be very
time and labour-intensive and it may be more cost-effective to replace with whole
new frames. A quantity surveyor can advise on cost differences.
Where structural building elements are severely damaged throughout the building,
a complete reclad would be needed to access the framing and fixings.
6.6 other issues to consiDer
6.6.1 structural problems
The report briefing needs to specify whether the recommendation should include
rectifying any structural issues that are not related to weathertightness such as
elements that were incorrectly designed or installed. In any case, it is essential
that the report identifies any structural elements that may be a safety risk,
for example inadequate bracing.
42 WeathertiGhtness: GuiDe to the DiaGnosis of Leaky BuiLDinGs
6.6.2 other building defects
Other non-structural building defects may be identified during the diagnosis, such as:
• leaks in internal wet areas
• acoustic or fire separation problems in apartments
• safety problems with barriers or lack of handrails
• plumbing leaks
• unsafe electrical instal ations.
While these are not weathertightness issues, if they pose a risk to safety they will need
to be addressed in the report. These matters should be brought to the building owner’s
attention as they could impact on any claims or legal proceedings the owner is involved in.
6.6.3 incidental design impacts
For some remediation projects, the proposed remediation work can trigger a need
to modify other aspects of building performance. For example, where direct-fixed
EIFS cladding is to be replaced by EIFS on a cavity, the level of compliance with
Clause H1 Energy Efficiency would be diminished by the added cavity. The insulation
design would need to be recalculated to be no worse than before, with additional
insulation to compensate, as required. Any of these items and their costings should
be clearly included in the diagnostic report.
6.7 estiMatinG the cost of reMeDiation
Often the brief for the diagnostic report requires the anticipated costs for the remediation
proposal to be included. The assessor therefore needs to produce a sufficiently itemised
schedule of repairs for both current and any potential future damage to assist a
quantity surveyor or experienced third party to prepare the cost estimate.
The assessor should clarify with the owner how the estimate should be presented
in the report. It may be appropriate to include separate breakdowns of costs,
for example for:
• current damage
• repairs already completed
• potential future damage
• work to meet the relevant legal requirements
• other non-weathertightness work
• building improvements (for example, for improved aesthetics/functionality)
• cost comparisons for different remediation options.
The cost estimate needs to specify what is included and what is excluded.
The assessor should provide the quantity surveyor with as much detail
as possible, including:
• relevant photographs, notes with marked up sketches and elevations
• the extent of framing for replacement, how much retained timber is to be
treated in situ, whether windows are to be reinstated or replaced
• any requirements for managing existing ground levels/drainage/landscaping
that encroach on the building
WeathertiGhtness : GuiDe to the DiaGnosis of Leak y BuiLDinGs 43
• whether membrane roofs/decks need replacement, other than new stainless
steel screw fixings and roof vents, whether falls and drainage need to be
corrected and whether the substrate and any roof framing should be replaced
• a thorough assessment of anticipated ‘Preliminary and General’ items,
such as the ease of site access, entering/protecting neighbouring property
or air space, al owances for scaffolding, propping, protection, on-site storage,
site huts, reinstating adjacent linings, bathrooms/kitchens, making good,
rubbish removal
• descriptions for the calculation of appropriate provisional sums for items
of uncertainty, plus realistic contingencies.
Agree inclusions with the owner, for example:
• building consent and inspection fees
• preparation of detailed plans and specifications
• consultants’ fees (designers, remediation specialists, and any others)
• laboratory tests and microscopic analyses, as required.
Agree any exclusions with the owner, for example:
• legal costs and expenses
• temporary accommodation, storage and relocation
• other costs incurred by the owner such as lost rent, borrowing costs,
consequential losses, damages
• damage to interior fittings and fixtures (unless specifically stated)
• painting interior walls and ceilings (unless specifically stated)
• cost fluctuations.
steP 6: suMMary of actions anD inforMation
Develop a remediation recommendation, with appropriate rationale
Prepare the initial of schedule of works for the QS and commission the cost
estimate, with relevant inclusions and cost benefit analyses (as required)
Identify non-weathertightness work
Collect and append supporting evidence
Col ate material for the full diagnostic report, including the investigation
and diagnosis, evidence, remediation recommendation and costings,
together with a summary
44 WeathertiGhtness: GuiDe to the DiaGnosis of Leaky BuiLDinGs
Step 7 – The diagnostic report
s
te
P 7
WeathertiGhtness : GuiDe to the DiaGnosis of Leak y BuiLDinGs 45
Step 7 – The diagnostic report
This section provides a simple checklist as an example for a diagnostic report based
on the generic investigation as described in this guidance document.
Some clients, however, may require only a short summary of pertinent issues
and recommendations.
Some diagnostic reports, such as those for the Weathertight Homes Resolution
Service (WHRS), may require additional information specific to their own
commissioning instructions.
1 report introduction
1.1 Description of the diagnostic project
1.2 Purpose of the report
1.3 Executive summary
2
Background information to the report
2.1 Description of property
2.2 Description of the building’s construction
2.3 History of construction
2.4 People and organisations associated with the construction
3 investigation – methodology
3.1 Pre-work and preliminary investigation
3.2 Site visits – dates, weather, meetings, details
3.3 Building investigation process and specialist equipment used
3.4 Owner/occupant comments and other information
4 investigation – observations
4.1 Investigation maps/drawings – moisture readings, cut-outs, sampling locations
4.2 Observations and photographs
5 investigation – analysis
5.1 Assessment of design risk features, leak paths and decay
5.2 Analysis of evidence from observations, laboratory results and other reports
5.3 Assessment of potential future leaking and damage
5.2 Risk matrix assessment
5.3 Health and safety
5.4 Non-weathertightness issues
6 remediation recommendation
6.1 Remediation proposal summarised
6.2 Rationale for the recommendation
6.3 Estimated cost details for the recommended work
46 WeathertiGhtness: GuiDe to the DiaGnosis of Leaky BuiLDinGs
7 summary conclusions
7.1 Repair proposal and estimated cost
7.2 Assessor statement of commission completion
8 report: supporting documents and information
8.1 Legislation relevant to the building/repair
8.2 Assessor’s qualifications and experience
8.3 Relevant Compliance Documents
8.4 Photographic records
8.5 Full estimate of repair costs
8.6 Certificate of Title
8.7 Explanation of particular items and terms used
8.8 Specialist reports
8.9 Manufacturers’ literature and technical specifications
8.10 Owner’s documents
8.11 Non-weathertightness building defects, deferred maintenance, etc – as applicable
WeathertiGhtness : GuiDe to the DiaGnosis of Leak y BuiLDinGs 47
48 WeathertiGhtness: GuiDe to the DiaGnosis of Leaky BuiLDinGs
a
PP
en
D
ices
Appendices
appendix i: indicative history of timber treatment in new Zealand 50
appendix ii: critical moisture content of timber framing 51
appendix iii: investigative tools and practices 53
Moisture detection tools that are often useful
53
Moisture detection tools that are occasional y useful
55
Treatment detection tools that are often useful
57
Decay detection tools that are often useful
57
Decay detection tools that are occasional y useful
58
appendix iv: Worked example of a diagnostic investigation 59
appendix v: further resources 68
appendix vi: Glossary 70
WeathertiGhtness : GuiDe to the DiaGnosis of Leak y BuiLDinGs 49
aPPenDix i: inDicative history of tiMBer treatMent
in neW ZeaLanD
Dates
Relevant activities
1930-40s
Native timber supplies running out.
1940s
Late in decade, State Advances Corporation concerned about insect attack on low
quality timber.
Use of tanalith approved.
1950s
DSIR investigates alternatives for treating pine. Decides on boron diffusion.
1955
Timber Preservation Authority (TPA) established.
Only two grades of timber treatment initial y: inside (protected) and outside (exposed).
1986
TPA releases list of treatments to achieve H1.
1987
TPA disbanded by Government. Industry establishes the New Zealand Timber Preservation
Council Inc (TPC) to operate a quality assurance programme known as WOODmark®.
1988
MP 3640 reduces required level of Boron in H1 to 0.1% B.A.E (boric acid equivalent)
at core of timber (core loading). Full sapwood penetration required.
Primary risk identified as decay.
1990
MP 3602 – Boron treated timber must be kept at 24% or drier.
1992
MP 3640 amended – changes primary risk from decay to insect attack.
1993
MP 3640 amended again – core loading in dry timber reduced to 0.04% B.A.E to
achieve H1.
Sept 1995
NZS 3602 amended to al ow for kiln-dried untreated timber (KDUT) provided in situ
moisture range is 18% or less (alternative solution at this stage).
Feb 1998
NZBC Acceptable Solution B2/AS1 amended to include NZS 3602: 1995.
KDUT now part of Acceptable Solution (in situ moisture range to be 18% or less).
Dec 2003
NZS 3640 amended to include the new levels of timber treatment – H1.1, H1.2, H3.1, H3.2.
Boron levels in H1.2 increased considerably to 0.4% B.A.E with some decay resistance.
NZS 3602 republished as NZS 3602: 2003 (NZS 3602 works in conjunction with
NZS 3640).
April 2004
Part 1 of NZS 3602: 2003 ‘Mandatory Requirements for Compliance with the Durability
Provisions of Clause B2 of the New Zealand Building Code’ becomes an Acceptable
Solution after being referenced in B2/AS1.
The previous Acceptable Solution, Part 1 of NZS 3602: 1995 (which al owed KDUT),
continues to apply as an Acceptable Solution until 31 March 2005.
April 2011
H1.2 standardised for framing timber in B2/AS1.
Notes:
• The above timeframes are a guide only.
• 0.4% means for every 100 grams of oven dry timber, there has to be 0.4 grams of boron by weight.
• The level of boron retention started off high in the 1950s as the system was quite crude.
• In the 1980s, there was a world shortage of boric acid, so industry became more efficient and
dropped the requirement to 0.1% in 1988.
• In April 1993, it was dropped again to 0.04% (measured at dry core) which is the level of most
of the buildings affected by the leaking building syndrome. This means there was very little boron
protection at the core of the timber, that is, at the centre of the cut (for example, at stud bottoms).
• It was difficult to be precise with boron treatment because of variables at both the initial uptake
and in the residual levels after drying.
50 WeathertiGhtness: GuiDe to the DiaGnosis of Leaky BuiLDinGs
aPPenDix ii: criticaL Moisture content of tiMBer fraMinG
This appendix provides further information on understanding the implications
and limitations of moisture content readings.
Moisture content readings presented in the broad bands below relate particularly
to untreated radiata pine. The indicative nature of site-recorded moisture readings
requires the assessor to consider the context and particular circumstances of the site
at the time of investigation. This might include recent weather conditions, variations
against the equilibrium moisture content (emc) at the control point, or false negatives.
For both resistance and capacitance meters, the assessor should not rely on any
single reading or observation in isolation, as accurate assessment of moisture content
is a progressive process. Low values should not be taken at face value, as moisture
elevation caused by faults is often a passing event. For example, occurrences of dormant
decay in concealed wood at moisture content values between 8–18 percent are common.
Any value above the expected or pre-recorded emc value should be taken as a sign
to look further, and this includes values below 18 percent. The emc should be
established by obtaining moisture content readings from a ‘control point’ or reference
in external wall areas that are highly unlikely to be affected by faults (such as under
protected eaves). For example, if background emc values are on average 11 percent,
any value that is 3–5 percent above this (that is, 14–16 percent) would indicate a
moisture problem worthy of consideration and possibly further exploration. It should
be noted however that a range of factors, including preservatives, temperature, wood
extractives, moulds and sapstain fungi, and wood species, can affect emc values.
Moisture content readings are only indicative
All moisture content thresholds used or referred to during investigation and remediation
are indicative and not absolute. The general y recognised safe threshold for moisture
content is 18 percent. Once decay is established, there is a probability that ongoing
decay can occur close to 18 percent, but for uninfected wood, the moisture content
conditions required for decay are closer to the fibre saturation point, probably
25–30 percent.
Fungi produce metabolic water during decomposition of wood and this local moisture
may be undetectable with available resistance meters which do not pick up the
micro-moisture percentage changes. Furthermore, moisture conditions in the outer
1–5 mm are sometimes higher than in deeper wood in situations that are marginal
for decay, for example, where condensation occurs.
Moisture content bands
The recognised moisture content bands are as fol ows.
Up to 18 percent
• Moisture content readings in this range fall within the maximum al owable range
for untreated radiata pine as per NZS 3602: 2003 for members protected from
weather and in dry conditions.
• While moisture content of this level could indicate possible problems,
it is general y considered that this level will not support timber decay.
WeathertiGhtness : GuiDe to the DiaGnosis of Leak y BuiLDinGs 51
18–24 percent
• Moisture content readings in this range indicate problems exist and excess
moisture should be immediately corrected.
• Such levels must be considered a warning that remedial action is required
to prevent future damage. Mould growth will be common in wall cavities.
• Once decay is established, there is a significant probability that ongoing
decay can and will occur.
24 percent and above
• Readings of 24–30 percent within wall cavities are commonly associated with
actual and often extensive damage.
• Moisture content of 24–35 percent will al ow decay to initiate depending
upon the treatment of the timber. However, once established, there is a
significant probability that ongoing decay can occur in the 18–24 percent range.
• For uninfected timber, the moisture content conditions for decay initiation
are closer to the fibre saturation point of 25–30 percent.
• Readings of 30–40 percent indicate inevitable decay caused by the availability
of free moisture above fibre saturation point (approximately 29 percent in radiata
pine, which is a commonly used framing timber).
• Moisture content of above 35 percent will almost certainly be harbouring decay
fungi which will cause rapid deterioration of untreated timber, or timber from
which the treatment has leached.
• Readings of 40–60 percent are optimal values for aggressive decay.
52 WeathertiGhtness: GuiDe to the DiaGnosis of Leaky BuiLDinGs
aPPenDix iii: investiGative tooLs anD Practices
This appendix provides a brief overview of common diagnostic tools and practices
in use in New Zealand at the time of publication. There are new systems and
proprietary products continuously being developed.
Two areas of improvement that would be particularly beneficial for diagnostic
technology would be:
• reducing the number of cut-outs that fail to yield subsequent evidence
• discovering areas of damage/moisture that are missed by current methods.
There is currently no ‘silver bullet’ for moisture (and decay) measurement that could
replace capacitance and resistance-based meters as the main diagnostic devices
in use, as these offer the best mix of value, usability and effectiveness.
An experienced assessor can bring significant benefit to the diagnosis of a leaking
building through understanding the limits of current technology and correctly
interpreting the technical results from their equipment.
summary of diagnostic techniques in use
Often useful
Occasionally useful
Moisture
Capacitance meters
Infra-red cameras
Resistance meters
Relative humidity sensors
Dye testing
Microwave meters
Oven drying
Decay
Chemical indicators (timber
Brashness test
treatment)
Air sampling
Microscopy
The table below notes tools that may be used for buildings that are constructed with
other than timber frames. The assessor needs to be aware of the limitations of each
tool they use and factor those limitations into the assessment.
tools for materials other than timber
Moisture
Capacitance meters (not for metals)
Dye testing
Infra-red cameras
Relative humidity sensors
Microwave meters
Decay
Air sampling
Moisture detection tools that are often useful
Electrical capacitance meters
Electrical capacitance meters are inexpensive and non-invasive but may miss areas
of high moisture that are found subsequently by other methods. They can be used
on almost all types of materials with the exception of metals. The assessor needs
to be familiar with the manufacturer’s instructions, such as calibrating the meter
for the particular material.
WeathertiGhtness : GuiDe to the DiaGnosis of Leak y BuiLDinGs 53
Capacitance meter readings should be used careful y and should not always be
relied on. The readings should be treated as being relative and indicative only,
as the numbers do not record moisture contents. Readings taken from capacitance
meters are used for comparative purposes to give an indication on site where further
investigation should focus.
Capacitance meters can scan external y or from inside the building. The fol owing
points on their use are prepared from the CIRIA publication,
Review of testing for
moisture in building elements.
• Ensure the material settings (for example, timber or concrete) of the meter are
applicable to the material being scanned.
• The signal will not pass through metal material that may be located between
the electrodes and the material being tested, such as metal lath, which can
affect readings.
• If the surface is rough, the readings are likely to be low. In such cases, for ‘soft’
materials, it is helpful to apply some force to minimise the air gaps that affect
the readings.
• Density variations within any given material substantially affect readings
(for example, knots in timber). Where possible, tests should be made on
representative areas.
• Direction of grain in the case of timber can affect readings; seek manufacturer’s
recommendations for specific information.
• Some screed additives or residues can affect readings and may give false readings.
• The meter will give reduced readings for a substrate through a thick coating.
• Elevated readings may be due to contaminants or certain additives.
• The meter response is non-linear with depth.
Capacitance meters are often completely ineffective when the cladding is thick,
such as EIFS, as the meter is unable to scan to the depth of the framing timbers.
Electrical resistance-based meters
Electrical resistance-based moisture meters are both an established technology
and a common way of assessing the moisture content of building materials in situ,
especial y wood.
There are three methods for obtaining timber moisture content readings.
• One-off measurement: the most common method is when measurement
electrodes are inserted into the timber for the duration of a single measurement.
• Fixed-probes: electrodes are left in the timber and re-connected to the meter
for another measurement at a later date.
• Continuous data acquisition: similar to the fixed probe method, the electrodes
(often simply stainless steel nails) are left in situ with uploaded measurements
at regular intervals via an automated logging system.
The fol owing are points on their use.
• Ensure the meter is correctly and regularly calibrated.
• Fol ow the manufacturer’s guidance regarding the operation of the resistance
meter. Use sliding hammer electrodes with long insulated probes driven parallel
to the grain.
54 WeathertiGhtness: GuiDe to the DiaGnosis of Leaky BuiLDinGs
• Ensure good electrical contact at the desired measurement location, keep the
electrodes in good condition and particularly pay attention to the condition
of any insulation on the electrodes.
• Consider the accuracy of the meter itself and especially how accurately the meter
is reading the actual materials within the situation at that time (that is, timber
species and treatment, temperature, the meter’s accuracy range).
• If comparing readings for the
same location at
different times, temperature
correction is necessary to make valid comparisons as temperature can
significantly alter the resistance of timber.
The assessor should look for the relative differences between readings, such as
3–4 percent above the equilibrium moisture content rather than absolute moisture
content readings.
The demand for technical correctness may be mitigated when using the results
in a comparative manner or if the timber is clearly above fibre saturation.
Users of the data need to be aware of the limitations.
Moisture detection tools that are occasionally useful
Infra-red (IR) cameras
Infra-red or thermal cameras are non-invasive tools that can support the reliability
of the subsequent invasive investigation. They measure the heat emitted by surfaces
and consequently they trace thermal differences. While not their primary function,
the resultant images can sometimes be interpreted to locate moisture.
With low levels of moisture ingress, especial y when hidden within a wal , the thermal
patterns will be subtle and will require extra skill and experience for interpretation.
Numerous factors can lead to false impressions from the thermal images, such as
these prepared with information from the Restoration Industry Association’s
Cleaning
and Restoration magazine November 2003, ‘Moisture Detection Using Surface
Temperature Patterns’ (L. Harriman).
• Cold inside corners – The corners of a room are inherently colder than
the bulk of the room due to limited air flow (mixing), rather than moisture.
• Sunlight/shadows – Sunlight can heat the internal surface of a wall and partial
shading can local y decrease the temperature. The resulting patterns from these
factors can be confused with moisture.
• Air conditioning – Air from air conditioning systems can cause patterns which
are highly suggestive of moisture.
• Electrical heat sources – The extra heat from electrical sources can generate
misleading variations in temperature.
• Air infiltration/exfiltration – Air constantly flows into and out of wal s.
This can change the internal and surface temperatures.
• Layers and gaps in the wall – Moisture-related temperature differences can
often be ‘flattened-out’ because the moisture is deep in the wall and not near
the surface.
• Ill-fitting thermal insulation in the walls – Insulation gaps can lead to spots
of higher or lower surface temperatures.
• Surface materials – While IR cameras detect radiation emitted from surfaces,
different materials have different emissivities leading to differing readings in spite
of those materials being at the same temperature.
WeathertiGhtness : GuiDe to the DiaGnosis of Leak y BuiLDinGs 55
The capability of the person using a thermal camera is just as important for avoiding
misdiagnosis as the technical capability of the camera.
Relative humidity sensors
Hygrometers (or relative humidity (RH) sensors) can simply be placed in an air space,
al owing humidity to be compared to humidity levels in other parts of the building.
This is often useful where electrical resistance meters are not applicable, such as
when the building has steel framing.
RH sensors provide readings that are purely comparative/indicative. They can be used
to assess the effectiveness of cladding, coatings and ventilation in reducing moisture
levels in construction materials and to check for condensation or high humidity in wall
and roof systems or in basement construction.
Moisture content for material in the vicinity of the airspace can also be estimated
using the humidity measurement. At a given relative humidity, a hygroscopic material
will reach an equilibrium moisture content level given enough time. The general
practice for a one-off reading is to drill a hole in the cladding and quickly seal the
hole with duct tape. A nick is made in the tape so that the sensor tip can be placed
in the hole. The humidity measurement is taken and compared to the ambient
humidity in the vicinity of the hole (taken immediately prior to the hole reading)
and other measurements from around the building.
Humidity sensors can form part of a long-term monitoring system that is implemented
using a relatively new range of small self-contained logging systems, but they do
require periodic recalibration. These units are very small and are simply programmed
and installed, with information downloaded as required.
However, there is a trade-off decision to make: is it worthwhile to monitor a building
when progress could be made more quickly with more invasive investigations?
Microwave meters
Microwave methods are mostly suited to flat surfaces which have a thickness
in excess of the penetration depth of the microwave signal. They are not suited
to the lightweight timber-framed wall construction used in the majority of residential
buildings and are most suited to blockwork or concrete construction, such as in larger
apartment-style or commercial buildings.
Similar to the capacitive methods used to scan wal s, the microwave method also
relies on the fact that water has a significantly higher dielectric constant than most
building materials.
The signal from microwave meters penetrates the material by about 20–30 cm,
therefore the building element under test needs to be at least this thick. Similar to
when capacitive methods are used on materials other than timber, the measurements
can only be taken as relative values. Metals can cause false readings due to
reflections and the generation of standing waves, and this could be an issue when
inspecting reinforced concrete.
Oven drying gravimetric method
This is a fundamental way to determine the amount of moisture in a hygroscopic
material. For timber, the oven drying method is described in AS 1080.1: 1997.
56 WeathertiGhtness: GuiDe to the DiaGnosis of Leaky BuiLDinGs
While this standard is focused on assessing timber from lumber yards, the principles
remain the same for the much smaller specimens taken from a building.
Although the oven drying method is relatively straightforward, the specimen needs
to be taken to the oven in its ‘as found’ condition.
• Samples should be handled carefully at all stages including collection,
transportation and processing.
• Samples should be kept in an airtight container in a cool, dry place.
Oven drying can be used to find and confirm the results from other tools and to find
the actual moisture content when an assessor suspects a resistance meter reading
may be false negative.
treatment detection tools that are often useful
Chemical indicators
Chemical reagents are used to determine significant information about the timber
under investigation (for example, whether it is sapwood, preservative treated, or
decayed), however this section focuses on those used for testing preservative treatment.
• Boron – A relatively easy identification test exists for boron treatment and,
when performed properly, its accuracy is comparable to a quantitative laboratory
analysis. The reagent is the chromophore from the spice turmeric, used in
conjunction with hydrochloric acid. When applied to the specimen, the colour
will change to orange or red if boron is positive, or yel ow or bronze if negative.
However, alkaline materials can result in a false positive, such as when the framing
is next to gypsum or masonry, so a cross-section of material is needed.
• Copper – The test for H3.2, H4 and H5 is easier to interpret because it uses
a single reagent (rubienic acid) and it is specific to copper.
• Tin – The test for tin can also react with zinc (for example, nail plates) so can
be open to misinterpretation.
• LOSP – There is currently no spot test to identify LOSP treatment and the only
infal ible way to identify it is to send samples to a laboratory for full chemical
analysis. This requires a number of samples and a series of tests.
The first test would be a sapwood/heartwood test, fol owed by spot tests for boron,
copper and possibly tin. Final y, destructive tests can ascertain the presence of LOSP.
Even then, the results are only strictly applicable to that piece of timber.
Decay detection tools that are often useful
Microscopy
Microscopic laboratory analysis of fungi is the de facto method for decay identification,
with a proven track record for success, but with the disadvantages of the time taken
to obtain results and the cost of the analysis.
The wetting regime and the type of timber can result in different types of decay
activity. By observing the decay, an understanding is gained about the moisture
history of the piece of timber and an assessment of how much structural damage
has been done to that sample.
WeathertiGhtness : GuiDe to the DiaGnosis of Leak y BuiLDinGs 57
It is important that the sample is representative of the rest of the framing timber.
When collecting samples it is recommended that:
• most samples are taken from borderline areas, as there is no need to analyse
obvious decay
• samples should ideal y all be solid cores through the depth of the piece of timber.
Shavings from small drilled holes may be an attractive option because they are clean
and quick. However they take longer to analyse and do not give as much information
about the depth of decay activity through the section. Larger samples are more useful.
Surface fungi can be sampled by applying a strip of adhesive tape to the timber
and then removing it.
Decay detection tools that are occasionally useful
Brashness test
This simple test consists of prying up some splinters of wood and observing the
type of splintering which occurs. This is essential y a test for toughness, since sound
wood general y produces a long, fibrous splinter, while decayed wood, which is
characteristical y brash, produces a short splinter which breaks easily across the grain.
The brashness test should not be relied on as the sole means of identifying timber
decay, but it may be of use to the assessor as an additional or ‘on-the-spot’ method.
Air sampling
Air analysis (including culturable methods) of wall spaces is only necessary where
conventional moisture meters have failed to pick anything up but a problem is still
suspected, such as in the height of a dry summer or with a steel-framed building.
The focus of the method is on looking for concentrations of bacteria or fungi in
the air (not the wood) that are indicative of moisture or moisture damage.
There are two kinds of analysis and each technique consists of a collection phase
and an analysis phase:
• the culturable method requires an incubation phase prior to analysis to al ow
the fungi and bacteria to grow
• the non-culturable spore trap method is used to analyse a wider range
of fungi than the culturable method, and is better suited to establishing whether
stachybotrys is present.
Problems in the wall space may not be identified by sampling air from the occupied
space, depending on the ventilation to/from the different areas. Also, high fungal
counts from the living space do not automatical y mean there is a problem within
the structure itself.
Assessors can collect their own non-culturable samples using a small portable sampling
pump: a small hole is drilled into the wal , into which a tube is placed that is used
to suck the air sample out. Here the sample is collected in a cassette containing
a gel-medium. The cassette is then sent to a laboratory for analysis by specialists.
The minimum number of samples for any case would be three – one for the area
under investigation, one from an area that gives no concerns and the final sample
should be from the outdoor environment that is well away from the structure.
58 WeathertiGhtness: GuiDe to the DiaGnosis of Leaky BuiLDinGs
aPPenDix iv: WorkeD exaMPLe of a DiaGnostic investiGation
This appendix provides an example of how a diagnostic investigation might proceed.
It sets out an approach to examining one elevation, as il ustrated in Figure 3, of
a notional two-storey, stand-alone, timber-framed building. The sample uses the steps
described in this document, and concludes with the defect analysis and summary
outline of a recommended remediation for the subject elevation.
Note that this example focuses on just the one elevation, whereas a real world
assessment would need to continue around the building. The aim of the example
is to demonstrate the process of determining the extent of current and potential
future damage to support the development of a recommendation for remediation.
step 1 – Pre-site work and visual investigation
Information collected from the BCA records and the owner includes:
• building constructed during 2002
• high wind zone
• consented specification for untreated kiln-dried timber wall framing with
H1 treated first floor joists
• manufacturers’ information for the wall cladding and windows.
The site inspection was carried out in late January after three weeks of very
dry weather.
An inspection of the interior indicated signs of water entry, stains and discolouration,
some water-damaged window sil s and skirting, and damp floor coverings around
the door opening to the deck adjacent to the elevation under investigation.
The fol owing high-risk design features were identified from the on-site observations:
• flush-finished, texture-coated fibre-cement wall cladding system with no visible
inter-storey joint, with stains and cracks apparent
• windows face-fixed with metal head flashings but no sill or jamb flashings
• complex roof-to-wall intersections above the two bay windows
• apron flashings above the bay windows without any kickouts – sealant was used
at the bottom of the flashings to prevent water entry, but appears to have failed
at location A
• 600 mm eaves at upper roof level and 300 mm eaves to the bay windows
• timber slat deck, on adjacent elevation, fixed directly through the cladding
with coach screws at first floor level.
WeathertiGhtness : GuiDe to the DiaGnosis of Leak y BuiLDinGs 59
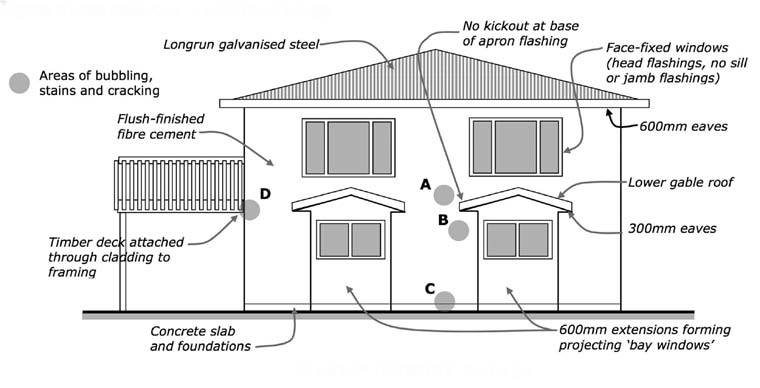
Figure 3: Elevation with visible moisture damage
The cladding is showing signs of damage due to moisture ingress as fol ows:
• location A – cracking of cladding and paint bubbling at inter-storey level above
bay window roof
• location B – cracking of cladding and paint bubbling below missing kickout flashing
• location C – nail popping and discolouration at bottom plate level directly below
other defects – cladding is installed hard up against the foundation restricting
drainage at bottom of sheet
• location D – cracking of paint and bubbling of paint at inter-storey level – adjacent
to where the deck is fixed.
The occupants have noticed musty smel s in the rooms on both levels of the elevation
for the past four or five months. A builder who looked at the problems several months
ago detected some possible water ingress at the kickouts of the bay windows and
applied sealant around these points.
step 2 – non-invasive testing
Capacitance meter readings were taken on each side of the two upper storey
windows, around the sil s. The readings suggested these areas were sound and
unaffected by moisture, however the recent dry weather could account for possible
‘false negative’ readings.
Further capacitance readings that were then taken over the elevation (concentrating
on the four locations A, B, C and D as noted above) showed signs of damage, including:
• along jamb edges of the windows (where moisture may be entering due to lack
of jamb flashings and poor sealing of the window jambs against the cladding)
• underneath all windows and particularly at the corners
• immediately below positions where bay window roof-to-wall apron flashings
lack kickouts
• at the inter-storey joint level for the full width of the elevation
• at the timber deck-to-wall junctions
• at bottom plate level for the full perimeter, including areas where the cladding
shows signs of moisture ingress.
60 DiaGnosis of BuiLDinGs for WeathertiGhtness
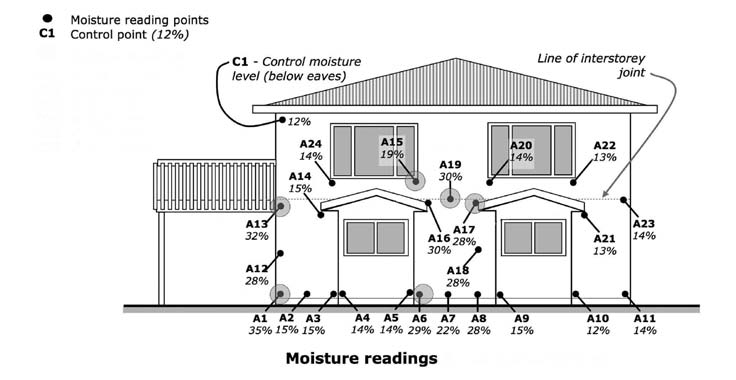
Readings exceeding an indicative control point were found along the middle
and left sections of the bottom plate. High readings were also found at the bottom
of the left-hand external corner.
Dyed water was then injected under the bay window apron flashing (at A16) with
dye traces subsequently found in location C at A6 (refer to Figure 4). Photographs
of the results were recorded as evidence.
The capacitance meter readings, the dye water tests and the assessment of the
design risk features indicate where to start invasive testing.
step 3 – invasive testing
A sheltered ‘control point’ beneath eaves was selected, as this location was considered
unlikely to be affected by any faults or moisture ingress. The equilibrium moisture
content (emc) reading at this control point was 12 percent.
The points chosen for electrical resistance readings were based on the indications
so far of water penetration, damage observations and where capacitance readings
were more than 3–4 percent above the emc. These locations were considered the
most informative for identifying obvious points of moisture ingress and for assessing
any damage.
Invasive electrical resistance moisture meter readings were taken in the framing timber
in each of the locations shown in Figure 4 at three progressive depths, starting close
to the exterior surface with the last reading in the approximate centre of the studs.
Figure 4: Moisture readings
Additional information was gained from the actual dril ing for invasive moisture readings.
The hardness of the timber could be estimated by the resistance of the drill compared
with the control point. Similarly, the moistness, smell and nature (appearance and
level of decay) of the dril ings themselves gave clues to support the meter readings.
However, these results and readings were still treated as only indicative at this stage.
Final conclusions were avoided until cut-outs had been made, the exposed timber
inspected, samples taken and laboratory test results received.
WeathertiGhtness : GuiDe to the DiaGnosis of Leak y BuiLDinGs 61
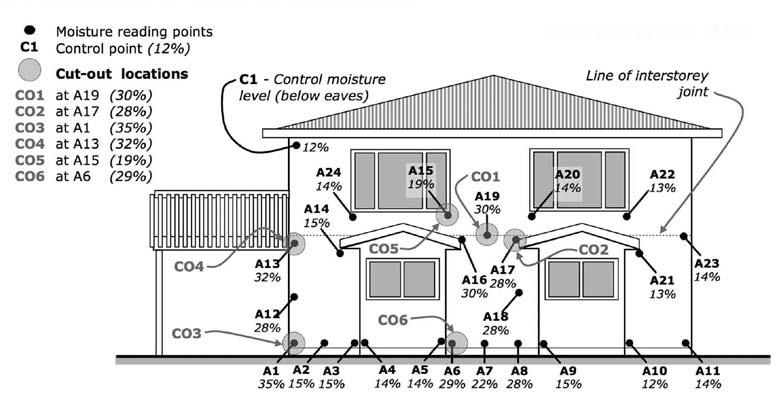 step 4 – Destructive investigation: cut-outs and samples
Determining number and location of cut-outs
Cut-outs were taken at areas with different construction features and high moisture
readings (more than 3–4 percent above the emc) to confirm the indicative results
from the previous non-invasive and invasive testing. In this example, cut-outs were
made at the locations shown in Figure 5.
Note: Too many cut-outs in a wall (particularly with monolithic cladding on direct-fixed,
untreated frames as in this example) will damage the cladding and affect its ongoing
weathering ability despite temporary patches. This itself can influence the repair
recommendation. Thorough examination of one or two details repeated throughout
a building can reveal sufficient information of leak causes and damage to support
the decision to limit the number of further cut-outs necessary where the details recur.
Figure 5: Cut-out locations
In this example, as shown in Figure 5, the locations for cut-outs were selected as fol ows.
• CO1 – to expose the inter-storey joint detail (refer to location A) and confirm decay.
• CO2 – to confirm whether the apron flashing (location B) directed water into the
wall rather than away from it, because there is no kickout on the actual flashing.
The dye test had already indicated a moisture path from A16 to A6. There was
no need to take cut-outs at A14, A16 or A21, as it was assumed that construction
details would be similar.
• CO3, CO6 – to confirm the suspect cladding detail at the base of the wall (such
as at location C) and resultant high moisture content and decay. As construction
details and moisture readings are similar, it was unnecessary to make any more
cut-outs at similar cladding base locations.
• CO4 – to confirm the inter-storey detailing and reveal any issues at the corner
(location D). (Any leak issues from the deck/balustrade on the adjacent elevation
are not included in this example.)
• CO5 – to check the elevated moisture content at A15 and to confirm how
the underlying window sil -to-jamb junction was built.
62 WeathertiGhtness: GuiDe to the DiaGnosis of Leaky BuiLDinGs
The six cut-outs all indicate some timber decay. There are also low levels of mould,
but the visual inspection so far cannot confirm any hazardous mould species without
laboratory tests. Removing the cladding cut-outs showed a clear water flow path
from the apron flashing over the bay window, behind the cladding and down into
the framing. The inter-storey cladding joint had not been built in accordance with
the manufacturer’s specifications, as revealed by cut-out C01.
The primary causes of the leaks, so far, point to two main defects:
• insufficient detailing around the bay window apron flashings
• poor detailing of the inter-storey junction.
Leakage around the upper storey window sil s shows only one area (A15) of elevated
moisture with mould evidence. However, the recent dry weather could have al owed
the timber moisture content to drop below recognised critical moisture levels at the
other sil s (A24, A20, A22), resulting in ‘false negative’ moisture readings.
So far there is evidence of high moisture readings, observed timber decay, poor inter-
storey detailing, a face-sealed type of cladding and insufficient framing treatment
specification.
Determining sampling location for analysis
In relation to overall costs involved in investigation and remediation work, the cost
of analysing timber samples is relatively minor.
As some decay and associated effects (including discolouration of timber) are evident,
the objective of taking timber or other samples is to determine the fol owing.
• Extent of decay – samples were obtained from the fringes of visible decay,
as it is important not to take timber samples from the middle of obvious decay.
• Type of fungi present – although the initial inspection did not indicate the
presence of any obvious hazardous mould species, it is still important to confirm
this with laboratory testing because of the potential health implications for the
owners/occupants and because of implications for site safety during remediation
construction. The mould and timber analysis can also provide useful information
as to how long the moisture has been present and the type of decay.
• Existence, level and type of timber treatment – although the building consent
documents indicate that untreated timber was used for all wall framing and H1
treated floor joists, this cannot be confirmed on site. Because this has important
implications for the remediation strategies (whether either a full reclad or a more
localised solution is needed), laboratory tests are needed to confirm treatment levels.
• Timber species – while the evidence suggests radiata pine framing was used,
this needs to be tested. Some timber species are more resistant to decay than
others and this can have implications for the recommended remediation strategy.
Collecting samples for analysis
The wall framing timber was specified as untreated, kiln-dried radiata pine. Therefore,
sufficient timber samples were collected for laboratory analysis to cross-check the
preservative and also for wood decay and to identify any fungus and mould. If moulds
were evident, but timber decay was not clear, additional wood samples would have
been necessary.
WeathertiGhtness : GuiDe to the DiaGnosis of Leak y BuiLDinGs 63
Included in these samples were one from CO5 (below the upper window) and one
from the first floor timber joist at CO1. The floor joists were specified as H1 boron-
treated timber (in contrast to the specified untreated wall framing), which has probably
helped prevent decay, but this needs to be confirmed by the laboratory test results.
For wall framing, a sample was taken from where decay appears to have started
and another at what appear to be the limits of the extent of decay.
The laboratory analysis subsequently confirmed the initial on-site assessments
and therefore no further timber or mould samples were necessary. If the laboratory
analysis had contradicted these earlier assessments, then more sampling and testing
would have been needed.
step 5 – Defect analysis
From the investigation described already, together with the laboratory test results,
a scenario of the moisture penetration and subsequent damage has been developed.
Refer to Figure 6.
• Area 1 (between the bay windows) – refer to A6, A17, etc
Initial y water has entered the wall at the bottom of the apron flashing (cut-out
CO2 revealed no kickout). The sealant that was added later on failed and water
has leaked again behind the cladding.
The resulting movement of timber and cladding has caused the deficient
(non-draining) detail at the horizontal inter-storey joint to fail, causing additional
cracking and moisture penetration.
Water has then leaked down through the structure to the bottom plate level where
moisture has been trapped due to the lack of drainage, causing damage to the framing
timber. Water has then spread along the bottom plate, causing further damage.
• Area 2 (the left-hand corner) – refer to A1, A13, etc
Initial y, it appears that water has penetrated the cladding from the adjacent deck
where the deck fixings are unsealed. The deck/wall flashing is suspect as wel as
the balustrade junction. This moisture is most likely to have travelled to the corner.
The resulting movement of timber and cladding has caused the deficient (non-
draining) detail at the horizontal inter-storey joint to fail, causing further cracking
and moisture penetration.
Water has then flowed down through the corner framing to the bottom plate level,
where moisture has been trapped due to a similar lack of drainage, causing
damage to the framing at A1.
• Area 3 (bottom corner of upper, left-hand window) – refer to A15
Although the moisture content is slightly above the 18 percent threshold
(confirmed by taking further moisture content readings after the cut-out was
made), only minor visible signs of moisture ingress and mould were found.
The laboratory analysis reported the timber framing sample showed incipient
decay that will probably continue without at least some in situ preservative
treatment to avoid further decay.
64 WeathertiGhtness: GuiDe to the DiaGnosis of Leaky BuiLDinGs
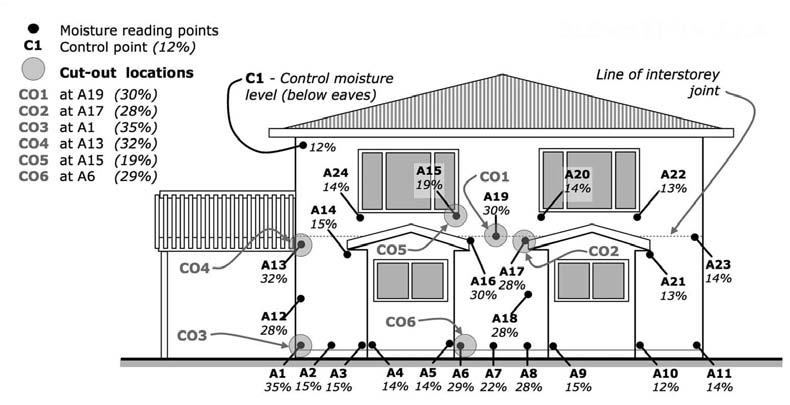
Figure 6: Location of moisture readings
step 6 – Developing the remediation recommendation
The evidence and analyses have been careful y weighed up in order to reach some
firm conclusions. The recommendations set out below for the extent of cladding
and timber framing replacement (with reference to Figure 5) consider both current
and potential damage.
Current damage
It has been concluded that the area including A6, A7, A8, A16, A17 and A19 will
require removal of the cladding and replacement of the framing. This is because
the timber is untreated and decayed – a rule-of-thumb approach is that all timber
one metre from the limit of any decayed timber should be removed and replaced.
Because the inter-storey joint has not been installed in accordance with the
manufacturer’s specifications and has failed at A19/CO1, sufficient cladding will have
to be removed to install a complying joint. High readings at A16 and A17 indicate a
problem around the apron flashings to the bay windows. The cut-out at CO2
confirmed that the flashing detailing was insufficient.
Cladding will need to be removed at the left-hand external corner at A1, A12 and A13
to al ow the necessary timber replacement, and similarly horizontal y one metre from
the assessed edge of decay. On this elevation, the practical approach would be to
take out the area of the wall along to the bay window. Removing the cladding around
the full length of the faulty inter-storey junction will al ow access to the first floor
framing as the bottom plate and bottom part of the studs are likely to be affected
(A19 has incipient decay). NZS 3604 does not al ow joins in studs, so the framing
needs to be properly exposed.
It is becoming increasingly unlikely that removing only isolated sections of cladding
in this example will result in a successful remediation outcome. In addition, the framing
at the corner on the adjacent elevation and around the decking and balustrade
attachments will still have to be closely investigated when continuing the assessment
of the whole building.
WeathertiGhtness : GuiDe to the DiaGnosis of Leak y BuiLDinGs 65
Potential damage
The implications for potential damage have been assessed.
First, A16 and A17 apron flashings show problems, but A14 (15 percent) and A21
(13 percent) indicated low moisture readings when inspected (after a three-week dry
spel ), despite their missing kickout detail. Although the additional water ingress from
the incorrect inter-storey flashing (CO1) will need to be considered in relation to these
faulty apron flashings, it is assumed that the potential for future failure at all these
repeated apron flashing locations will be similarly high.
Secondly, the higher moisture content reading at location A15/CO5 (19 percent) was
considered. It is assumed that the window instal ation conformed to the manufacturer’s
specifications at the time of construction. Even though a building detail or design may
be built a different way today (for example, where an Acceptable Solution provides
a different way of building that detail), this is not necessarily a defect that will result
in future failure. However, the moisture content reading of 19 percent at A15 was
more than 3–4 percent above other moisture contents, hence the cut-out at CO5.
Note: Where details that prove to be faulty on this elevation are similarly repeated
on other elevations, it indicates the reasonable probability of future weathertightness
problems in those other locations too. The investigation will need to establish further
whether there are sound technical grounds to definitely rule out the probability
of future failure, such as further invasive moisture testing and destructive cut-outs
that show no moisture/decay, or otherwise existing mitigating factors (such as
a different cladding system or sufficiently treated timber).
Summary recommendation – for this worked example of the one elevation
At least 60 percent of the framing on this elevation will need to be either replaced
or otherwise treated in-situ with preservative. However, removing only parts
of the cladding will not give clear access to the underlying untreated wall framing
and defective flashings in this leaking elevation of the flush-finished, fibre-cement
cladding system.
Rectifying the inter-storey joint in itself will effectively require much of the cladding
to be removed from corner to corner. The decayed timber will need to be replaced
when the left-hand corner is rebuilt, as will the wall between the bay windows plus
any damage rectified to the first floor bottom plate, wall studs, boundary and floor
joists. Any remaining timber will need to be treated in-situ, where appropriate
according to the laboratory results, to reduce the risk of continuing decay.
Furthermore, were the upper storey cladding to remain, some complex inter-storey
flashing would still be necessary and the potential risk of window leaks on the
upper storey would still need to be addressed.
For these reasons, the recommendation for this elevation is that all cladding should
be removed to effect satisfactory repairs.
If the existing monolithic cladding system is to be replaced with another face-sealed
monolithic cladding, then a cavity will be required under the weathertightness risk matrix
of E2/AS1 to help drainage and drying of any moisture that penetrates the cladding.
The two bay window penetrations will require proper apron flashings and the ridge/
wall junction will need to be installed properly.
66 WeathertiGhtness: GuiDe to the DiaGnosis of Leaky BuiLDinGs
This recommendation would then offer sufficient certainty that the remedial building
work will meet the requirements of Building Code Clauses E2 (External Moisture),
B2 (Durability) and B1 (Structure).
Final y, this example focuses on just the one elevation, whereas a full assessment
would need to continue around the building. There is evidence of leaking and potential
risk from the deck construction on the adjacent elevation (damp floor coverings
around the door opening) that may already be contributing to leaks in the corner
framing on this subject elevation.
WeathertiGhtness : GuiDe to the DiaGnosis of Leak y BuiLDinGs 67
aPPenDix v: further resources
The fol owing is a list of various resources that can provide additional detail on many
of the points raised in this guide.
Some of these publications may be out of date or superceded, however they can
provide the particular construction details relevant at a certain period of time.
Department of Building and housing – Publications are available from the
Department as a free download from www.dbh.govt.nz, or freephone 0800 370 370.
Acceptable Solution E2/AS1
External moisture – a guide to using the risk matrix: June 2005
External moisture – an introduction to weathertightness design principles: August 2006
Constructing cavities for wall claddings: June 2006
Characteristics and defects – a study of weathertightness determinations: April 2007
External Moisture – a guide to weathertightness remediation: November 2007
Codewords 32: October 2008
Weathertightness Guide to Remediation Design: May 2011
new Zealand standards – available from www.standards.co.nz,
or freephone 0800 782 632
NZS 3602 Timber and wood-based products for use in buildings
NZS 3640 Chemical preservation of round and sawn timber
NZS 3604 Timber-framed buildings
BranZ publications – available from www.branz.co.nz
Good Stucco Practice: February 1996
Good Texture-Coated Fibre-Cement Practice: April 2001
Good Practice Guide Stucco: January 2004
Good Practice Guide Membrane Roofing: November 1999
Timber Cladding Good Practice Guide
Profiled Metal Wall Cladding Good Practice Guide
Weathertight Solutions, Volume One Weatherboards
Weathertight Solutions, Volume Two Stucco
Weathertight Solutions, Volume Three Profiled Metal
Weathertight Solutions, Volume Four Masonry
Weathertight Solutions, Volume Five Roofing
Weathertight Solutions, Volume Six Membrane Roofing
Maintaining Your Home, 2nd edition: 2006
Weathertightness Guide to Remediation Design: May 2011
BranZ Bulletins – available from www.branz.co.nz
304: Flashing design: February 1993 (now withdrawn)
353: Ground clearances: February 1997
428: Weathertightness dos and don’ts: July 2002
434: Results of weathertightness failure: February 2003
435: Weathertightness evaluation: February 2003
68 WeathertiGhtness: GuiDe to the DiaGnosis of Leaky BuiLDinGs
448: Domestic flashing instal ation: April 2004
449: Keeping water out – timber-framed wal s: June 2004
452: Aluminium windows and E2/AS1: August 2004
465: Domestic flashing instal ation: September 2005
466: Timber-framed parapets, balustrades and columns: September 2005
467: Principles of flashing design: December 2005
470: Wall underlays: February 2006
481: Timber windows: February 2007
493: Timber treatment: December 2007
505: Acceptable plans and specifications: November 2008
527: Drained and vented cavities: October 2010
canada Mortgage and housing corporation
Building envelope rehabilitation – Consultant’s guide: 2001
Building envelope rehabilitation – Owner-property manager guide: 2001
occupational health and safety – available from www.osh.dol.govt.nz
Risks to health from mould and other fungi – Workplace Health Bul etin No. 17: 2002
WHRS Pamphlet on Moulds and Other Fungi: WD018
new Zealand Metal roofing Manufacturers inc. – available from www.metalroofing.org.nz
Profiled Metal Roofing Design and Instal ation Handbook: 1995
New Zealand Metal Roof and Wall Cladding Code of Practice: v1 2003 and
v2 2008
new Zealand Membrane Group. – available from www.membrane.org.nz
Code of Practice for Torch-on Membrane Systems for Roofs and Deck: 2008
Building research establishment – available from www.bre.co.uk
Recognising wood rot and insect damage in buildings, 3rd edition: 2003
scion – available from www.scionresearch.com
Measuring the Moisture Content of Wood: Bul etin (Ian Simpson)
WeathertiGhtness : GuiDe to the DiaGnosis of Leak y BuiLDinGs 69
aPPenDix vi: GLossary
The fol owing provides a brief explanation of the meanings of the terms used in this
guidance document.
Acceptable Solutions Examples of materials, components and construction methods
published by the Department that, if used, will comply with
the Building Code. They are one way, but not a mandatory
way, of complying with the Code.
Acceptable Solution An Acceptable Solution for Building Code Clause E2
E2/AS1
External Moisture
Assessor
The person undertaking the diagnosis stage of remediation.
May also be known as the building surveyor.
Building
The building may also be known as a private residence or
dwel inghouse. The fundamentals of the diagnosis guidance
may be applied to some low to medium-rise non-residential
buildings.
Building consent
A BCA can be an organisation, such as a territorial authority
authority (BCA)
or a private body, that is accredited to carry out certain building
control functions as defined in the Building Act 2004.
Control point
A location known to be dry and undamaged (such as below
the eaves) that is set up as a reference point, against which
moisture content measurements from other locations may
be compared.
Cut-out
The removal of a small section of cladding to al ow inspection
of the underlying construction (including moisture and decay
testing of samples of framing timber if appropriate).
Decay
Deterioration of timber due to the action of fungi that become
established within building timbers when moisture levels
are elevated above fibre saturation in untreated timber.
Defect or deficiency An aspect of a building’s design, construction or alteration,
or of materials used in its construction or alteration, that has
enabled or is likely in future to enable water to penetrate
it and cause damage.
Department
The Department of Building and Housing.
Destructive
Testing or sampling that involves removal of sections
of cladding to examine underlying construction or to extract
samples for laboratory analysis.
Direct-fixed cladding A cladding that is fixed directly over the building underlay
to the exterior wall framing (that is, without a drained cavity).
Drained cavity
Cavity behind a wall cladding – as defined in E2/AS1
(refer to Acceptable Solution E2/AS1 – 3rd edition).
Drillings
The swarf (timber debris) removed when dril ing into
the framing in order to take invasive moisture readings.
70 WeathertiGhtness: GuiDe to the DiaGnosis of Leaky BuiLDinGs
Equilibrium moisture The moisture content at a control point or reference point
content (emc)
deliberately chosen to represent the ‘dry’ area of a building with
timber framing unaffected by moisture ingress. The reference
point will typical y be under the eaves or some other suitably
protected area.
Invasive testing
Testing that involves dril ing into the wall to measure
the moisture content within the framing (in contrast to
non-invasive testing that uses surface measurement).
Iterative process
The process of revisiting, adding to and reassessing earlier work
– based on increasing knowledge developed during the process.
LOSP
Light Organic Solvent Preservative – used in timber treatment.
Monolithic claddings Wall cladding systems that are flush-finished or otherwise
face-sealed to simulate plastered masonry and rely on
protective coatings for weatherproofing (for example:
flush-finished fibre-cement sheet, stucco or EIFS).
Moulds and fungi
Decay fungi can cause rot and decay in timber. Moulds are
fungi in the form of simple microscopic organisms that release
spores that can be inhaled. Mould and sometimes sapstain
(or blue stain) fungi can be found on many building materials
in the presence of high humidity, but are usual y present
where any material containing cellulose (timber, fibre-cement,
Kraft-based building paper or plasterboard) is wetted.
Owner
The building owner, in this guide, may also be a party or
‘claimant’ to a dispute or otherwise some litigation process.
Remediation
The investigative, design and associated construction processes
required to repair a building that has deficiencies causing
(or likely to cause) moisture penetration and consequential
damage to make it adequately weathertight and durable.
Risk matrix
A table from Acceptable Solution E2/AS1, used to simply
calculate the representative level of weathertightness risk
applying to a building design.
Samples or sampling Materials removed from a building (such as timber, building
underlay, linings, carpet) that will be sent away for
laboratory testing.
Stachybotrys atra
A toxigenic mould that has been implicated in health risks
for some people who come into contact with it. Refer also
to Moulds and fungi.
Territorial authority
City or district council responsible for community wel being
(TA)
and development, environmental health and safety (including
building control), infrastructure, recreation and culture,
and resource management.
Weathertight Homes A service established through the Weathertight Homes
Resolution Service
Resolution Services Act 2006 to help owners of buildings who
(WHRS)
have suffered damage to their properties due to water ingress.
WeathertiGhtness : GuiDe to the DiaGnosis of Leak y BuiLDinGs 71
72 WeathertiGhtness: GuiDe to the DiaGnosis of Leaky BuiLDinGs
Published in May 2011 by
Department of Building and Housing
PO Box 10-729
Wel ington, New Zealand
This document is also available
on the Department’s website:
www.dbh.govt.nz
ISBN:978-0-478-34385 – 4 (document)
ISBN: 978-0-478-34386 – 1 (website)
Document Outline